【PostgreSQL】PostgreSQL のインストールと初期設定【Part.3】

PostgreSQL のインストールと初期設定について解説します。


PostgreSQL のインストールについては以下も参考にしてください。


【PostgreSQL】【CentOS7】yum コマンドで PostgreSQL インストール&初期設定(ユーザー作成、パスワード設定、データベース作成、権限割り当て)手順


PostgreSQL の構築手順概要

  1. PostgreSQL のインストール
  2. データベースクラスタの作成
  3. サーバの起動
  4. データベースの作成


PostgreSQL のインストール

PostgreSQL のインストールは、以下の2つの方法があります。

  • ソースコードをコンパイルしてインストールする方法
  • バイナリパッケージをインストールする方法

特別な事情がない限り、通常は yum コマンド、rpm コマンドなどを利用してパッケージをインストールします。


以下、例として OS は RedHat 7.6 を使用しています。

[root@redhat7 ~]# cat /etc/redhat-release 
Red Hat Enterprise Linux Server release 7.6 (Maipo) 
[root@redhat7 ~]# 


PostgreSQL をインストールするために特別なリポジトリは必要ありません。

デフォルトの状態で以下のコマンドを実行するだけで PostgreSQL をインストールできます。

[root@redhat7 ~]# yum install postgresql postgresql-server 


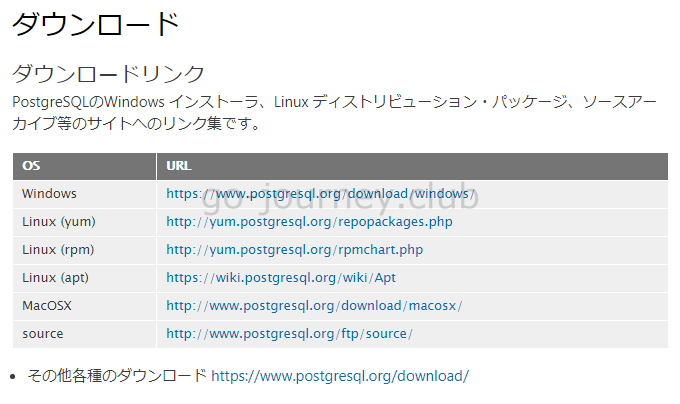
別途パッケージをダウンロードする場合

以下のURLよりパッケージのダウンロードページに移動できます。

PostgreSQL ダウンロードページ

https://www.postgresql.jp/download


以下はすでに PostgreSQL がインストール済みの状態の場合です。


yum コマンドで PostgreSQL をインストールできます。

以下はすでに PostgreSQL がインストールされた状態です。

[root@redhat7 ~]# yum install postgresql postgresql-server 
Loaded plugins: amazon-id, rhui-lb, search-disabled-repos 
rhui-REGION-client-config-server-7                       | 2.9 kB     00:00 
rhui-REGION-rhel-server-releases                         | 3.5 kB     00:00 
rhui-REGION-rhel-server-rh-common                        | 3.8 kB     00:00 
(1/2): rhui-REGION-rhel-server-releases/7Server/x86_64/upd | 3.1 MB   00:00 
(2/2): rhui-REGION-rhel-server-releases/7Server/x86_64/pri |  53 MB   00:01 
Package postgresql-9.2.24-1.el7_5.x86_64 already installed and latest version 
Package postgresql-server-9.2.24-1.el7_5.x86_64 already installed and latest version 
Nothing to do 
[root@redhat7 ~]#


PostgreSQL がインストールされると自動的に「postgres」アカウントが作成されます。

[root@redhat7 ~]# cat /etc/passwd | grep postgres
postgres:x:26:26:PostgreSQL Server:/var/lib/pgsql:/bin/bash
[root@redhat7 ~]#


PostgreSQL は 1台のサーバーに複数バージョンをインストールして使用することもできます。

ただしその場合は、インストールディレクトリやポート番号の変更が必要になります。


データベースクラスタの作成

OS アカウント postgres にて initdb コマンドを実行してデータベースクラスタを作成します。

initdb コマンドを実行したアカウントが postgres の場合は、postgres アカウントが PostgreSQL 管理アカウントになります。


最初にデータベースクラスタを作成するディレクトリを作成します。

postgres アカウントの権限が必要です。

-bash-4.2$ mkdir test02 
-bash-4.2$ ls 
backups  data  initdb.log  test  test01  test02 
-bash-4.2$ pwd 
/var/lib/pgsql


initdb コマンドを実行します。

-D オプションでインストールするディレクトリを指定します。

-bash-4.2$ initdb -D /var/lib/pgsql/test02 
The files belonging to this database system will be owned by user “postgres”. 
This user must also own the server process. 
 
The database cluster will be initialized with locale “en_US.UTF-8”. 
The default database encoding has accordingly been set to “UTF8”. 
The default text search configuration will be set to “english”. 
 
fixing permissions on existing directory /var/lib/pgsql/test02 … ok 
creating subdirectories … ok 
selecting default max_connections … 100 
selecting default shared_buffers … 32MB 
creating configuration files … ok 
creating template1 database in /var/lib/pgsql/test02/base/1 … ok 
initializing pg_authid … ok 
initializing dependencies … ok 
creating system views … ok 
loading system objects’ descriptions … ok 
creating collations … ok 
creating conversions … ok 
creating dictionaries … ok 
setting privileges on built-in objects … ok 
creating information schema … ok 
loading PL/pgSQL server-side language … ok 
vacuuming database template1 … ok 
copying template1 to template0 … ok 
copying template1 to postgres … ok 
 
WARNING: enabling “trust” authentication for local connections 
You can change this by editing pg_hba.conf or using the option -A, or 
–auth-local and –auth-host, the next time you run initdb. 
 
Success. You can now start the database server using: 
 
    postgres -D /var/lib/pgsql/test02 
or 
    pg_ctl -D /var/lib/pgsql/test02 -l logfile start 
 
-bash-4.2$


PostgreSQL プロセスの起動確認

PostgreSQL プロセスが起動しているか確認します。

systemctl コマンドで postgresql.service が起動していることを確認します。

[root@redhat7 data]# systemctl status postgresql.service 
● postgresql.service – PostgreSQL database server 
   Loaded: loaded (/usr/lib/systemd/system/postgresql.service; enabled; vendor preset: disabled) 
   Active: active (running) since Fri 2018-12-28 13:24:16 UTC; 2h 8min ago 
  Process: 3760 ExecStart=/usr/bin/pg_ctl start -D ${PGDATA} -s -o -p ${PGPORT} -w -t 300 (code=exited, status=0/SUCCESS) 
  Process: 3752 ExecStartPre=/usr/bin/postgresql-check-db-dir ${PGDATA} (code=exited, status=0/SUCCESS) 
 Main PID: 3768 (postgres) 
   CGroup: /system.slice/postgresql.service 
           tq3768 /usr/bin/postgres -D /var/lib/pgsql/data -p 5432 
           tq3774 postgres: logger process 
           tq3776 postgres: checkpointer process 
           tq3777 postgres: writer process 
           tq3778 postgres: wal writer process 
           tq3779 postgres: autovacuum launcher process 
           mq3780 postgres: stats collector process 
 
Dec 28 13:24:15 redhat7 systemd[1]: Starting PostgreSQL database server… 
Dec 28 13:24:16 redhat7 systemd[1]: Started PostgreSQL database server. 
[root@redhat7 data]#


postgres プロセスが起動していることを確認します。

[root@redhat7 ~]# ps -ef | grep postgres 
postgres  3768     1  0 13:24 ?        00:00:00 /usr/bin/postgres -D /var/lib/pgsql/data -p 5432 
postgres  3774  3768  0 13:24 ?        00:00:00 postgres: logger process 
postgres  3776  3768  0 13:24 ?        00:00:00 postgres: checkpointer process   
postgres  3777  3768  0 13:24 ?        00:00:00 postgres: writer process 
postgres  3778  3768  0 13:24 ?        00:00:00 postgres: wal writer process 
postgres  3779  3768  0 13:24 ?        00:00:00 postgres: autovacuum launcher process 
postgres  3780  3768  0 13:24 ?        00:00:00 postgres: stats collector process 
root      4498  4154  0 15:25 pts/0    00:00:00 grep –color=auto postgres 
[root@redhat7 ~]#


データベースの作成(createdb)

createdb コマンドでデータベースを作成できます。

createdb コマンドを実行したユーザーが新しいデータベースの所有者になります。


【例】

最初に「postgres」アカウントになります。

[root@redhat7 ~]# su – postgres
Last login: Tue Jan 1 07:29:22 UTC 2019 on pts/0
-bash-4.2$


データベース(testdb01)を作成します。

-bash-4.2$ createdb testdb01
-bash-4.2$


確認します。

-bash-4.2$ psql 
psql (9.2.24) 
Type “help” for help. 
 
 
postgres=# \x ← 表示を横長から縦長に変更します。  
Expanded display is on. 
postgres=# \l ← データベース一覧を表示します。 
List of databases 
-[ RECORD 1 ]—–+———————- 
Name              | postgres 
Owner             | postgres 
Encoding          | UTF8 
Collate           | en_US.UTF-8 
Ctype             | en_US.UTF-8 
Access privileges | 
-[ RECORD 2 ]—–+———————- 
Name              | template0 
Owner             | postgres 
Encoding          | UTF8 
Collate           | en_US.UTF-8 
Ctype             | en_US.UTF-8 
Access privileges | =c/postgres 
                  | postgres=CTc/postgres 
-[ RECORD 3 ]—–+———————- 
Name              | template1 
Owner             | postgres 
Encoding          | UTF8 
Collate           | en_US.UTF-8 
Ctype             | en_US.UTF-8 
Access privileges | =c/postgres 
                  | postgres=CTc/postgres 
-[ RECORD 4 ]—–+———————- 
Name              | testdb 
Owner             | postgres 
Encoding          | UTF8 
Collate           | en_US.UTF-8 
Ctype             | en_US.UTF-8 
Access privileges | 
-[ RECORD 5 ]—–+———————- 
Name              | testdb01 ← データベースが作成されています。 
Owner             | postgres 
Encoding          | UTF8 
Collate           | en_US.UTF-8 
Ctype             | en_US.UTF-8 
Access privileges | 
 
postgres=#


PostgreSQL シリーズ

今まで学習した PostgreSQL の技術をシリーズとしてまとめました。


【PostgreSQL】PostgreSQL の特徴と基本【Part.1】


【PostgreSQL】【正規化】リレーショナルデータベース(RDMS)の基本【Part.2】


【PostgreSQL】PostgreSQL のインストールと初期設定【Part.3】


【PostgreSQL】PostgreSQL の標準付属ツールの説明とコマンド手順【Part.4】


【PostgreSQL】PostgreSQL の設定ファイル(postgresql.conf、pg_hba.conf)の解説【Part.5】


【PostgreSQL】PostgreSQL のバックアップ手順とリストア手順【Part.6】


【PostgreSQL】PostgreSQL の運用管理(ユーザー管理、バキューム)【Part.7】


【PostgreSQL】PostgreSQL の基本的な SQL文 とオブジェクトについて【Part.8】


【PostgreSQL】PostgreSQL の組み込み関数、ユーザー定義関数、演算子について【Part.9】


【PostgreSQL】PostgreSQL のトランザクションについて【Part.10】


【PostgreSQL】SQL文【Part.11】


【PostgreSQL】テーブル設計(データ型、制約)【Part.12】


よかったらシェアしてね!
  • URLをコピーしました!
  • URLをコピーしました!

この記事を書いた人

コメント

コメントする

AlphaOmega Captcha Medica  –  What Do You See?


このサイトはスパムを低減するために Akismet を使っています。コメントデータの処理方法の詳細はこちらをご覧ください