「エックスサーバー」や「Zenlogic(ゼンロジック)」のレンタルサーバーを利用しているなら、無料で「Let’s Encrypt」を導入できます。
通常ならレンタルサーバーのサービスを利用すればいいのですが、今回は自分で「Let’s Encrypt」のSSL証明書を導入してみました。
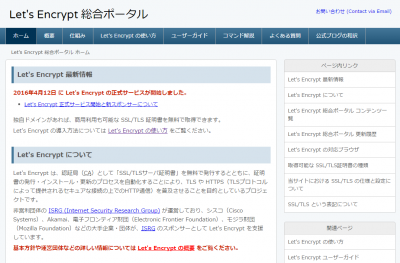
Let’s Encryptとは何かを解説したページです。

Let’s Encrypt公式サイトです。
目次
Let’s Encrypt 導入環境
導入先サーバーは「さくらのVPS」です。
Apacheは2017年4月26日現在最新の「2.4.6」をインストールしています。
CentOS7へのApacheインストール手順は以下のページを参照してください。

OS:CentOS 7.3.1611
Apache:2.4.6
OpenSSL:1.0.1e-fips
|
# cat /etc/redhat-release CentOS Linux release 7.3.1611 (Core) # httpd -v |
Let’s Encrypt インストール
エックスサーバー ![]() や Zenlogic[ゼンロジック] では簡単に「Let’s Encrypt」を利用した「無料独自SSL証明書」を
や Zenlogic[ゼンロジック] では簡単に「Let’s Encrypt」を利用した「無料独自SSL証明書」を![]() 利用できます。
利用できます。
本サイトは、エックスサーバーに「Let’s Encrypt」を利用した「無料独自SSL証明書」を設定してサイトを「https化」したサイトです。

レンタルサーバー会社のサービスを利用すれば簡単に導入できますが、自分でも「無料独自SSL証明書」を導入できるのでチャレンジしてみましょう。
Let’s Encrypt インストール手順概要
手順の概要を以下に示します。
1.Apache を SSL 対応にする
2.epelレポジトリをインストールする
3.Certbotをインストールする
4.設定をする
以上です。
簡単に無料で独自SSLサーバー証明書を設定できます。
※Apacheのインストール手順は、以下を参照してください。
1.Apache を SSL 対応にする
|
# yum install mod_ssl 読み込んだプラグイン:fastestmirror, langpacks Loading mirror speeds from cached hostfile * base: ftp.iij.ad.jp * epel: ftp.yz.yamagata-u.ac.jp * extras: ftp.iij.ad.jp * updates: ftp.iij.ad.jp 依存性の解決をしています –> トランザクションの確認を実行しています。 —> パッケージ mod_ssl.x86_64 1:2.4.6-45.el7.centos.4 を インストール –> 依存性解決を終了しました。 依存性を解決しました ======================================================================================================== Package アーキテクチャー バージョン リポジトリー 容量 ======================================================================================================== インストール中: mod_ssl x86_64 1:2.4.6-45.el7.centos.4 updates 105 k トランザクションの要約 ======================================================================================================== インストール 1 パッケージ 総ダウンロード容量: 105 k インストール容量: 224 k Is this ok [y/d/N]: y ←「y」を入力します。 Downloading packages: mod_ssl-2.4.6-45.el7.centos.4.x86_64.rpm | 105 kB 00:00:00 Running transaction check Running transaction test Transaction test succeeded Running transaction インストール中 : 1:mod_ssl-2.4.6-45.el7.centos.4.x86_64 1/1 検証中 : 1:mod_ssl-2.4.6-45.el7.centos.4.x86_64 1/1 インストール: mod_ssl.x86_64 1:2.4.6-45.el7.centos.4 完了しました! |
mod_sslをインストールしたら、httpd(Apache)のサービスを再起動します。
|
# systemctl restart httpd ←httpd(Apache)を再起動します。 # systemctl status httpd ←httpd(Apache)のステータスを確認します。active(running)であることを確認します。 ● httpd.service – The Apache HTTP Server Loaded: loaded (/usr/lib/systemd/system/httpd.service; enabled; vendor preset: disabled) Active: active (running) since 水 2017-04-26 20:26:39 JST; 4s ago Docs: man:httpd(8) man:apachectl(8) Process: 8454 ExecStop=/bin/kill -WINCH ${MAINPID} (code=exited, status=0/SUCCESS) Main PID: 8458 (httpd) Status: “Processing requests…” CGroup: /system.slice/httpd.service tq8458 /usr/sbin/httpd -DFOREGROUND tq8459 /usr/sbin/httpd -DFOREGROUND tq8460 /usr/sbin/httpd -DFOREGROUND tq8461 /usr/sbin/httpd -DFOREGROUND tq8462 /usr/sbin/httpd -DFOREGROUND mq8463 /usr/sbin/httpd -DFOREGROUND 4月 26 20:26:39 tk2-250-34861.vs.sakura.ne.jp systemd[1]: Starting The Apache HTTP Server… 4月 26 20:26:39 tk2-250-34861.vs.sakura.ne.jp systemd[1]: Started The Apache HTTP Server. |
2.EPEL レポジトリをインストールする
EPEL レポジトリとは、CentOSの公式レポジトリではないのですが、一般的にサーバーを構築する際にインストールするパッケージ、あると便利なパッケージを集めたリポジトリです。
ディストリビューション「Fedora」を元に、RedHat Enterprise Linux や CentOS などに使えます。
EPEL
https://fedoraproject.org/wiki/EPEL
たとえば、レンタルサーバーでMySQLデータベース管理で利用されている「phpMyAdmin」も「epel」レポジトリからインストールしています。
yumコマンドで EPEL レポジトリをインストールします。
(すでにインストール済みの場合はインストール不要です)
|
# yum install epel-release 読み込んだプラグイン:fastestmirror, langpacks Loading mirror speeds from cached hostfile * base: ftp.iij.ad.jp * extras: ftp.iij.ad.jp * updates: ftp.iij.ad.jp 依存性の解決をしています –> トランザクションの確認を実行しています。 —> パッケージ epel-release.noarch 0:7-9 を インストール –> 依存性解決を終了しました。 依存性を解決しました ======================================================================================================== Package アーキテクチャー バージョン リポジトリー 容量 ======================================================================================================== インストール中: epel-release noarch 7-9 extras 14 k トランザクションの要約 ======================================================================================================== インストール 1 パッケージ 総ダウンロード容量: 14 k インストール容量: 24 k Is this ok [y/d/N]: y ←「y」を入力します。 Downloading packages: epel-release-7-9.noarch.rpm | 14 kB 00:00:00 Running transaction check Running transaction test Transaction test succeeded Running transaction インストール中 : epel-release-7-9.noarch 1/1 検証中 : epel-release-7-9.noarch 1/1 インストール: epel-release.noarch 0:7-9 完了しました! |
3.Certbotをインストールする
次に Cerbot をインストールします。
EPEL レポジトリのインストールと同様に yum コマンドで Certbot をインストールします。
|
# yum install certbot python-certbot-apache certbot-apache |
4.Certbotの動作テストをする
Certbotの動作テストをします。
certbotコマンドを実行して正常に動作するか確認するのですが、以下のようなエラーが出力されました。
|
# certbot ← certbotコマンドを実行する Traceback (most recent call last): File “/bin/certbot”, line 9, in <module> load_entry_point(‘certbot==0.12.0’, ‘console_scripts’, ‘certbot’)() File “/usr/lib/python2.7/site-packages/pkg_resources/__init__.py”, line 560, in load_entry_point return get_distribution(dist).load_entry_point(group, name) File “/usr/lib/python2.7/site-packages/pkg_resources/__init__.py”, line 2642, in load_entry_point return ep.load() File “/usr/lib/python2.7/site-packages/pkg_resources/__init__.py”, line 2296, in load return self.resolve() File “/usr/lib/python2.7/site-packages/pkg_resources/__init__.py”, line 2302, in resolve module = __import__(self.module_name, fromlist=[‘__name__’], level=0) File “/usr/lib/python2.7/site-packages/certbot/main.py”, line 21, in <module> from certbot import client File “/usr/lib/python2.7/site-packages/certbot/client.py”, line 10, in <module> from acme import client as acme_client File “/usr/lib/python2.7/site-packages/acme/client.py”, line 31, in <module> requests.packages.urllib3.contrib.pyopenssl.inject_into_urllib3() File “/usr/lib/python2.7/site-packages/requests/packages/urllib3/contrib/pyopenssl.py”, line 112, in inject_into_urllib3 _validate_dependencies_met() File “/usr/lib/python2.7/site-packages/requests/packages/urllib3/contrib/pyopenssl.py”, line 147, in _validate_dependencies_met raise ImportError(“‘pyOpenSSL’ module missing required functionality. “ ImportError: ‘pyOpenSSL’ module missing required functionality. Try upgrading to v0.14 or newer. ←このエラー |
エラーが出力されましたが、最後の以下の一文が解決をするためにヒントになりそうです。
「ImportError: ‘pyOpenSSL’ module missing required functionality. Try upgrading to v0.14 or newer.」
pyOpenSSLとは?
pyOpenSSLとは、OpenSSLライブラリのPythonラッパーモジュールです。
pyOpenSSLは、Python暗号機関(PyCA)によって共同開発され、暗号化を実現しています。
エラー後に以下の対応
バージョンが低すぎる可能性があるので、「yum update」で一旦すべてのパッケージに対して update を実施します。
|
# yum update |
yum updateが完了したら、OSを再起動して反映します。
|
# reboot |
OS再起動後にpyOpenSSLのバージョンをチェックします。
|
# rpm -qa | grep pyOpenSSL ← pyOpenSSLのバージョンを調べます。 # yum remove pyOpenSSL ← pyOpenSSLを一旦アンインストールします。 依存性を解決しました ===================================================== トランザクションの要約 インストール容量: 3.8 M 削除しました: 依存性の削除をしました: 完了しました! # yum install certbot ←再度 certbot のインストールを試します。 https://access.redhat.com/articles/1320623 If above article doesn’t help to resolve this issue please create a bug on https://bugs.centos.org/ Loading mirror speeds from cached hostfile 依存性を解決しました ======================================================= トランザクションの要約 総ダウンロード容量: 761 k インストール: 依存性関連をインストールしました: 完了しました! |
今後はwgetで「pyOpenSSL-0.15.1」をダウンロードしてインストール
再度 pyOpenSSL をアンインストールします。
|
# yum remove pyOpenSSL-0.13.1-3.el7.x86_64 |
wgetコマンドでバージョン「pyOpenSSL-0.15.1」のパッケージを別途ダウンロードします。
|
# wget ftp://ftp.muug.mb.ca/mirror/centos/7.3.1611/cloud/x86_64/openstack-mitaka/common/pyOpenSSL-0.15.1-1.el7.noarch.rpm |
yum コマンドでインストールします。
rpm コマンドでもインストールできますが、私の場合は常に yum コマンドを使うようにしています。
|
# yum install pyOpenSSL-0.15.1-1.el7.noarch.rpm |
再度、yum コマンドで certbot をインストールします。
|
# yum install certbot |
certbotコマンドを実行して動作確認をします。
エラーではないですが、注意・警告が表示されました。
|
# certbot Saving debug log to /var/log/letsencrypt/letsencrypt.log Certbot doesn’t know how to automatically configure the web server on this system. However, it can still get a certificate for you. Please run “certbot certonly” to do so. You’ll need to manually configure your web server to use the resulting certificate. |
念のため、ログを見てみましょう。
|
# cat /var/log/letsencrypt/letsencrypt.log 2017-04-26 12:13:15,159:DEBUG:certbot.main:Root logging level set at 20 2017-04-26 12:13:15,159:INFO:certbot.main:Saving debug log to /var/log/letsencrypt/letsencrypt.log 2017-04-26 12:13:15,159:DEBUG:certbot.main:certbot version: 0.12.0 2017-04-26 12:13:15,159:DEBUG:certbot.main:Arguments: [] 2017-04-26 12:13:15,159:DEBUG:certbot.main:Discovered plugins: PluginsRegistry(PluginEntryPoint#webroot,PluginEntryPoint#null,PluginEntryPoint#manual,PluginEntryPoint#standalone) 2017-04-26 12:13:15,160:DEBUG:certbot.plugins.selection:Requested authenticator None and installer None 2017-04-26 12:13:15,160:DEBUG:certbot.plugins.selection:No candidate plugin 2017-04-26 12:13:15,160:DEBUG:certbot.plugins.selection:Selected authenticator None and installer None |
特にエラーは出てないですが、「Requested authenticator None and installer None」や「No candidate plugin」が設定が足りないことを示しているような気がします。
再度certbotの動作確認をします。
helpが表示されるか試してみます。
|
# certbot –help certbot [SUBCOMMAND] [options] [-d DOMAIN] [-d DOMAIN] … Certbot can obtain and install HTTPS/TLS/SSL certificates. By default, obtain, install, and renew certificates: (the certbot apache plugin is not installed) -n Run non-interactively manage certificates: manage your account with Let’s Encrypt: More detailed help: -h, –help [TOPIC] print this message, or detailed help on a topic; all, automation, commands, paths, security, testing, or any of the |
こう見ると正常に certbot がインストールされているようです。
5.Certbot で SSL証明書を取得する
今回の設定は、以下の設定とします。
サーバー名:xxx-xxx-xxx.vs.sakura.ne.jp
※xxx-xxx-xxxは文字を伏せています。
|
# certbot run –apache -d xxx-xxx-xxx.vs.sakura.ne.jp Saving debug log to /var/log/letsencrypt/letsencrypt.log Enter email address (used for urgent renewal and security notices) (Enter ‘c’ to cancel): xxx@gmail.com ——————————————————————————- Please read the Terms of Service at
あわせて読みたい
404 Page not found
Let's Encrypt is a free, automated, and open Certificate Authority brought to you by the nonprofit Internet Security Research Group (ISRG). Read all about our n...
You must agree in order to register with the ACME server at https://acme-v01.api.letsencrypt.org/directory——————————————————————————- (A)gree/(C)ancel: A ← Aを入力します。 ——————————————————————————- Would you be willing to share your email address with the Electronic Frontier Foundation, a founding partner of the Let’s Encrypt project and the non-profit organization that develops Certbot? We’d like to send you email about EFF and our work to encrypt the web, protect its users and defend digital rights. ——————————————————————————- (Y)es/(N)o: Y ← Yを入力します。 Obtaining a new certificate Performing the following challenges: tls-sni-01 challenge for xxx-xxx-xxx.vs.sakura.ne.jp We were unable to find a vhost with a ServerName or Address of xxx-xxx-xxx.vs.sakura.ne.jp. Which virtual host would you like to choose? (note: conf files with multiple vhosts are not yet supported) ——————————————————————————- 1: ssl.conf | | HTTPS | Enabled ——————————————————————————- Press 1 [enter] to confirm the selection (press ‘c’ to cancel): 1 ← 1を入力します。
Waiting for verification…
Cleaning up challenges Generating key (2048 bits): /etc/letsencrypt/keys/0000_key-certbot.pem Creating CSR: /etc/letsencrypt/csr/0000_csr-certbot.pem
An unexpected error occurred: There were too many requests of a given type :: Error creating new cert :: too many certificates already issued for: sakura.ne.jp
Please see the logfiles in /var/log/letsencrypt for more details. IMPORTANT NOTES: – Your account credentials have been saved in your Certbot configuration directory at /etc/letsencrypt. You should make a secure backup of this folder now. This configuration directory will also contain certificates and private keys obtained by Certbot so making regular backups of this folder is ideal. |
SSL証明書取得で失敗しました。
どうやら sakura.net.jp ドメインで多くの SSL証明書がすでに発行されているため、エラーが発生したそうです。
そのため、他のドメインを利用することとします。
6.あらためて独自ドメインでSSL証明書を取得する
あらためて独自ドメインを利用して Certbot で SSL証明書を取得します。
サーバー名:www.xxxx.com
※xxxxは文字を伏せています。
|
# certbot run –apache -d www.xxxx.com ←再度certbotコマンドを実行します。 We were unable to find a vhost with a ServerName or Address of www.xxxx.com. We were unable to find a vhost with a ServerName or Address of www.xxxx.com. Press 1 [enter] to confirm the selection (press ‘c’ to cancel): 1 ←1を入力します。 Please choose whether HTTPS access is required or optional. ——————————————————————————- You should test your configuration at: IMPORTANT NOTES: Donating to ISRG / Let’s Encrypt: https://letsencrypt.org/donate # |
7.httpsで警告なく表示されるのか確認する
ブラウザを起動して「https://www.xxxx.com」にアクセスしてみます。
警告が出ることなくhttpsでアクセスができました。
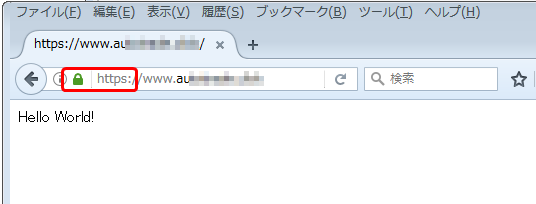
証明書を確認します。
緑色の鍵のマークをクリックして、矢印をクリックします。
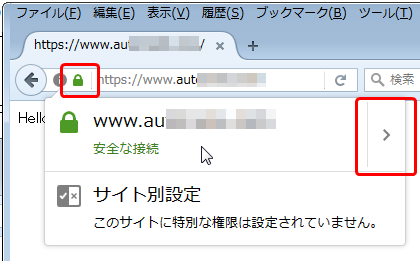
「詳細を表示」をクリックします。
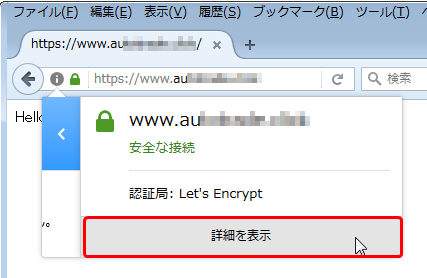
認証局が「Let’s Encrypt」であることが確認できます。
更に「証明書を表示」ボタンをクリックします。
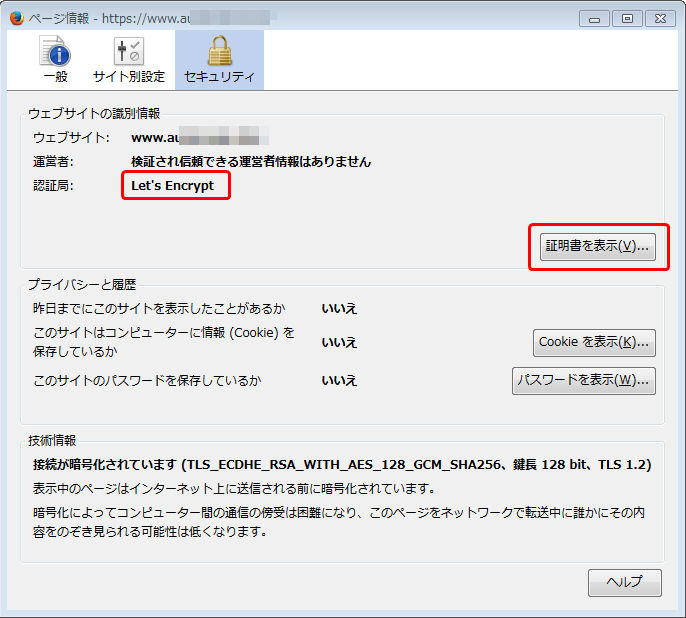
証明書の詳細情報です。
証明書の「有効期限」が3か月後であることが分かります。
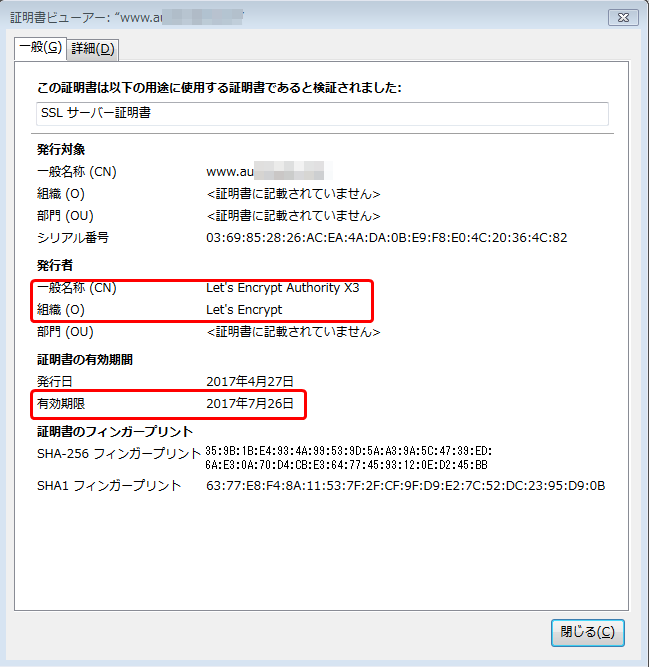
以上で、さくらVPSで独自ドメインで「Let’s Encrypt」の無料SSLサーバー証明書を導入する手順は完了です。
Let’s EncryptのSSL証明書の更新
上図のSSL証明書で確認したように「Let’s Encrypt」のSSL証明書の有効期限は3か月(90日)です。
そのため、環境を構築したら、90日ごとにSSL証明書を更新してしっかりと運用しなければいけません。
ただ、SSL証明書の更新作業は簡単です。
以下のコマンドを実行するだけです。
|
# certbot renew |
ただ、このコマンドを90日おきに実行するのは、人間には無理です。
必ず忘れます。
そのため、コンピュータを利用しましょう。
cronで仕込めば大丈夫です。
ただ、どのタイミングでこのコマンドを実行すればいいのか分かりません。
公式サイトの説明文を見ても、「有効期限が近い証明書を自動的に更新します。」と記載があるだけで、「近い」とは3日前なのか?10日前なのか?情報がないので、1週間程度をめどにcronを使って繰り返し実行し続けます。

毎週「certbot renew」コマンドを実行するように crontab を設定する
以下のように毎週日曜日の0時に「certbot renew」コマンドを実行するように設定します。
|
# crontab -e ←crontab -eコマンドを実行して編集モードにします。 ↓以下のように設定します。 # 毎週月曜日の0時にcertbot renewコマンドを実行する
|
ちなみにcrontabの設定ですが、以下のような意味があります。
| 項目 | 値 |
|---|---|
| 分 | 0-59 |
| 時 | 0-23 |
| 日 | 1-31 |
| 月 | 1-12 |
| 曜日 | 0-7(0と7は日曜日を表します) 0→日曜日 1→月曜日 2→火曜日 3→水曜日 4→木曜日 5→金曜日 6→土曜日 7→日曜日 |
まとめ
意外と簡単に導入することができました。
ただ、公式サイトを参考に設定をしたのですが、手順が分かりづらかったです。
しかしまだまだ細かく設定をすることができるので更に調査を進めていきます。