|
# cd /etc/httpd/conf ← httpd.confファイルがある「/etc/httpd/conf」へ移動する。
# cat httpd.conf
#
# This is the main Apache HTTP server configuration file. It contains the
# configuration directives that give the server its instructions.
# See <URL:http://httpd.apache.org/docs/2.4/> for detailed information. ← Apacheの公式マニュアルは「http://httpd.apache.org/docs/2.4/」にあります。
# In particular, see
# <URL:http://httpd.apache.org/docs/2.4/mod/directives.html> ← また、各ディレクディブに関するマニュアルは「http://httpd.apache.org/docs/2.4/mod/directives.html」にあります。(結構なボリュームがあります)
# for a discussion of each configuration directive.
#
# Do NOT simply read the instructions in here without understanding ←これらの設定が何かを理解せずにこの解説を読むなと警告をしています。
# what they do. They’re here only as hints or reminders. If you are unsure
# consult the online docs. You have been warned.
#
# Configuration and logfile names: If the filenames you specify for many ←ファイル名を / から始まるパスで書くと、/(root)ディレクトリからのパスになるよと警告をしています。たとえば、/htmlと書くと、実際は「/www/html」だとしても、Apacheは「/html」を探してエラーにすると言っています。
# of the server’s control files begin with “/” (or “drive:/” for Win32), the
# server will use that explicit path. If the filenames do *not* begin
# with “/”, the value of ServerRoot is prepended — so ‘log/access_log’
# with ServerRoot set to ‘/www’ will be interpreted by the
# server as ‘/www/log/access_log’, where as ‘/log/access_log’ will be
# interpreted as ‘/log/access_log’.
#
# ServerRoot: The top of the directory tree under which the server’s ← ServerRootとは、Apacheの設定ファイルの /(root)ディレクトリのことを言います。
# configuration, error, and log files are kept.
#
# Do not add a slash at the end of the directory path. If you point ← ServerRootのパスを書くときに、最後に / (スラッシュ)をつけるなと言っています。
# ServerRoot at a non-local disk, be sure to specify a local disk on the
# Mutex directive, if file-based mutexes are used. If you wish to share the
# same ServerRoot for multiple httpd daemons, you will need to change at
# least PidFile.
#
ServerRoot “/etc/httpd” ← このサーバーの Apache の設定ファイルの /(root)ディレクトリ(トップディレクトリ)は、「/etc/httpd」に設定しています。
#
# Listen: Allows you to bind Apache to specific IP addresses and/or
# ports, instead of the default. See also the <VirtualHost>
# directive.
#
# Change this to Listen on specific IP addresses as shown below to
# prevent Apache from glomming onto all bound IP addresses.
#
#Listen 12.34.56.78:80
Listen 80 ← Webサーバーとして80番ポートで処理をします。
#
# Dynamic Shared Object (DSO) Support
#
# To be able to use the functionality of a module which was built as a DSO you
# have to place corresponding `LoadModule’ lines at this location so the
# directives contained in it are actually available _before_ they are used.
# Statically compiled modules (those listed by `httpd -l’) do not need
# to be loaded here.
#
# Example:
# LoadModule foo_module modules/mod_foo.so
#
Include conf.modules.d/*.conf ← Apacheで動的モジュールを使用したい場合は、「conf.modules.d」ディレクトリ(実際は/etc/httpd/conf.modules.dになる)にconfファイルを置きましょうと言っています。
ApacheはDSO(動的共有オブジェクト)をサポートしています。
動的共有オブジェクトとは、ライブラリを別ファイルとして作成して、必要な時に動的に追加されるライブラリです。
静的オブジェクトに比べると若干処理が重くなります(動的に組み込む時のオーバーヘッドがあるため)がその代り管理が楽になります。
#
# If you wish httpd to run as a different user or group, you must run
# httpd as root initially and it will switch.
#
# User/Group: The name (or #number) of the user/group to run httpd as.
# It is usually good practice to create a dedicated user and group for
# running httpd, as with most system services.
#
User apache ← Apacheを他のアカウントやグループで動かしたい場合は、ここを変更する。
Group apache
# ‘Main’ server configuration
#
# The directives in this section set up the values used by the ‘main’
# server, which responds to any requests that aren’t handled by a
# <VirtualHost> definition. These values also provide defaults for
# any <VirtualHost> containers you may define later in the file.
#
# All of these directives may appear inside <VirtualHost> containers,
# in which case these default settings will be overridden for the
# virtual host being defined.
#
#
# ServerAdmin: Your address, where problems with the server should be
# e-mailed. This address appears on some server-generated pages, such
# as error documents. e.g. admin@your-domain.com
#
ServerAdmin root@localhost ← このWebサーバーの管理者のメールアドレスを記述します。
#
# ServerName gives the name and port that the server uses to identify itself.
# This can often be determined automatically, but we recommend you specify
# it explicitly to prevent problems during startup.
#
# If your host doesn’t have a registered DNS name, enter its IP address here.
#
#ServerName www.example.com:80
↓ コメントアウトする
ServerName www.example.com:80 ← Webサーバーとして公開するホスト名を指定します。ホスト名は FQDN(Fully Qualified Domain Name) で記述します。
【例】
ホスト名:test01
ドメイン名:sample.ne.jp
の場合、test01だけでなく「test01.sample.ne.jp」とフルドメインネームで記述するということです。
※コメントアウトとは、先頭の「#」を外すことを言います。先頭に「#」があるとその行はプログラムに読まれません。
#
# Deny access to the entirety of your server’s filesystem. You must
# explicitly permit access to web content directories in other
# <Directory> blocks below.
#
<Directory /> ← Directory / は、/(root)ディレクトリ配下に関しての設定しますよという意味です。
AllowOverride none ← AllowOverride は 上位のディレクトリ(この場合は/(root)ディレクトリ)でした設定を下位のディレクトリで設定を上書きできるかどうか(オーバーライドできるかどうか)を設定します。none → 下位での変更が無効。all → 下位での変更が有効。
Require all denied ← アクセス制限に関する設定です。デフォルトではすべて拒否する設定になっています。何から何に対するアクセス制限なのでしょうか?
Webサーバーなので、特定のコンピューターから、このWebサーバーに対するアクセスの許可・不許可について設定しています。
たとえば、IPアドレス 192.168.1.1からのアクセスを拒否する場合は、「Require ip 192.168.1.1」となります。
</Directory>
#
# Note that from this point forward you must specifically allow
# particular features to be enabled – so if something’s not working as
# you might expect, make sure that you have specifically enabled it
# below.
#
#
# DocumentRoot: The directory out of which you will serve your
# documents. By default, all requests are taken from this directory, but
# symbolic links and aliases may be used to point to other locations.
#
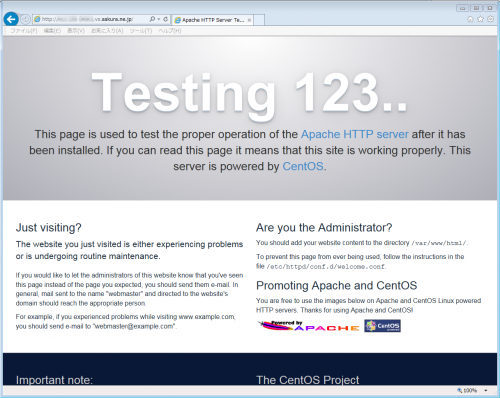
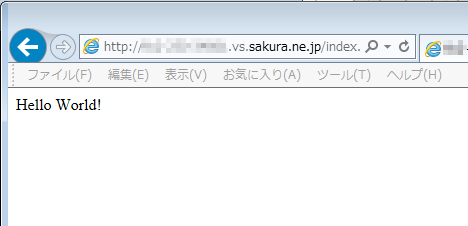
DocumentRoot “/var/www/html” ← ドキュメントルート(DocumentRoot)は、Webサーバーのトップディレクトリです。例えば「/var/www/html」ディレクトリ配下に「index.html」ファイルを置いた場合、「http://xxx-xxxx-xxxx.vs.sakura.ne.jp/index.html」でアクセスすることができます。
#
# Relax access to content within /var/www.
#
<Directory “/var/www”> ← /var/wwwディレクトリ配下へのアクセス制御に関する設定です。
AllowOverride None
# Allow open access:
Require all granted ← /var/wwwディレクト配下へのアクセスは全員が可能です。つまり、Webサイトを閲覧することができます。
</Directory>
# Further relax access to the default document root:
<Directory “/var/www/html”>
#
# Possible values for the Options directive are “None”, “All”,
# or any combination of:
# Indexes Includes FollowSymLinks SymLinksifOwnerMatch ExecCGI MultiViews
#
# Note that “MultiViews” must be named *explicitly* — “Options All”
# doesn’t give it to you.
#
# The Options directive is both complicated and important. Please see
# http://httpd.apache.org/docs/2.4/mod/core.html#options
# for more information.
#
Options Indexes FollowSymLinks ← シンボリックリンクをたどれるようにします。
#
# AllowOverride controls what directives may be placed in .htaccess files.
# It can be “All”, “None”, or any combination of the keywords:
# Options FileInfo AuthConfig Limit
#
AllowOverride None ← このディレクトリ(/var/www/html)配下に「.htaccess」ファイルを作成した場合、上書きするか(オーバーライドするか)設定します。
none → 上書きしません。つまり、.htaccessファイルに設定を書いても無視されます。
all → 上書きされます。つまり、このディレクトリ(/var/www/html)配下に「.htaccess」ファイルを作成した場合、有効になります。
#
# Controls who can get stuff from this server.
#
Require all granted ← /var/www/html ディレクト配下へのアクセスは全員が可能です。つまり、Webサイトを閲覧することができます。
</Directory>
#
# DirectoryIndex: sets the file that Apache will serve if a directory
# is requested.
#
<IfModule dir_module>← IfModule は条件分岐です。「IfModule dir_module」は、「もし dir_module が組み込まれている場合」という意味です。
DirectoryIndex index.html ← DirectoryIndex とは一言で言うと、ディレクトリのインデックス一覧です。そのままの意味なのですが、ここでの意味は「もしindex.htmlファイルがあれば表示するよ。もしindex.htmlファイルがなければ、ディレクトリの一覧を表示するよ」という意味です。たまにサイトにアクセスしたときにリンクの設定が間違えていて、ファイルが全部見えてしまうことがありますが、その状態になるということです。(セキュリティ的によくありません)
</IfModule>
#
# The following lines prevent .htaccess and .htpasswd files from being
# viewed by Web clients.
#
<Files “.ht*”>
Require all denied ← もしディレクトリに「.htaccess」ファイルや「.htpasswd」ファイルがあった場合、ユーザーに表示するかどうかを設定しています。もちろん「Require all denied」で表示させないように設定しています。
</Files>
#
# ErrorLog: The location of the error log file.
# If you do not specify an ErrorLog directive within a <VirtualHost>
# container, error messages relating to that virtual host will be
# logged here. If you *do* define an error logfile for a <VirtualHost>
# container, that host’s errors will be logged there and not here.
#
ErrorLog “logs/error_log” ←エラーログの場所を指定しています。この環境では「ServerRoot “/etc/httpd”」なので、エラーログは「/etc/httpd/logs/error_log」になります。
#
# LogLevel: Control the number of messages logged to the error_log.
# Possible values include: debug, info, notice, warn, error, crit,
# alert, emerg.
#
LogLevel warn ← どのレベルでログを出力するのかを設定します。開発段階ならデバッグレベル(非常に細かくログが出力される)で、運用段階に入ったら通常のログレベルなどに設定します。
ちなみに、ログのレベルです。
emerg:緊急、システムが利用できないレベル
alert:今すぐに対処が必要なレベル
crit:致命的な状態(個人的にはcriticalがalertの下にあるのは違和感があります)
error:エラーレベル
warn:(デフォルト) 警告レベル
notice:注意すべき重要な情報
info:一般的な情報
debug:デバッグレベル
<IfModule log_config_module>
#
# The following directives define some format nicknames for use with
# a CustomLog directive (see below).
#
LogFormat “%h %l %u %t \”%r\” %>s %b \”%{Referer}i\” \”%{User-Agent}i\”” combined ←ログのフォーマットを指定します。ログフォーマットのニックネームを「combined」と名付けます。
LogFormat “%h %l %u %t \”%r\” %>s %b” common ←ログのフォーマットを指定します。ログフォーマットのニックネームを「common」と名付けます。
<IfModule logio_module>
# You need to enable mod_logio.c to use %I and %O
LogFormat “%h %l %u %t \”%r\” %>s %b \”%{Referer}i\” \”%{User-Agent}i\” %I %O” combinedio ←ログのフォーマットを指定します。ログフォーマットのニックネームを「combinedio」と名付けます。
</IfModule>
#
# The location and format of the access logfile (Common Logfile Format).
# If you do not define any access logfiles within a <VirtualHost>
# container, they will be logged here. Contrariwise, if you *do*
# define per-<VirtualHost> access logfiles, transactions will be
# logged therein and *not* in this file.
#
#CustomLog “logs/access_log” common ← カスタムログの場所とフォーマットを指定します。ログの場所は、この環境では「ServerRoot “/etc/httpd”」なので、ログは「/etc/httpd/logs/access_log」になります。フォーマットは、ニックネーム「common」の形式にします。
#
# If you prefer a logfile with access, agent, and referer information
# (Combined Logfile Format) you can use the following directive.
#
CustomLog “logs/access_log” combined ← カスタムログの場所とフォーマットを指定します。ログの場所は、この環境では「ServerRoot “/etc/httpd”」なので、ログは「/etc/httpd/logs/access_log」になります。フォーマットは、ニックネーム「combined」の形式にします。
</IfModule>
<IfModule alias_module>
#
# Redirect: Allows you to tell clients about documents that used to
# exist in your server’s namespace, but do not anymore. The client
# will make a new request for the document at its new location.
# Example:
# Redirect permanent /foo http://www.example.com/bar
#
# Alias: Maps web paths into filesystem paths and is used to
# access content that does not live under the DocumentRoot.
# Example:
# Alias /webpath /full/filesystem/path
#
# If you include a trailing / on /webpath then the server will
# require it to be present in the URL. You will also likely
# need to provide a <Directory> section to allow access to
# the filesystem path.
#
# ScriptAlias: This controls which directories contain server scripts.
# ScriptAliases are essentially the same as Aliases, except that
# documents in the target directory are treated as applications and
# run by the server when requested rather than as documents sent to the
# client. The same rules about trailing “/” apply to ScriptAlias
# directives as to Alias.
#
ScriptAlias /cgi-bin/ “/var/www/cgi-bin/” ← 【例】http://sample.ne.jpの場合、「/var/www/cgi-bin/」ディレクトリを「http://sample.ne.jp/cgi-bin」に割り当てます。つまりどのディレクトリを「cgi-bin」に割り当てるのか設定します。
</IfModule>
#
# “/var/www/cgi-bin” should be changed to whatever your ScriptAliased
# CGI directory exists, if you have that configured.
#
<Directory “/var/www/cgi-bin”> ← cgi-binディレクトリの動作について設定します。
AllowOverride None
Options None ← オプションは何もありません。
Require all granted ← 全員がアクセス可能です。
</Directory>
<IfModule mime_module>
#
# TypesConfig points to the file containing the list of mappings from
# filename extension to MIME-type.
#
TypesConfig /etc/mime.types ←MIMEタイプを設定します。具体的には「/etc/mime.types」ファイルで設定します。例を挙げると「application/javascript js」や「application/json json」などのように設定が入っています。
#
# AddType allows you to add to or override the MIME configuration
# file specified in TypesConfig for specific file types.
#
#AddType application/x-gzip .tgz
#
# AddEncoding allows you to have certain browsers uncompress
# information on the fly. Note: Not all browsers support this.
#
#AddEncoding x-compress .Z
#AddEncoding x-gzip .gz .tgz
#
# If the AddEncoding directives above are commented-out, then you
# probably should define those extensions to indicate media types:
#
AddType application/x-compress .Z ← MIMEタイプを追加しています。拡張子 .Z は「x-compress」でエンコードされています。
AddType application/x-gzip .gz .tgz ← MIMEタイプを追加しています。拡張子 .gz .tgz は「x-gzip」でエンコードされています。
#
# AddHandler allows you to map certain file extensions to “handlers”:
# actions unrelated to filetype. These can be either built into the server
# or added with the Action directive (see below)
#
# To use CGI scripts outside of ScriptAliased directories:
# (You will also need to add “ExecCGI” to the “Options” directive.)
#
#AddHandler cgi-script .cgi
# For type maps (negotiated resources):
#AddHandler type-map var
#
# Filters allow you to process content before it is sent to the client.
#
# To parse .shtml files for server-side includes (SSI):
# (You will also need to add “Includes” to the “Options” directive.)
#
AddType text/html .shtml ← SSI(Server Side Includes)を有効にしています。
AddOutputFilter INCLUDES .shtml ← SSI(Server Side Includes)を有効にしています。
</IfModule>
#
# Specify a default charset for all content served; this enables
# interpretation of all content as UTF-8 by default. To use the
# default browser choice (ISO-8859-1), or to allow the META tags
# in HTML content to override this choice, comment out this
# directive:
#
AddDefaultCharset UTF-8 ← デフォルトの文字コードを「UTF-8」に設定します。
<IfModule mime_magic_module>
#
# The mod_mime_magic module allows the server to use various hints from the
# contents of the file itself to determine its type. The MIMEMagicFile
# directive tells the module where the hint definitions are located.
#
MIMEMagicFile conf/magic ← mod_mime_magic が解決できないMIMEタイプがあった場合、conf/magic を使ってMIMEタイプを指定します。あくまでも予備的な位置づけで、このモジュールを使う必要がないことがよいです。
</IfModule>
#
# Customizable error responses come in three flavors:
# 1) plain text 2) local redirects 3) external redirects
#
# Some examples:
#ErrorDocument 500 “The server made a boo boo.”
#ErrorDocument 404 /missing.html
#ErrorDocument 404 “/cgi-bin/missing_handler.pl”
#ErrorDocument 402 http://www.example.com/subscription_info.html
#
#
# EnableMMAP and EnableSendfile: On systems that support it,
# memory-mapping or the sendfile syscall may be used to deliver
# files. This usually improves server performance, but must
# be turned off when serving from networked-mounted
# filesystems or if support for these functions is otherwise
# broken on your system.
# Defaults if commented: EnableMMAP On, EnableSendfile Off
#
#EnableMMAP off
EnableSendfile on ← クライアントにファイルを送る時に sendfile を使うかどうかを設定します。onは使います。
# Supplemental configuration
#
# Load config files in the “/etc/httpd/conf.d” directory, if any.
IncludeOptional conf.d/*.conf ← 設定ファイルの場所と形式を設定します。「/etc/httpd/conf.d」ディレクトリ配下にある .confファイルはすべて設定ファイルになります。
|