【Python】メール受信をトリガーとして【さくらVPS】サーバー上の Python プログラムをスタートしたい

「さくらVPS」でインターネット経由でのメール(Gmail)を受信し、メール受信をトリガーにして Python プログラムを起動するシステムを構築してみます。


■さくらVPSは結構楽しめるのでお勧め

Webアプリを作る場合はレンタルサーバーより「VPS」の方が自由度が高いのでお勧めです。

最近は Python や Ruby を利用できるレンタルサーバーが増えてきましたが、必要なライブラリをインストールしたり、環境を変更したりすることは難しいです。

ちなみにVPSなら「さくらのVPS」は価格が安くてスペックがいいので、結構楽しめます。


以下、さくらのVPSのスペックです。

[test@SAKURA_VPS ~]$ cat /proc/cpuinfo | grep processor
processor       : 0
[test@SAKURA_VPS ~]$ cat /proc/meminfo | grep MemTotal
MemTotal:         500208 kB


月額    : 685円~

ディスク: SSD 20GB

CPU     : Intel Xeon CPU E5-2650v2 @ 2.60GHz 1個

メモリ  : 512MB

【さくらVPS】【Python】Django で Web アプリを作る(カスタマイズ編)【Part.9】


メール受信をトリガーにプログラムを起動するシステムの構成図

下図のような構成です。

構成図にすると分かりやすいです。

【Python】メール受信をトリガーとして【さくらVPS】サーバー上の Python プログラムをスタートしたい


やりたいこと

簡単ですが「やりたいこと」をまとめました。

  • パソコン・スマホから Gmail で「さくらVPS」のサーバーにメールを送信する
  • 「さくらVPS」サーバーはメールを受信する
  • メール受信をトリガーとして「さくらVPS」サーバー上の Python プログラムが実行される


設計

  • さくらVPSにドメインを設定してインターネット上から名前解決ができるようにする
  • メール受信サーバーを設定する
  • メール送信は不要
  • トリガーは/etc/aliasesでの設定


環境

今回構築したシステムの環境です。

  • OS : CentOS 7.4
  • Postfix : 2.10.1
  • Dovecot : 2.2.10


[root@SAKURA_VPS tmp]# cat /etc/redhat-release
CentOS Linux release 7.4.1708 (Core)

[root@SAKURA_VPS tmp]# rpm -qa | grep postfix
postfix-2.10.1-6.el7.x86_64

[root@SAKURA_VPS tmp]# rpm -qa | grep dovecot
dovecot-2.2.10-8.el7.x86_64


手順の確認

一見複雑そうに見えますが、手順を細かく分解するとそれほど複雑ではありません。

以下、手順の概要です。


■手順の概要

  1. さくら VPS にお名前.comで取得した独自ドメインを割り当ててインターネットから FQDN でアクセスできるように設定する
  2. メール受信サーバー(Dovecot)を構築する
  3. 「/etc/aliases」でメールを受信したタイミングでトリガーを発動し、Python プログラムをキックする


さくら VPS にお名前.comで取得した独自ドメインを割り当ててインターネットから FQDN でアクセスできるように設定する

以前、以下の記事で解説しました。

基本的にはこの手順で「さくらVPS」「お名前.com」で取得した独自ドメインを割り当て、インターネットから FQDN(tama-chan.comなど)でアクセスできるようになります。


「さくらのVPS」に「お名前.com」で取得した独自ドメインを割り当てる手順


【今回想定している構成図】


作業の概要

作業の概要を以下に記載します。

  • ドメイン側(お名前.com)で「さくらのVPS」サーバーのグローバルIPアドレスを設定する

以上です。


これだけで問題なくインターネットから名前解決ができるようになります。


【事前準備】さくらのVPSサーバーにログインしてIPアドレスを確認する

「お名前.com」のネームサーバーに「さくらのVPS」サーバーのグローバルIPアドレスを登録するために、「さくらのVPS」サーバーにログインしてグローバルIPアドレスを調べます。

サーバーにログインしたら「ifconfig」コマンドを実行します。

(pyenv) [test@SAKURA_VPS scraping]$ ifconfig
eth0: flags=4163<UP,BROADCAST,RUNNING,MULTICAST>  mtu 1500
        inet 160.xxx.xxx.xx5  netmask 255.255.254.0  broadcast 160.xxx.xxx.xxx ← この「160.xxx.xxx.xx5」がグローバルIPアドレスです。
        ether 9c:a3:ba:02:0e:cd  txqueuelen 1000  (Ethernet)
        RX packets 38625484  bytes 3025270626 (2.8 GiB)
        RX errors 0  dropped 332  overruns 0  frame 0
        TX packets 650145  bytes 155085296 (147.9 MiB)
        TX errors 0  dropped 0 overruns 0  carrier 0  collisions 0

eth1: flags=4163<UP,BROADCAST,RUNNING,MULTICAST>  mtu 1500
        ether 9c:a3:ba:03:95:6d  txqueuelen 1000  (Ethernet)
        RX packets 0  bytes 0 (0.0 B)
        RX errors 0  dropped 0  overruns 0  frame 0
        TX packets 0  bytes 0 (0.0 B)
        TX errors 0  dropped 0 overruns 0  carrier 0  collisions 0

eth2: flags=4163<UP,BROADCAST,RUNNING,MULTICAST>  mtu 1500
        ether 9c:a3:ba:05:1c:0d  txqueuelen 1000  (Ethernet)
        RX packets 0  bytes 0 (0.0 B)
        RX errors 0  dropped 0  overruns 0  frame 0
        TX packets 0  bytes 0 (0.0 B)
        TX errors 0  dropped 0 overruns 0  carrier 0  collisions 0

lo: flags=73<UP,LOOPBACK,RUNNING>  mtu 65536
        inet 127.0.0.1  netmask 255.0.0.0
        loop  txqueuelen 1  (Local Loopback)
        RX packets 12335  bytes 32424091 (30.9 MiB)
        RX errors 0  dropped 0  overruns 0  frame 0
        TX packets 12335  bytes 32424091 (30.9 MiB)
        TX errors 0  dropped 0 overruns 0  carrier 0  collisions 0

virbr0: flags=4099<UP,BROADCAST,MULTICAST>  mtu 1500
        inet 192.168.xxx.xxx  netmask 255.255.255.0  broadcast 192.168.xxx.xxx ← このvirbr0はグローバルIPアドレスではありません。
        ether 52:54:00:0e:30:19  txqueuelen 1000  (Ethernet)
        RX packets 0  bytes 0 (0.0 B)
        RX errors 0  dropped 0  overruns 0  frame 0
        TX packets 0  bytes 0 (0.0 B)
        TX errors 0  dropped 0 overruns 0  carrier 0  collisions 0

(pyenv) [test@SAKURA_VPS scraping]$


ドメイン側(お名前.com)でネームサーバーの変更の設定

次に「お名前.com」のネームサーバーで、「さくらのVPS」サーバーの名前解決ができる「さくらインターネットのネームサーバー」のFQDN(DNS名)を登録します。

その結果、インターネットのどこからでも今回設定した「prog.xxxxx.com」でアクセスできるようになります。


お名前.com の「ドメイン Navi」にログインする

以下のURLより「お名前.com」のログインページにアクセスします。

https://www.onamae.com/navi/


「ドメイン Navi ログインページに進む」ボタンをクリックします。

【Python】メール受信をトリガーとして【さくらVPS】サーバー上の Python プログラムをスタートしたい


下図のようにログイン画面が表示されたら「お名前ID(会員ID)」「パスワード」を入力して「ログイン」ボタンをクリックします。

【Python】メール受信をトリガーとして【さくらVPS】サーバー上の Python プログラムをスタートしたい


ログインしたら下図のように「ドメイン」タブをクリックします。

【Python】メール受信をトリガーとして【さくらVPS】サーバー上の Python プログラムをスタートしたい


下図のように「このページから移動しますか?」画面が表示されたら「このページを離れる」ボタンをクリックします。

【Python】メール受信をトリガーとして【さくらVPS】サーバー上の Python プログラムをスタートしたい


「DNS 関連機能の設定」画面に移動する

今回、私の場合は以下のような若干複雑な構成にしたかったので

  • 独自ドメイン xxxxxx.com ← 別のレンタルサーバー
  • 独自ドメインのサブドメイン prog.xxxxxx.com ← さくらのVPS


【Python】メール受信をトリガーとして【さくらVPS】サーバー上の Python プログラムをスタートしたい


「DNS関連機能設定 – 機能一覧」画面に移動したら「DNSレコード設定を利用する」「設定する」ボタンをクリックします。

【Python】メール受信をトリガーとして【さくらVPS】サーバー上の Python プログラムをスタートしたい


下図のようにサブドメインに対して「さくらのVPS」のグローバルIPアドレスを入力して「追加」ボタンをクリックします。

【Python】メール受信をトリガーとして【さくらVPS】サーバー上の Python プログラムをスタートしたい


下図のように追加されていることを確認します。

【Python】メール受信をトリガーとして【さくらVPS】サーバー上の Python プログラムをスタートしたい


下の方にスクロールすると下図のように「確認画面へ進む」ボタンをあるのでクリックします。

【Python】メール受信をトリガーとして【さくらVPS】サーバー上の Python プログラムをスタートしたい


DNSレコード設定(確認)画面に移動したら、設定内容を確認して「設定する」ボタンをクリックします。

【Python】メール受信をトリガーとして【さくらVPS】サーバー上の Python プログラムをスタートしたい


「DNSレコード設定(完了)」画面が表示されることを確認します。

【Python】メール受信をトリガーとして【さくらVPS】サーバー上の Python プログラムをスタートしたい


名前解決の動作確認をする

設定が完了したら動作確認をします。

念のため Google のパブリック DNS(8.8.8.8)でも動作確認します。

[test@SAKURA_VPS ~]$ nslookup prog.xxxxxx.com
Server:         xxx.xxx.xxx.10
Address:        xxx.xxx.xxx.10#53

Non-authoritative answer:
Name:   prog.xxxxxx.com
Address: 1xx.xxx.xxx.xx5

[test@SAKURA_VPS ~]$ nslookup prog.xxxxxx.com 8.8.8.8 ← 念のため Google のパブリック DNS でも動作確認をします。
Server:         8.8.8.8
Address:        8.8.8.8#53

Non-authoritative answer:
Name:   prog.xxxxxx.com
Address: 1xx.xxx.xxx.xx5

[test@SAKURA_VPS ~]$


以上で問題ないことが確認できました。


【Linux】nslookup コマンド


Postfixをインストール&設定をする

今回は受信だけですが、内部でメール転送をするので Postfix が必要です。

しかし外部へはメールを送信しないため最低限の設定だけします。


Postfix をインストールする

Postfix をインストールします。

[root@SAKURA_VPS postfix]# yum install postfix


Mailbox と Maildir と mail_spool の違い

main.cfファイルの設定を調べると以下の3種類の設定があることに気が付きます。

  • Mailbox
  • Maildir
  • mail_spool


■home_mailbox = Mailbox

各ユーザホームディレクトリに「Mailbox」が作成されます。

メールを受信したら Mailbox に配送されます。

※最後に/(スラッシュ)が付かないと、ボックス形式になり、Mailbox というボックス名のファイルにメールが配送されます。

Mailbox は1つのファイルに多数のメールが格納されている形式です。

そのため多数のプロセスがアクセスする場合は、ロック・アンロックをきちんとする必要があります。

同時オープン、同時変更でメールボックスを壊す危険性があります。


■home_mailbox = Maildir/

Maildir/ ディレクトリが作成されます。

※最後に/(スラッシュ)が付くと、ディレクトリ名となり、そのディレクトリ配下にメールが配送されます。

なぜ Maildir ができたのかというと、Mailbox 形式(1つのファイル内にたくさんメールが入っている形式)の場合は、多数のプロセスがアクセスして変更した場合に不具合が発生する可能性があるからです。

そのため、1つのファイル内にたくさんのメールを格納するのではなく、Maildir ディレクト配下に1通ずつメールを置く形式にしました。


mail_spool

「home_mailbox = Mailbox」も「home_mailbox = Mailbox」もコメントアウトされた場合(以下のような場合)に、mail_spool の項目が有効になります。

#home_mailbox = Mailbox
#home_mailbox = Maildir/


Postfix の設定をする

/etc/postfix/main.cf ファイルを編集します。

[root@SAKURA_VPS postfix]# cd /etc/postfix
[root@SAKURA_VPS postfix]# vi main.cf


~ 省略 ~


# The mydomain parameter specifies the local internet domain name.
# The default is to use $myhostname minus the first component.
# $mydomain is used as a default value for many other configuration
# parameters.
#
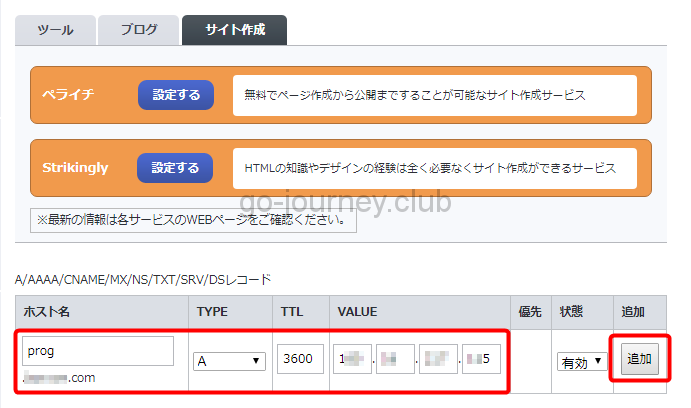
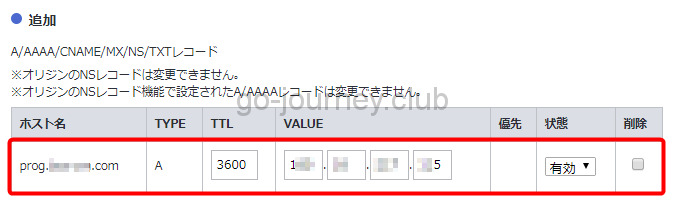
#mydomain = domain.tld
mydomain = prog.xxxxxx.com ← ここに自分のドメインを設定します。


~ 省略 ~


# RECEIVING MAIL

# The inet_interfaces parameter specifies the network interface
# addresses that this mail system receives mail on.  By default,
# the software claims all active interfaces on the machine. The
# parameter also controls delivery of mail to user@[ip.address].
#
# See also the proxy_interfaces parameter, for network addresses that
# are forwarded to us via a proxy or network address translator.
#
# Note: you need to stop/start Postfix when this parameter changes.
#
#inet_interfaces = all
#inet_interfaces = $myhostname
#inet_interfaces = $myhostname, localhost
#inet_interfaces = localhost ← 「inet_interfaces = localhost」をコメントアウトします。
inet_interfaces = all ← 追加します。


~ 省略 ~


# The mydestination parameter specifies the list of domains that this
# machine considers itself the final destination for.
#
# These domains are routed to the delivery agent specified with the
# local_transport parameter setting. By default, that is the UNIX
# compatible delivery agent that lookups all recipients in /etc/passwd
# and /etc/aliases or their equivalent.
#
# The default is $myhostname + localhost.$mydomain. On a mail domain
# gateway, you should also include $mydomain.
#
# Do not specify the names of virtual domains – those domains are
# specified elsewhere (see VIRTUAL_README).
#
# Do not specify the names of domains that this machine is backup MX
# host for. Specify those names via the relay_domains settings for
# the SMTP server, or use permit_mx_backup if you are lazy (see
# STANDARD_CONFIGURATION_README).
#
# The local machine is always the final destination for mail addressed
# to user@[the.net.work.address] of an interface that the mail system
# receives mail on (see the inet_interfaces parameter).
#
# Specify a list of host or domain names, /file/name or type:table
# patterns, separated by commas and/or whitespace. A /file/name
# pattern is replaced by its contents; a type:table is matched when
# a name matches a lookup key (the right-hand side is ignored).
# Continue long lines by starting the next line with whitespace.
#
# See also below, section “REJECTING MAIL FOR UNKNOWN LOCAL USERS”.
#

mydestination = $myhostname, localhost.$mydomain, localhost, $mydomain ← 「mydestination」に「$mydomain」を追加します。その結果、postfix は「prog.xxxxxx.com」を宛先(メール送信先)であると認識することができます。
#mydestination = $myhostname, localhost.$mydomain, localhost, $mydomain
#mydestination = $myhostname, localhost.$mydomain, localhost, $mydomain,
# mail.$mydomain, www.$mydomain, ftp.$mydomain


~ 省略 ~


# DELIVERY TO MAILBOX
#
# The home_mailbox parameter specifies the optional pathname of a
# mailbox file relative to a user’s home directory. The default
# mailbox file is /var/spool/mail/user or /var/mail/user. Specify
# “Maildir/” for qmail-style delivery (the / is required).
#
#home_mailbox = Mailbox
home_mailbox = Maildir/ ← 今回は Maildir 形式にします。

# The mail_spool_directory parameter specifies the directory where
# UNIX-style mailboxes are kept. The default setting depends on the
# system type.
#
#mail_spool_directory = /var/mail
#mail_spool_directory = /var/spool/mail


~ 省略 ~


allow_mail_to_commands = alias,forward,include ← 新規で1行追加します。


mydomain パラメータ

自分のドメイン名を設定します。

今回は、お名前.comで取得した独自ドメインのサブドメイン(prog.xxxxxx.com)でインターネットからアクセスできるように設定したので、「prog.xxxxxx.com」を設定します。


inet_interfaces パラメータ

メールを受け取るインターフェイスを指定します。

localhost」は localhost からしかメールを受け取りません。

「all」はすべてのインターフェイルからメールを受け取ります。


mydestination パラメータ

postfixは宛先(メールの送信先)にメールを送信しようとします。

その宛先はどこなのか、という設定を「mydestination」パラメータで設定します。

今回は、自身のサーバー(prog.xxxxxx.com)が最終的な宛先になるので、$mydomain(つまり、prog.xxxxxx.com)を設定します。


home_mailbox パラメータ

メールボックスの形式とパスを設定します。

上にも書きましたが、「Maildir/」と設定すると Maildir ディレクトリ配下に各メールが作成されます。


allow_mail_to_commands パラメータ

デフォルトでは「:include:」ファイルでの「”|command”」の実行は認められていません。(拒否されます)

そこで「/etc/aliases」で「:include:」でスクリプトを呼び出しているのであれば、 設定ファイルに

allow_mail_to_commands = alias,forward,include

を記載します。


メール受信サーバー(Dovecot)を構築する

メール受信サーバーは「Dovecot」を利用します。


Dovecotをインストールする

yum コマンドで dovecot をインストールします。

[root@SAKURA_VPS ~]# yum install dovecot


Dovecotの設定をする

Dovecot のインストールが完了したら最低限の設定だけします。

[root@SAKURA_VPS ~]# cd /etc/dovecot/conf.d/

[root@SAKURA_VPS conf.d]# vi 10-mail.conf

##
## Mailbox locations and namespaces
##

# Location for users’ mailboxes. The default is empty, which means that Dovecot
# tries to find the mailboxes automatically. This won’t work if the user
# doesn’t yet have any mail, so you should explicitly tell Dovecot the full
# location.
#
# If you’re using mbox, giving a path to the INBOX file (eg. /var/mail/%u)
# isn’t enough. You’ll also need to tell Dovecot where the other mailboxes are
# kept. This is called the “root mail directory”, and it must be the first
# path given in the mail_location setting.
#
# There are a few special variables you can use, eg.:
#
#   %u – username
#   %n – user part in user@domain, same as %u if there’s no domain
#   %d – domain part in user@domain, empty if there’s no domain
#   %h – home directory
#
# See doc/wiki/Variables.txt for full list. Some examples:
#
#   mail_location = maildir:~/Maildir
#   mail_location = mbox:~/mail:INBOX=/var/mail/%u
#   mail_location = mbox:/var/mail/%d/%1n/%n:INDEX=/var/indexes/%d/%1n/%n
#
# <doc/wiki/MailLocation.txt>
#
#mail_location =
mail_location = mailder:~/Maildir


Dovecot の自動起動設定と起動

設定が完了したら Dovecot の自動起動の設定と起動をします。

[root@SAKURA_VPS conf.d]# systemctl enable dovecot.service
Created symlink from /etc/systemd/system/multi-user.target.wants/dovecot.service to /usr/lib/systemd/system/dovecot.service.
[root@SAKURA_VPS conf.d]# systemctl start dovecot.service
[root@SAKURA_VPS conf.d]# systemctl status dovecot.service
● dovecot.service – Dovecot IMAP/POP3 email server
   Loaded: loaded (/usr/lib/systemd/system/dovecot.service; enabled; vendor preset: disabled)
   Active: active (running) since 日 2017-12-10 08:00:45 JST; 4s ago
  Process: 26673 ExecStartPre=/usr/libexec/dovecot/prestartscript (code=exited, status=0/SUCCESS)
 Main PID: 26683 (dovecot)
   CGroup: /system.slice/dovecot.service
           tq26683 /usr/sbin/dovecot -F
           tq26691 dovecot/anvil
           tq26692 dovecot/log
           mq26694 dovecot/config

12月 10 08:00:45 xxxx.vs.sakura.ne.jp systemd[1]: Starting Dovecot IMAP/POP3 email server…
12月 10 08:00:45 xxxx.vs.sakura.ne.jp systemd[1]: Started Dovecot IMAP/POP3 email server.
12月 10 08:00:45 xxxx.vs.sakura.ne.jp dovecot[26683]: master: Dovecot v2.2.10 starting up …)
Hint: Some lines were ellipsized, use -l to show in full.
[root@SAKURA_VPS conf.d]#


テストメールを送信する

mailコマンドでテストメールを送信します。

[root@SAKURA_VPS conf.d]# echo “これはテストメールです。” | mail -s “Dovecot設定テスト” root@prog.xxxxxx.com
メールが /var/spool/mail/root にあります ← メールコマンドを送信した瞬間にメッセージが表示されます。(遅れることもあります)
[root@SAKURA_VPS conf.d]#


/var/spool/mail/rootを確認します。

[root@SAKURA_VPS log]# less /var/spool/mail/root

Content-Description: Undelivered Message
Content-Type: message/rfc822
Content-Transfer-Encoding: 8bit

Return-Path: <root@xxxxxxxxxxxx.vs.sakura.ne.jp>
Received: by xxxxxxxxxxxx.vs.sakura.ne.jp (Postfix, from userid 0)
        id 0F8931F225E4; Sun, 10 Dec 2017 08:24:01 +0900 (JST)
Date: Sun, 10 Dec 2017 08:24:01 +0900
To: root@prog.xxxxxx.com
Subject: =?utf-8?B?RG92ZWNvdOioreWumuODhuOCueODiA==?= ← タイトルが文字化けしています。
User-Agent: Heirloom mailx 12.5 7/5/10
MIME-Version: 1.0
Content-Type: text/plain; charset=utf-8
Content-Transfer-Encoding: 8bit
Message-Id: <20171209232401.0F8931F225E4@xxxxxxxxxxxx.vs.sakura.ne.jp>
From: root@xxxxxxxxxxxx.vs.sakura.ne.jp (root)

これはテストメールです。 ← しかし本文は文字化けしていません。

–0F8931F225E4.1512861841/xxxxxxxxxxxx.vs.sakura.ne.jp–


■Gmailから「root@prog.xxxxxx.com」へメールを送信した場合

/var/spool/mail/root ファイル

From xxxxxxxxx@gmail.com  Sun Dec 10 10:18:56 2017
Return-Path: <xxxxxxxxx@gmail.com>
X-Original-To: root@prog.xxxxxx.com
Delivered-To: root@prog.xxxxxx.com
Received: from mail-it0-f48.google.com (mail-it0-f48.google.com [209.85.214.48])
        by xxxxxxxxxx.vs.sakura.ne.jp (Postfix) with ESMTP id 26D9B1F225E4
        for <root@prog.xxxxxx.com>; Sun, 10 Dec 2017 10:18:56 +0900 (JST)
Received: by mail-it0-f48.google.com with SMTP id f190so9570012ita.5
        for <root@prog.xxxxxx.com>; Sat, 09 Dec 2017 17:18:56 -0800 (PST)
DKIM-Signature: v=1; a=rsa-sha256; c=relaxed/relaxed;
        d=gmail.com; s=20161025;
        h=mime-version:from:date:message-id:subject:to;
        bh=d629STY1j5GlbWE/551tWrhT+h1apa/aW+5XBvZ5sNU=;
        b=ZzuoXNuaa4VGESyJkfJcHpkxf1php5gY+0rxmMuDzsc9rhK5RRtr1aYaB/8YE9sKvq
         yuXWG6ZN+kjQ6HlauS2m7REXqBtp0Q8+LSN0DqjYAzd9ZK3ONbHdqx7xlmAEECD92iog
         dhaMx3IXpPxBw0KcM00MgU80aBr0F8D0U892ZoBfuJMSNrqSHpsHoWmrhhw3gdyjoPAP
         aC+ak/TI4r/if9oEV/RRZmBe6VZvJd5Al7U+UegzhY6RsZtM2h8Ow3vvL6oKW8cpkMQj
         X/2OpHKUhX669b4ZaH9bhlfwm2SSNV/Mmxl3DM1umzYDMxhXDs8o4XOpITQbz0iIzJqv
         TWfA==
X-Google-DKIM-Signature: v=1; a=rsa-sha256; c=relaxed/relaxed;
        d=1e100.net; s=20161025;
        h=x-gm-message-state:mime-version:from:date:message-id:subject:to;
        bh=d629STY1j5GlbWE/551tWrhT+h1apa/aW+5XBvZ5sNU=;
        b=M5wPb4XCrRpab2cn1t+siQXPnZD7XgwIpqdVGC5xkpRso2sPDiLfwnwfq/cjM4aoCe
         xBPs/iowuLUkqwXTT11hpuu6qh+T0n2GAS2IJU3spSzS0pFnytIvUPp4PV/5ySjnso0N
         dPum5S0rsL/TIze6/Fwn1oVcejcAitlbOxO505m3HAhVGT9GA4FrmpzytdnbjmjrpBBy
         oexfCMTfekBils+shpqwb05OQ1cP36bMyXCF/ViV69hCWgnuGFJzkT0DUPBka+ZoORPx
         ++Lpuh8PFXBAk258Uhu9M17mFpr4P42bSMc+oHPpfQWistbGIHKvwXEsA7o4kIQFJpKS
         bl5g==
X-Gm-Message-State: AKGB3mK5w4FB+HrahGHvR6JtERE42naBeQB054wgpCCEsJSmVj2bIMCD
        7EK81zVWG0OJL2DHcdlNrIfizB4HhAR1i+aLe9o=
X-Google-Smtp-Source: AGs4zMZPWsQxSkT8zHqHmksrHytN5j00F8+7TdhU+BBeleZ0Om/FcpnjSTFc/9ZaW8TKx3C+79oksLbbE1dHlfm0TKs=
X-Received: by 10.36.176.9 with SMTP id d9mr12763946itf.125.1512868735336;
 Sat, 09 Dec 2017 17:18:55 -0800 (PST)
MIME-Version: 1.0
Received: by 10.79.174.86 with HTTP; Sat, 9 Dec 2017 17:18:54 -0800 (PST)
From: xxx <xxxxxxxxx@gmail.com>
Date: Sun, 10 Dec 2017 10:18:54 +0900
Message-ID: <CADRkdyCwDLQv9n69cmOzzFfVk0qxDNbD3pcSbXdKDzUK=QW_bw@mail.gmail.com>
Subject: test mail title
To: root@prog.xxxxxx.com
Content-Type: multipart/alternative; boundary=”089e082319208fdb3c055ff233fd”

–089e082319208fdb3c055ff233fd
Content-Type: text/plain; charset=”UTF-8″

test mail body

–089e082319208fdb3c055ff233fd
Content-Type: text/html; charset=”UTF-8″

<div dir=”auto”>test mail body

–089e082319208fdb3c055ff233fd–


■/var/log/maillog の中身 

Dec 10 10:02:44 xxxxxxxxxx postfix/smtpd[29262]: connect from mail-io0-f195.google.com[209.85.223.195]
Dec 10 10:02:44 xxxxxxxxxx postfix/smtpd[29262]: 586E21F225E4: client=mail-io0-f195.google.com[209.85.223.195]
Dec 10 10:02:44 xxxxxxxxxx postfix/cleanup[29266]: 586E21F225E4: message-id=<CADRkdyA5rY6yxQX1SpJ7oFLwCrfE6vM1YyUrgHkwFgAs6yNPYQ@mail.gmail.com>
Dec 10 10:02:44 xxxxxxxxxx postfix/qmgr[28971]: 586E21F225E4: from=<xxxxxxxxx@gmail.com>, size=3571, nrcpt=1 (queue active)
Dec 10 10:02:44 xxxxxxxxxx postfix/local[29267]: 586E21F225E4: to=<root@prog.xxxxxx.com>, relay=local, delay=0.31, delays=0.3/0.01/0/0, dsn=2.0.0, status=sent (delivered to mailbox)
Dec 10 10:02:44 xxxxxxxxxx postfix/qmgr[28971]: 586E21F225E4: removed
Dec 10 10:02:44 xxxxxxxxxx postfix/smtpd[29262]: disconnect from mail-io0-f195.google.com[209.85.223.195]


エラーになった場合のチェック

メールサーバー周りの設定、メール送受信はなかなか一発でうまくはいきません。

そんな時に以下の点をチェックしてみてください。

「Gmaiからメール送信」 → 「さくらのVPSサーバーのDovecotで受信」だけなら、単純な構成なので確実にうまくいきます。


Gmailからメールを送信しても「Relay access denied」が出力される

以下のようなログです。

Gmailからのメールはサーバー側に確実に届いているのに「Relay access denied」が表示される場合です。

Dec 10 09:25:43 xxxxxxxxxxxxx postfix/smtpd[28626]: connect from mail-io0-f174.google.com[209.85.223.174]
Dec 10 09:25:43 xxxxxxxxxxxxx postfix/smtpd[28626]: NOQUEUE: reject: RCPT from mail-io0-f174.google.com[209.85.223.174]: 454 4.7.1 <root@prog.xxxxxx.com>: Relay access denied; from=<xxxxxxxxx@gmail.com> to=<root@prog.xxxxxx.com> proto=ESMTP helo=<mail-io0-f174.google.com>
Dec 10 09:25:44 xxxxxxxxxxxxx postfix/smtpd[28626]: disconnect from mail-io0-f174.google.com[209.85.223.174]


「Relay access denied;」ということは、デスティネーション(宛先)がないため、Postfix が転送しようとして失敗しています。

この場合は、

  • mydomain ← このサーバーのドメイン名(DNS名、FQDN)。今回の場合は「prog.xxxxxx.com」。 
  • mydestination ← 最終的な宛先。今回の場合は「prog.xxxxxx.com」。

の設定が必要です。


「/etc/aliases」でメールを受信したタイミングでトリガーを発動し、Python プログラムをキックする

ここから /etc/aliases を利用して、「root@prog.xxxxxx.com」へのメール受信をトリガーに Python プログラムを起動する設定をします。

簡単な Python プログラムを作成する

/home/test ディレクトリにシェルスクリプト test.sh を作成し、シェルから test.py プログラムを実行する形式にします。

理由は、将来的にシェルスクリプトの中で「環境変数」や「パス」や「ログ」などを管理したかったからです。


プログラムの内容は単純に現在時刻を取得して、現在時刻のファイル名でカレントディレクトリに出力するプログラムです。


■test.sh

[test@SAKURA_VPS ~]$ pwd
/home/test
[test@SAKURA_VPS ~]$ cat test.sh
#!/bin/sh


/bin/python3.6 /home/test/test.py ← とりあえず、Python プログラムを実行するだけの簡単な内容です。
[test@SAKURA_VPS ~]$


■test.py

[test@SAKURA_VPS ~]$ pwd
/home/test

[test@SAKURA_VPS ~]$ cat test.py
# -*- coding: utf-8 -*-
from datetime import datetime

# 現在時刻を取得する
current_time = datetime.now().strftime(“%Y-%m-%d_%H:%M:%S”)
print(current_time)

# /home/testディレクトリに現在時刻のファイルを作成する
f = open(‘/home/test/’ + current_time, ‘w’)
f.write(‘test’)
f.close()

[test@SAKURA_VPS ~]$


実行するとカレントディレクトリに現在時刻のファイル名でファイルが作成されます。

[test@SAKURA_VPS ~]$ python test.py
2017-12-10_15:18:35
[test@SAKURA_VPS ~]$ ls -l 2017*
-rw——- 1 nobody nobody 4 12月 10 15:07 2017-12-10_15:07:36
-rw-rw-r– 1 test   test   4 12月 10 15:18 2017-12-10_15:18:35 ← プログラム実行時の時刻のファイル名ができています。
[test@SAKURA_VPS ~]$

[test@SAKURA_VPS ~]$ cat 2017-12-10_15:18:35
test[test@SAKURA_VPS ~]$


プログラム(シェルスクリプト)に実行権限を与える

/etc/aliases からプログラム(シェルスクリプト)が実行できるようにファイルに実行権限を与えます。

[test@SAKURA_VPS ~]$ chmod +x test.sh ← 今回は Python プログラムを直接起動せずにシェルスクリプトから起動するので、シェルスクリプトの方に実行権限を与えています。
[test@SAKURA_VPS ~]$ ls -l test.sh
-rwxr-xr-x 1 test test 45 12月 10 14:27 test.sh
[test@SAKURA_VPS ~]$


/home/test/aliases ファイルを作成する

この後編集しますが、今回は「/etc/aliases」「:include:」で起動プログラムを設定する予定です。

そのため、あらかじめ「:include:」でインクルードする(取り込む)ファイル(/home/test/aliases)を作成しておきます。

※ファイル名は何でもいいです。私の場合は後程忘れないように「aliases」というファイル名で作成しています。

[test@SAKURA_VPS ~]$ pwd
/home/test
[test@SAKURA_VPS ~]$ cat aliases
“| /home/test/test.sh”
[test@SAKURA_VPS ~]$


/etc/aliases ファイルを編集する

以下のように test 宛(test@prog.xxxxx.com 宛)にメールが届いたら「/home/test/aliases」をインクルードするように設定をします。

[root@SAKURA_VPS etc]# vi /etc/aliases


~ 省略 ~


test: :include: /home/test/aliases


■メールを受信して且つプログラムも実行する場合

以下の例ですが、test@prog.xxxx.com宛のメールを受信すると、/home/test/Maildir/ ディレクトリ配下にメールが受信され、且つプログラムも実行することができます。

[root@SAKURA_VPS etc]# vi /etc/aliases


~ 省略 ~


test: \test,:include: /home/test/aliases


■ログの内容

2つを同時に実行すると /var/log/maillog ファイルには以下のようなログが出力されます。

delivered to maildir

delivered to command:

の2行が出力されます。

zpMJs3JGcyiFVLga-j6KYoA@mail.gmail.com>
Dec 14 22:24:32 localhost postfix/qmgr[26021]: AF4121E7295D: from=<xxxxxx@gmail.com>, size=2344, nrcpt=1 (queue active)
Dec 14 22:24:32 localhost postfix/local[26389]: AF4121E7295D: to=<test@xxxx.vs.sakura.ne.jp>, orig_to=<test@prog.xxxx.com>, relay=local, delay=0.19, delays=0.18/0.01/0/0, dsn=2.0.0, status=sent (delivered to maildir)
Dec 14 22:24:32 localhost postfix/local[26389]: AF4121E7295D: to=<test@prog.xxxx.com>, relay=local, delay=0.24, delays=0.18/0.01/0/0.05, dsn=2.0.0, status=sent (delivered to command: /home/test/test.sh)
Dec 14 22:24:32 localhost postfix/qmgr[26021]: AF4121E7295D: removed


※失敗例

以下のように記述すると失敗します。

test: test
test:  :include: /home/test/aliases

理由はtestアカウントの設定が2行になっています。

2行になっている場合は、上の行が実行されて、次の行(test:  :include: /home/test/aliases)は実行されません。


/etc/aliasesファイルを編集したら反映させます。

[root@SAKURA_VPS etc]# newaliases


Postfixを再起動します。

[root@SAKURA_VPS etc]# systemctl restart postfix.service
[root@SAKURA_VPS etc]#


動作確認をする

プログラムの実行に成功すると「/var/log/maillog」に以下のようなログが出力されます。

/var/log/maillog ファイルの内容

Dec 10 14:59:04 xxxxxx postfix/smtpd[3901]: connect from mail-qk0-f182.google.com[209.85.220.182]
Dec 10 14:59:04 xxxxxx postfix/smtpd[3901]: 583F51C65A47: client=mail-qk0-f182.google.com[209.85.220.182]
Dec 10 14:59:04 xxxxxx postfix/cleanup[3905]: 583F51C65A47: message-id=<CAOw3vJTfo6-_PMD5cBAm01huJ8TXCSkno-n8_L7bzQfnAcWziA@mail.gmail.com>
Dec 10 14:59:04 xxxxxx postfix/qmgr[3896]: 583F51C65A47: from=<xxxxxx@gmail.com>, size=2331, nrcpt=1 (queue active)
Dec 10 14:59:04 xxxxxx postfix/local[3906]: 583F51C65A47: to=<test@prog.xxxxxx.com>, relay=local, delay=0.43, delays=0.36/0.01/0/0.06, dsn=2.0.0, status=sent (delivered to command:  /home/test/test.sh) ← delivered to command が表示されていれば成功しています。
Dec 10 14:59:04 xxxxxx postfix/qmgr[3896]: 583F51C65A47: removed
Dec 10 14:59:04 xxxxxx postfix/smtpd[3901]: disconnect from mail-qk0-f182.google.com[209.85.220.182]


postfixにとっては、メールもコマンドも「配送」しているということです。


■Python プログラムから生成されたファイル

[root@SAKURA_VPS test]# ls -l /home/test/2017*
-rw——- 1 nobody nobody 4 12月 10 15:07 /home/test/2017-12-10_15:07:36 ← ファイルが作成されています。所有者は「nobody:nobody」になっています。

[root@SAKURA_VPS test]# cat 2017-12-10_15:07:36
test[root@SAKURA_VPS test]#


これで一連のシステムがうまく動作していることが確認できました。


エラーになった場合の対処

エラーになった場合の対処方法です。


ファイル&ディレクトリのパーミッションを確認する

メール受信までできて、うまくいかない場合は「権限(パーミッション)」に問題がある可能性が高いです。

さらにややこしいことに、実行しているのが一般アカウントではなく「nobody」「nogroup」アカウントが実行しているようです。

[root@SAKURA_VPS test_python]# tail -f /var/log/maillog
Dec 10 11:09:47 xxxxxxxxxx postfix/smtpd[30654]: A975A1F225E4: client=mail-it0-f54.google.com[209.85.214.54]
Dec 10 11:09:47 xxxxxxxxxx postfix/cleanup[30671]: A975A1F225E4: message-id=<CADRkdyAUkjDwQgvo5SiMN6UqA0x99f-zxzx8OjVsMwL1nuGT+A@mail.gmail.com>
Dec 10 11:09:47 xxxxxxxxxx postfix/qmgr[30633]: A975A1F225E4: from=<xxxxxxxx@gmail.com>, size=2642, nrcpt=1 (queue active)
Dec 10 11:09:48 xxxxxxxxxx local[30673]: fatal: execvp /root/test_python/test.py: Permission denied
Dec 10 11:09:48 xxxxxxxxxx postfix/local[30672]: A975A1F225E4: to=<root@prog.xxxxxx.com>, relay=local, delay=0.34, delays=0.31/0.01/0/0.02, dsn=4.3.0, status=deferred (temporary failure. Command output: local: fatal: execvp /root/test_python/test.py: Permission denied )
Dec 10 11:09:48 xxxxxxxxxx postfix/smtpd[30654]: disconnect from mail-it0-f54.google.com[209.85.214.54]
Dec 10 11:11:35 xxxxxxxxxx postfix/postfix-script[30740]: stopping the Postfix mail system
Dec 10 11:11:35 xxxxxxxxxx postfix/master[30631]: terminating on signal 15
Dec 10 11:11:36 xxxxxxxxxx postfix/postfix-script[30818]: starting the Postfix mail system
Dec 10 11:11:36 xxxxxxxxxx postfix/master[30820]: daemon started — version 2.10.1, configuration /etc/postfix


■解決策

  • 実行権限を見直す。
  • rootアカウントでのプログラム起動をやめる。


プログラムがうまく動かない(syntax error

  • サーバー上でコマンド実行 ← うまくいく
  • /etc/aliasesからコマンド実行 ← シンタックスエラーになる


ログを見ると実行されているように見えます。

Dec 10 11:25:37 xxxxxxxx postfix/smtpd[31122]: connect from mail-io0-f175.google.com[209.85.223.175]
Dec 10 11:25:38 xxxxxxxx postfix/smtpd[31122]: 400E51F225E7: client=mail-io0-f175.google.com[209.85.223.175]
Dec 10 11:25:38 xxxxxxxx postfix/cleanup[31126]: 400E51F225E7: message-id=<CADRkdyDzx=uRKwc-Eh85+bzKh3k7s-sVqe-PY1wmLKCP+d8Zqg@mail.gmail.com>
Dec 10 11:25:38 xxxxxxxx postfix/qmgr[31072]: 400E51F225E7: from=<xxxxxx@gmail.com>, size=3409, nrcpt=1 (queue active)
Dec 10 11:25:38 xxxxxxxx postfix/local[31127]: 400E51F225E7: to=<root@prog.xxxxxx.com>, relay=local, delay=0.32, delays=0.3/0.01/0/0.01, dsn=5.3.0, status=bounced (Command died with status 2: ” /tmp/test.py”. Command output: /tmp/test.py: line 2: from: command not found /tmp/test.py: line 5: syntax error near unexpected token `(‘ /tmp/test.py: line 5: `current_time = datetime.now().strftime(“%Y___%m___%d___%H:%M:%S”)’ )
Dec 10 11:25:38 xxxxxxxx postfix/cleanup[31126]: 8BF6B1F225E8: message-id=<20171210022538.8BF6B1F225E8@xxxxxxxx.vs.sakura.ne.jp>
Dec 10 11:25:38 xxxxxxxx postfix/qmgr[31072]: 8BF6B1F225E8: from=<>, size=5764, nrcpt=1 (queue active)
Dec 10 11:25:38 xxxxxxxx postfix/bounce[31130]: 400E51F225E7: sender non-delivery notification: 8BF6B1F225E8
Dec 10 11:25:38 xxxxxxxx postfix/qmgr[31072]: 400E51F225E7: removed
Dec 10 11:25:38 xxxxxxxx postfix/smtpd[31122]: disconnect from mail-io0-f175.google.com[209.85.223.175]
Dec 10 11:25:39 xxxxxxxx postfix/smtp[31131]: 8BF6B1F225E8: to=<xxxxxx@gmail.com>, relay=gmail-smtp-in.l.google.com[74.125.204.26]:25, delay=1.2, delays=0/0.01/0.56/0.67, dsn=2.0.0, status=sent (250 2.0.0 OK 1512872739 3si7776356pll.350 – gsmtp)
Dec 10 11:25:39 xxxxxxxx postfix/qmgr[31072]: 8BF6B1F225E8: removed
Dec 10 11:27:12 xxxxxxxx postfix/qmgr[31072]: A975A1F225E4: from=<xxxxxx@gmail.com>, size=2642, nrcpt=1 (queue active)


■解決策

  • フルパスになっているか確認する。
  • /etc/aliases ファイルの設定を「include」に変更する。


 プログラムがうまく動かない「mail to command is restricted

一見するとエラーはないように見えますが、「mail to command is restricted」が表示されています。

プログラムも実行されていません。

Dec 10 11:52:13 xxxxxx postfix/smtpd[31689]: connect from mail-it0-f43.google.com[209.85.214.43]
Dec 10 11:52:13 xxxxxx postfix/smtpd[31689]: 953BB1F225E4: client=mail-it0-f43.google.com[209.85.214.43]
Dec 10 11:52:13 xxxxxx postfix/cleanup[31693]: 953BB1F225E4: message-id=<CADRkdyAWmHiw3Z3Nvp=8qrPv-94-P7s8TJ2x36OL+vHVhnW7fA@mail.gmail.com>
Dec 10 11:52:13 xxxxxx postfix/qmgr[31622]: 953BB1F225E4: from=<xxxxxx@gmail.com>, size=3406, nrcpt=1 (queue active)
Dec 10 11:52:13 xxxxxx postfix/local[31694]: 953BB1F225E4: to=<root@prog.xxxxxx.com>, relay=local, delay=0.16, delays=0.14/0.01/0/0.01, dsn=5.7.1, status=bounced (mail to command is restricted)
Dec 10 11:52:13 xxxxxx postfix/cleanup[31693]: B9FEB1F225E6: message-id=<20171210025213.B9FEB1F225E6@xxxxxx.vs.sakura.ne.jp>
Dec 10 11:52:13 xxxxxx postfix/qmgr[31622]: B9FEB1F225E6: from=<>, size=5344, nrcpt=1 (queue active)
Dec 10 11:52:13 xxxxxx postfix/bounce[31695]: 953BB1F225E4: sender non-delivery notification: B9FEB1F225E6
Dec 10 11:52:13 xxxxxx postfix/qmgr[31622]: 953BB1F225E4: removed
Dec 10 11:52:13 xxxxxx postfix/smtpd[31689]: disconnect from mail-it0-f43.google.com[209.85.214.43]
Dec 10 11:52:14 xxxxxx postfix/smtp[31696]: B9FEB1F225E6: to=<xxxxxx@gmail.com>, relay=gmail-smtp-in.l.google.com[74.125.204.26]:25, delay=0.82, delays=0/0.01/0.35/0.46, dsn=2.0.0, status=sent (250 2.0.0 OK 1512874334 o1si7891795pld.226 – gsmtp)
Dec 10 11:52:14 xxxxxx postfix/qmgr[31622]: B9FEB1F225E6: removed


■解決策

Postfix の設定ファイル「/etc/postfix/main.cf」

  • allow_mail_to_commands = alias,forward,include
  • allow_mail_to_files    = alias,forward,include(プログラムに寄りますが必要に応じて)

の行を追加する。


そもそも Python プログラムを実行しようとしてもうまく動かない

■解決策

その場合は、シェルをかましてシェル経由で Python プログラムが起動するか試してみます。


どうしても Permission denied になりプログラムが動かない

■解決策

もし root アカウントで実行しようとしているなら /etc/aliases ファイルで、root アカウントでプログラムを起動するのではなく、一般アカウントに切り替えて試してください。

#root: “| /tmp/test.py” ← root アカウントでプログラムを実行するのは、セキュリティ的に無理が出てきます。
#root: :include: /root/aliases ← root アカウントでプログラムを実行するのは、セキュリティ的に無理が出てきます。
test: :include: /home/test/aliases ← 一般アカウントで実行して必要なら sudo で root アカウントになる方が確実です。


参考にしたサイト

日本のPostfixの公式サイト

http://www.postfix-jp.info/origdocs/QandA.html#3.1


Postfix main.cf ファイルフォーマット

http://www.postfix-jp.info/trans-2.1/jhtml/postconf.5.html


よかったらシェアしてね!
  • URLをコピーしました!
  • URLをコピーしました!

この記事を書いた人

コメント

コメント一覧 (1件)

コメントする

AlphaOmega Captcha Medica  –  What Do You See?


このサイトはスパムを低減するために Akismet を使っています。コメントデータの処理方法の詳細はこちらをご覧ください