【AWS】AWS SDK for Python (Boto3) で CloudWatch のメトリクスを取得する手順

AWS SDK for Python (Boto3) で CloudWatch のメトリクスを取得する手順について解説します。

日常的に業務で AWS でインフラを運用管理している私としては GUI でボタンをクリックして設定していくスタイルから徐々に CUI またはプログラムでの運用管理に移行したいと考えています。


また Python はインターネットで調べると他の言語に比べて情報が多いというところと、コンパイル型ではなく敷居が低いという点から選択しています。


AWS SDK for Ruby で CloudWatch メトリクスを取得する手順については以下の記事を参考にしてください。


【AWS】AWS SDK for Ruby (3.0.1) で CloudWatch のメトリクスを取得する手順


Python で CloudWatch メトリクスを取得したいと思った理由

コマンドラインやプログラムで CloudWatch のメトリクスを取得したいと思った理由としては、以下の記事のように Zabbix とも連携できてよりレベルの高い運用保守ができるのではと考えたからです。


ZabbixでAWS/CloudWatchの値を取得してみた

https://dev.classmethod.jp/articles/zabbix-with-cloudwatch/


Python プログラムは以下の記事を参考にしました。

boto3(AWS SDK for Python)でCloudWatchからメトリクスを取得する【cloudpack 大阪 BLOG】

https://cloudfish.hatenablog.com/entry/2015/11/01/122309


CentOS8 に Python 3.8 をインストールする

始めに CentOS8 に Python 3.8 をインストールしました。


■OS は CentOS8.3

[root@test01 ~]# cat /etc/redhat-release 
CentOS Linux release 8.3.2011 
[root@test01 ~]# 


■Python のインストール

CentOS8 ではパッケージをインストールする場合は、yum コマンドを使用せずに dnf コマンドを利用します。

dnf コマンドは yum とコマンドの構文はほぼ同じで dnf install ●● でインストールできます。

dnf install python38 で pip3.8 も一緒にインストールされます。

[root@test01 ~]# dnf install python38 
Last metadata expiration check: 0:36:08 ago on Sat 13 Feb 2021 09:49:32 AM JST. 
Dependencies resolved. 
================================================================================================================= 
 Package                         Architecture Version                                      Repository       Size 
================================================================================================================= 
Installing: 
 python38                        x86_64       3.8.3-3.module_el8.3.0+468+0c52a667          appstream        78 k 
Installing dependencies: 
 python38-libs                   x86_64       3.8.3-3.module_el8.3.0+468+0c52a667          appstream       8.3 M 
 python38-pip-wheel              noarch       19.3.1-1.module_el8.3.0+441+3b561464         appstream       1.2 M 
 python38-setuptools-wheel       noarch       41.6.0-4.module_el8.3.0+441+3b561464         appstream       304 k 
Installing weak dependencies: 
 python38-pip                    noarch       19.3.1-1.module_el8.3.0+441+3b561464         appstream       1.9 M 
 python38-setuptools             noarch       41.6.0-4.module_el8.3.0+441+3b561464         appstream       667 k 
Enabling module streams: 
 python38                                     3.8 
 
Transaction Summary 
================================================================================================================= 
Install  6 Packages 
 
Total download size: 12 M 
Installed size: 45 M 
Is this ok [y/N]: 
Downloading Packages: 
(1/6): python38-pip-19.3.1-1.module_el8.3.0+441+3b561464.noarch.rpm              5.8 MB/s | 1.9 MB     00:00 
(2/6): python38-3.8.3-3.module_el8.3.0+468+0c52a667.x86_64.rpm                   241 kB/s |  78 kB     00:00 
(3/6): python38-setuptools-41.6.0-4.module_el8.3.0+441+3b561464.noarch.rpm       816 kB/s | 667 kB     00:00 
(4/6): python38-pip-wheel-19.3.1-1.module_el8.3.0+441+3b561464.noarch.rpm        1.3 MB/s | 1.2 MB     00:00 
(5/6): python38-libs-3.8.3-3.module_el8.3.0+468+0c52a667.x86_64.rpm              5.5 MB/s | 8.3 MB     00:01 
(6/6): python38-setuptools-wheel-41.6.0-4.module_el8.3.0+441+3b561464.noarch.rpm 604 kB/s | 304 kB     00:00 
—————————————————————————————————————– 
Total                                                                            6.3 MB/s |  12 MB     00:01 
Running transaction check 
Transaction check succeeded. 
Running transaction test 
Transaction test succeeded. 
Running transaction 
  Preparing        :                                                                                         1/1 
  Installing       : python38-setuptools-wheel-41.6.0-4.module_el8.3.0+441+3b561464.noarch                   1/6 
  Installing       : python38-pip-wheel-19.3.1-1.module_el8.3.0+441+3b561464.noarch                          2/6 
  Installing       : python38-libs-3.8.3-3.module_el8.3.0+468+0c52a667.x86_64                                3/6 
  Installing       : python38-3.8.3-3.module_el8.3.0+468+0c52a667.x86_64                                     4/6 
  Running scriptlet: python38-3.8.3-3.module_el8.3.0+468+0c52a667.x86_64                                     4/6 
  Installing       : python38-setuptools-41.6.0-4.module_el8.3.0+441+3b561464.noarch                         5/6 
  Running scriptlet: python38-setuptools-41.6.0-4.module_el8.3.0+441+3b561464.noarch                         5/6 
  Installing       : python38-pip-19.3.1-1.module_el8.3.0+441+3b561464.noarch                                6/6 
  Running scriptlet: python38-pip-19.3.1-1.module_el8.3.0+441+3b561464.noarch                                6/6 
  Verifying        : python38-3.8.3-3.module_el8.3.0+468+0c52a667.x86_64                                     1/6 
  Verifying        : python38-libs-3.8.3-3.module_el8.3.0+468+0c52a667.x86_64                                2/6 
  Verifying        : python38-pip-19.3.1-1.module_el8.3.0+441+3b561464.noarch                                3/6 
  Verifying        : python38-pip-wheel-19.3.1-1.module_el8.3.0+441+3b561464.noarch                          4/6 
  Verifying        : python38-setuptools-41.6.0-4.module_el8.3.0+441+3b561464.noarch                         5/6 
  Verifying        : python38-setuptools-wheel-41.6.0-4.module_el8.3.0+441+3b561464.noarch                   6/6 
 
Installed: 
  python38-3.8.3-3.module_el8.3.0+468+0c52a667.x86_64 
  python38-libs-3.8.3-3.module_el8.3.0+468+0c52a667.x86_64 
  python38-pip-19.3.1-1.module_el8.3.0+441+3b561464.noarch 
  python38-pip-wheel-19.3.1-1.module_el8.3.0+441+3b561464.noarch 
  python38-setuptools-41.6.0-4.module_el8.3.0+441+3b561464.noarch 
  python38-setuptools-wheel-41.6.0-4.module_el8.3.0+441+3b561464.noarch 
 
Complete! 
[root@test01 ~]# 


■Ruby のバージョン確認

[root@test01 ~]# python3.8 –version
Python 3.8.3
[root@test01 ~]# 


■pip のバージョン確認

[root@test01 ~]# pip3.8 –version
pip 19.3.1 from /usr/lib/python3.8/site-packages/pip (python 3.8)
[root@test01 ~]# 


AWS SDK for Python(boto3)のインストール 

Python と pip コマンドをインストールしたら AWS SDK for Python(boto3)をインストールします。


■AWS SDK for Python(boto3) のインストール

AWS SDK for Python(boto3)は、pip コマンドでインストールできます。

[root@test01 ~]# pip3.8 install boto3 
WARNING: Running pip install with root privileges is generally not a good idea. Try `pip3.8 install –user` instead. 
Collecting boto3 
  Downloading https://files.pythonhosted.org/packages/96/f6/33474285546aedb5d06b3a4225e361e8956ca23764124f368903cf97ff31/boto3-1.17.7.tar.gz (100kB) 
     |????????????????????????????????| 102kB 11.0MB/s 
Collecting botocore<1.21.0,>=1.20.7 
  Downloading https://files.pythonhosted.org/packages/51/c3/af73e35f97ebbe0f4609bc2433ca06421305cc1eedef1009bd14354fb3af/botocore-1.20.7-py2.py3-none-any.whl (7.2MB) 
     |????????????????????????????????| 7.2MB 11.1MB/s 
Collecting jmespath<1.0.0,>=0.7.1 
  Downloading https://files.pythonhosted.org/packages/07/cb/5f001272b6faeb23c1c9e0acc04d48eaaf5c862c17709d20e3469c6e0139/jmespath-0.10.0-py2.py3-none-any.whl 
Collecting s3transfer<0.4.0,>=0.3.0 
  Downloading https://files.pythonhosted.org/packages/ea/43/4b4a1b26eb03a429a4c37ca7fdf369d938bd60018fc194e94b8379b0c77c/s3transfer-0.3.4-py2.py3-none-any.whl (69kB) 
     |????????????????????????????????| 71kB 17.7MB/s 
Collecting urllib3<1.27,>=1.25.4 
  Downloading https://files.pythonhosted.org/packages/23/fc/8a49991f7905261f9ca9df5aa9b58363c3c821ce3e7f671895442b7100f2/urllib3-1.26.3-py2.py3-none-any.whl (137kB) 
     |????????????????????????????????| 143kB 47.4MB/s 
Collecting python-dateutil<3.0.0,>=2.1 
  Downloading https://files.pythonhosted.org/packages/d4/70/d60450c3dd48ef87586924207ae8907090de0b306af2bce5d134d78615cb/python_dateutil-2.8.1-py2.py3-none-any.whl (227kB) 
     |????????????????????????????????| 235kB 42.8MB/s 
Collecting six>=1.5 
  Downloading https://files.pythonhosted.org/packages/ee/ff/48bde5c0f013094d729fe4b0316ba2a24774b3ff1c52d924a8a4cb04078a/six-1.15.0-py2.py3-none-any.whl 
Installing collected packages: urllib3, six, python-dateutil, jmespath, botocore, s3transfer, boto3 
    Running setup.py install for boto3 … done 
Successfully installed boto3-1.17.7 botocore-1.20.7 jmespath-0.10.0 python-dateutil-2.8.1 s3transfer-0.3.4 six-1.15.0 urllib3-1.26.3 
[root@test01 ~]# 


AWS SDK for Python の動作確認

AWS SDK for Python の動作確認をします。


■AWS SDK for Python の動作確認

[root@test01 ~]# python3.8 
Python 3.8.3 (default, Aug 31 2020, 16:03:14) 
[GCC 8.3.1 20191121 (Red Hat 8.3.1-5)] on linux 
Type “help”, “copyright”, “credits” or “license” for more information. 
>>> import boto3 ← import boto3 で Enter を押下します。 
>>> ← エラーが出なければ正しくインストール出来ています。


AWS CLI のインストールする

動作確認等で必要になるかもしれないので AWS CLI もインストールしておきます。


■AWS CLI のインストール

AWS CLI も pip コマンドでインストールできます。

[root@test01 ~]# pip3.8 install awscli 
WARNING: Running pip install with root privileges is generally not a good idea. Try `pip3.8 install –user` instead. 
Collecting awscli 
  Downloading https://files.pythonhosted.org/packages/27/ff/69e75549d058e29a0486c9889c41af342c5718c376012a0a2089aed9f999/awscli-1.19.7-py2.py3-none-any.whl (3.6MB) 
     |????????????????????????????????| 3.6MB 11.3MB/s 
Collecting PyYAML<5.4,>=3.10 
  Downloading https://files.pythonhosted.org/packages/64/c2/b80047c7ac2478f9501676c988a5411ed5572f35d1beff9cae07d321512c/PyYAML-5.3.1.tar.gz (269kB) 
     |????????????????????????????????| 276kB 30.6MB/s 
Collecting docutils<0.16,>=0.10 
  Downloading https://files.pythonhosted.org/packages/22/cd/a6aa959dca619918ccb55023b4cb151949c64d4d5d55b3f4ffd7eee0c6e8/docutils-0.15.2-py3-none-any.whl (547kB) 
     |????????????????????????????????| 552kB 29.8MB/s 
Collecting colorama<0.4.4,>=0.2.5 
  Downloading https://files.pythonhosted.org/packages/c9/dc/45cdef1b4d119eb96316b3117e6d5708a08029992b2fee2c143c7a0a5cc5/colorama-0.4.3-py2.py3-none-any.whl 
Requirement already satisfied: botocore==1.20.7 in /usr/local/lib/python3.8/site-packages (from awscli) (1.20.7) 
Collecting rsa<=4.5.0,>=3.1.2 
  Downloading https://files.pythonhosted.org/packages/26/f8/8127fdda0294f044121d20aac7785feb810e159098447967a6103dedfb96/rsa-4.5-py2.py3-none-any.whl 
Requirement already satisfied: s3transfer<0.4.0,>=0.3.0 in /usr/local/lib/python3.8/site-packages (from awscli) (0.3.4) 
Requirement already satisfied: jmespath<1.0.0,>=0.7.1 in /usr/local/lib/python3.8/site-packages (from botocore==1.20.7->awscli) (0.10.0) 
Requirement already satisfied: python-dateutil<3.0.0,>=2.1 in /usr/local/lib/python3.8/site-packages (from botocore==1.20.7->awscli) (2.8.1) 
Requirement already satisfied: urllib3<1.27,>=1.25.4 in /usr/local/lib/python3.8/site-packages (from botocore==1.20.7->awscli) (1.26.3) 
Collecting pyasn1>=0.1.3 
  Downloading https://files.pythonhosted.org/packages/62/1e/a94a8d635fa3ce4cfc7f506003548d0a2447ae76fd5ca53932970fe3053f/pyasn1-0.4.8-py2.py3-none-any.whl (77kB) 
     |????????????????????????????????| 81kB 17.3MB/s 
Requirement already satisfied: six>=1.5 in /usr/local/lib/python3.8/site-packages (from python-dateutil<3.0.0,>=2.1->botocore==1.20.7->awscli) (1.15.0) 
Installing collected packages: PyYAML, docutils, colorama, pyasn1, rsa, awscli 
    Running setup.py install for PyYAML … done 
Successfully installed PyYAML-5.3.1 awscli-1.19.7 colorama-0.4.3 docutils-0.15.2 pyasn1-0.4.8 rsa-4.5 
[root@test01 ~]# 


■AWS CLI のバージョン確認

[root@test01 ~]# aws –version
aws-cli/1.19.7 Python/3.8.3 Linux/4.18.0-240.1.1.el8_3.x86_64 botocore/1.20.7
[root@test01 ~]#


Python のプログラム作成

CloudWatch のメトリクスを取得する Python プログラムを作成します。


■Python のプログラム(boto3 用)

[root@test01 ~]# vi cloudwatch02.py 
import boto3 
import os 
from boto3.session import Session 
import datetime 
import pprint 
pp = pprint.PrettyPrinter(indent=4) 
 
accesskey = os.environ.get(“アクセスキー入力“) 
secretkey = os.environ.get(“シークレットアクセスキー入力“) 
 
session = Session(aws_access_key_id=accesskey, 
                  aws_secret_access_key=secretkey) 
 
cloud_watch = session.client(‘cloudwatch’, region_name=’ap-northeast-1‘)  ← 最初は Session に入れましたがエラーが出力されるため、外部に出したところエラーは収束しました。
 
get_metric_statistics = cloud_watch.get_metric_statistics( 
    Namespace=’AWS/EC2′, 
    MetricName=’CPUUtilization’, 
    Dimensions=[ 
                   { 
                   ‘Name’: ‘InstanceId’, 
                   ‘Value’: ‘インスタンスID入力‘ 
                   }], 
    StartTime=datetime.datetime.now() – datetime.timedelta(days=1), 
    EndTime=datetime.datetime.now(), 
    Period=300, 
    Statistics=[‘Average‘] 

 
pp.pprint(get_metric_statistics) 
 
[root@test01 ~]# 


各パラメータの説明をします。


■get_metric_statistics

https://boto3.amazonaws.com/v1/documentation/api/latest/reference/services/cloudwatch.html#CloudWatch.Client.get_metric_statistics


Google 翻訳で翻訳

get_metric_statistics

指定されたメトリックの統計を取得します。

1回の呼び出しから返されるデータポイントの最大数は1,440です。

1,440を超えるデータポイントをリクエストすると、CloudWatchはエラーを返します。

データポイントの数を減らすには、指定した時間範囲を狭めて隣接する時間範囲で複数のリクエストを行うか、指定した期間を増やすことができます。

データポイントは時系列で返されません。 ← 複数のデータポイントを取得すると順番はバラバラで表示されるので別途ソートする必要があります。

CloudWatchは、指定した期間の長さに基づいてデータポイントを集約します。

たとえば、1時間の統計をリクエストすると、CloudWatchはすべてのデータポイントを各1時間のタイムスタンプで集計します。

したがって、CloudWatchによって集約される値の数は、返されるデータポイントの数よりも多くなります。

CloudWatchには、パーセンタイル統計を計算するための生データポイントが必要です。

代わりに統計セットを使用してデータを公開する場合、次の条件のいずれかが当てはまる場合にのみ、このデータのパーセンタイル統計を取得できます。


  • 統計セットのSampleCount値は1です。
  • 統計セットの最小値と最大値は同じです。

メトリック値のいずれかが負の数である場合、パーセンタイル統計はメトリックに使用できません。

Amazon CloudWatchは、次のようにメトリックスデータを保持します。

60秒未満のデータポイントは3時間利用できます。

これらのデータポイントは高解像度のメトリックであり、StorageResolution1で定義されたカスタムメトリックでのみ使用できます。


  • 60秒(1分)のデータポイントは15日間利用できます。
  • 300秒(5分)のデータポイントは63日間利用できます。
  • 3600秒(1時間)のデータポイントは、455日(15か月)利用できます。


最初に公開された期間が短いデータポイントは、長期保存のために集約されます。

たとえば、1分の期間を使用してデータを収集する場合、データは1分の解像度で15日間利用できます。

15日後も、このデータは引き続き利用できますが、5分の解像度でのみ集計および取得できます。

63日後、データはさらに集計され、1時間の解像度で利用できます。

CloudWatchは、2016年7月9日より、5分および1時間のメトリックスデータの保持を開始しました。


■Namespace(名前空間)

Namespace は日本語では「名前空間」と呼ばれます。

一般的には、命名規則 AWS/サービス名 が使用されます。

たとえば、Amazon EC2 インスタンスは AWS/EC2 という名前空間を使用します。


CloudWatch の画面では、以下の「EC2」が名前空間です。
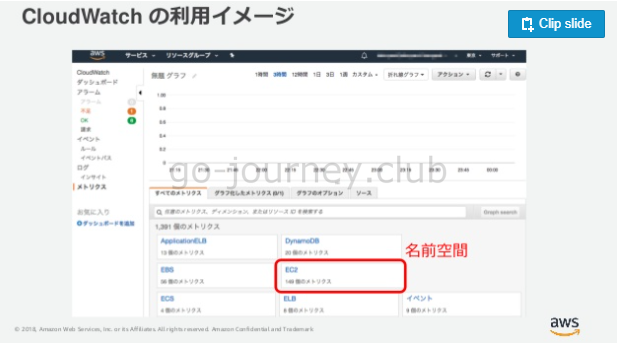
 

名前空間の例


■MetricName(メトリクス)

CloudWatch 画面でのメトリクス名は以下より確認できます。
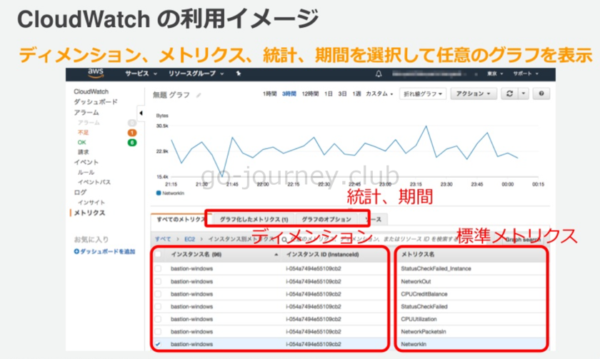
 

メトリクスの例

  • CPUUtilization
  • DiskReadOps
  • DiskWriteOps
  • DiskReadBytes
  • DiskWriteBytes
  • NetworkIn
  • NetworkOut
  • NetworkPacketsIn
  • NetworkPacketsOut
  • MetadataNoToken


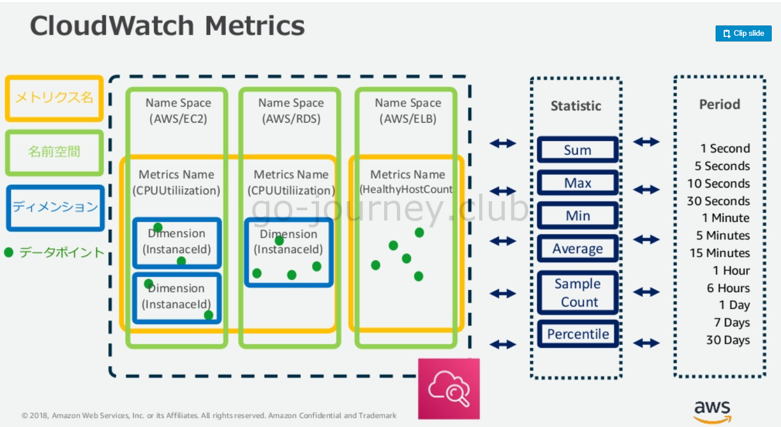
■Dimensions(ディメンション)

ディメンションは下図のように「InstanceId」「インスタンスID」のセットで一意のインスタンスを特定できます。


■メトリクスと名前空間とディメンションの関係図


datetime.timedelta の使い方

timedelta オブジェクトを使用すると、datetimeオブジェクトやdateオブジェクトと引き算や足し算などが可能になります。

指定できるのは以下の単位となります。

  • weeks
  • days
  • hours
  • minutes
  • seconds
  • milliseconds(ミリ秒)
  • microseconds(マイクロ秒)


■プログラムの実行結果

[root@test01 ~]# python3.8 cloudwatch02.py 
{   ‘Datapoints’: [   {   ‘Average’: 18.33333333333336
                          ‘Timestamp’: datetime.datetime(2021, 2, 13, 6, 29, tzinfo=tzutc()), 
                          ‘Unit’: ‘Percent’}, 
                      {   ‘Average’: 14.716666666669578
                          ‘Timestamp’: datetime.datetime(2021, 2, 13, 2, 4, tzinfo=tzutc()), 
                          ‘Unit’: ‘Percent’}, 
                      {   ‘Average’: 3.875
                          ‘Timestamp’: datetime.datetime(2021, 2, 12, 21, 39, tzinfo=tzutc()), 
                          ‘Unit’: ‘Percent’}, 
                      {   ‘Average’: 17.95000000000194
                          ‘Timestamp’: datetime.datetime(2021, 2, 13, 4, 9, tzinfo=tzutc()), 
                          ‘Unit’: ‘Percent’}, 
                      {   ‘Average’: 4.166666666666669
                          ‘Timestamp’: datetime.datetime(2021, 2, 12, 23, 44, tzinfo=tzutc()), 
                          ‘Unit’: ‘Percent’}, 


           ~ 省略 ~


                          ‘Unit’: ‘Percent’}, 
                      {   ‘Average’: 2.27499999999903
                          ‘Timestamp’: datetime.datetime(2021, 2, 13, 0, 24, tzinfo=tzutc()), 
                          ‘Unit’: ‘Percent’}, 
                      {   ‘Average’: 2.04999999999806
                          ‘Timestamp’: datetime.datetime(2021, 2, 12, 23, 49, tzinfo=tzutc()), 
                          ‘Unit’: ‘Percent’}, 
                      {   ‘Average’: 2.1000000000009678
                          ‘Timestamp’: datetime.datetime(2021, 2, 12, 23, 14, tzinfo=tzutc()), 
                          ‘Unit’: ‘Percent’}, 
                      {   ‘Average’: 3.116601833839888
                          ‘Timestamp’: datetime.datetime(2021, 2, 12, 22, 39, tzinfo=tzutc()), 
                          ‘Unit’: ‘Percent’}, 
                      {   ‘Average’: 2.016666666667636
                          ‘Timestamp’: datetime.datetime(2021, 2, 12, 22, 4, tzinfo=tzutc()), 
                          ‘Unit’: ‘Percent’}], 
    ‘Label’: ‘CPUUtilization’, 
    ‘ResponseMetadata’: {   ‘HTTPHeaders’: {   ‘content-length’: ‘28484’, 
                                               ‘content-type’: ‘text/xml’, 
                                               ‘date’: ‘Sat, 13 Feb 2021 ‘ 
                                                       ’08:34:47 GMT’, 
                                               ‘vary’: ‘accept-encoding’, 
                                               ‘x-amzn-requestid’: ‘xxxxxxxxxxxxxxxxxxxxxxxx’}, 
                            ‘HTTPStatusCode’: 200, 
                            ‘RequestId’: ‘xxxxxxxxxxxxxxxxxxxxxxxxxxx’, 
                            ‘RetryAttempts’: 0}} 
[root@test01 ~]# 


1daysより少なくすると値が取得できない現象

プログラムの StartTime と EndTime の間隔を 1days より少なくすると値が取得できない現象が発生しました。


■プログラム(CPUUtilization の値が取得できない)

import boto3 
import os 
from boto3.session import Session 
import datetime 
import pprint 
pp = pprint.PrettyPrinter(indent=4) 
 
accesskey = os.environ.get(“アクセスキー入力“) 
secretkey = os.environ.get(“シークレットアクセスキー入力“) 
 
session = Session(aws_access_key_id=accesskey, 
                  aws_secret_access_key=secretkey) 
 
cloud_watch = session.client(‘cloudwatch’, region_name=’ap-northeast-1‘) 
 
get_metric_statistics = cloud_watch.get_metric_statistics( 
    Namespace=’AWS/EC2′, 
    MetricName=’CPUUtilization’, 
    Dimensions=[ 
                   { 
                   ‘Name’: ‘InstanceId’, 
                   ‘Value’: ‘インスタンスID入力‘ 
                   }], 
    StartTime=datetime.datetime.now() + datetime.timedelta(seconds=-600), 
    EndTime=datetime.datetime.now(), 
    Period=300, 
    Statistics=[‘Average’] 

 
pp.pprint(get_metric_statistics) 


以下のように、utcnowを付けたところ、表示されるようになりました。

■プログラム(CPUUtilization の値が取得できる)

import boto3 
import os 
from boto3.session import Session 
import datetime 
import pprint 
pp = pprint.PrettyPrinter(indent=4) 
 
accesskey = os.environ.get(“アクセスキー入力“) 
secretkey = os.environ.get(“シークレットアクセスキー入力“) 
 
session = Session(aws_access_key_id=accesskey, 
                  aws_secret_access_key=secretkey) 
 
cloud_watch = session.client(‘cloudwatch’, region_name=’ap-northeast-1‘) 
 
get_metric_statistics = cloud_watch.get_metric_statistics( 
    Namespace=’AWS/EC2′, 
    MetricName=’CPUUtilization’, 
    Dimensions=[ 
                   { 
                   ‘Name’: ‘InstanceId’, 
                   ‘Value’: ‘インスタンスID入力‘ 
                   }], 
    StartTime=datetime.datetime.utcnow() + datetime.timedelta(seconds=-600),  ← utcnow() にしないと CPUUtilization の値が取得できません。
    EndTime=datetime.datetime.utcnow(), ← utcnow() にしないと CPUUtilization の値が取得できません。
    Period=300, 
    Statistics=[‘Average’] 

 
pp.pprint(get_metric_statistics) 


■プログラム実行結果

[root@test01 ~]# python3.8 cloudwatch03.py 
{   ‘Datapoints’: [   {   ‘Average’: 18.008333333336243
                          ‘Timestamp’: datetime.datetime(2021, 2, 13, 9, 38, tzinfo=tzutc()), 
                          ‘Unit’: ‘Percent’}], 
    ‘Label’: ‘CPUUtilization’, 
    ‘ResponseMetadata’: {   ‘HTTPHeaders’: {   ‘content-length’: ‘512’, 
                                               ‘content-type’: ‘text/xml’, 
                                               ‘date’: ‘Sat, 13 Feb 2021 ‘ 
                                                       ’09:48:38 GMT’, 
                                               ‘x-amzn-requestid’: ‘xxxxxxxxxxxxxxxxxxxxxxxx’}, 
                            ‘HTTPStatusCode’: 200, 
                            ‘RequestId’: ‘xxxxxxxxxxxxxxxxxxxxxxxxxxxxx’, 
                            ‘RetryAttempts’: 0}} 


なぜ値が取得できるようになったのか

  • datetime.datetime.now() ← 値が取得できない。
  • datetime.datetime.utcnow() ← 値が取得できる。

おそらく CloudWatch はタイムゾーンが UTC(協定世界時)となっている為、datetime.now だと時間がずれて取得できないと思われます。 

1days の場合はタイムゾーンがずれていても、枠内に入った値のみが取得出来ていただけで、値を取得する時間の枠を絞ると UTC で合わせないと時間がずれてしまい、値が取得できなくなります。


以下の記事を参考にしました。

CloudWatch

http://boto.cloudhackers.com/en/latest/cloudwatch_tut.html


The Metric object has a query method that lets us actually perform the query against the collected data in CloudWatch.

To call that, we need a start time and end time to control the time span of data that we are interested in.

For this example, let’s say we want the data for the previous hour:


実行結果から更に必要な情報を取得する

上記のプログラムを実行すると不要な情報も取得されます。


■プログラム実行結果

[root@test01 ~]# python3.8 cloudwatch03.py 
{   ‘Datapoints’: [   {   ‘Average’: 18.008333333336243
                          ‘Timestamp’: datetime.datetime(2021, 2, 13, 9, 38, tzinfo=tzutc()), 
                          ‘Unit’: ‘Percent’}], 
    ‘Label’: ‘CPUUtilization’, 
    ‘ResponseMetadata’: {   ‘HTTPHeaders’: {   ‘content-length’: ‘512’, 
                                               ‘content-type’: ‘text/xml’, 
                                               ‘date’: ‘Sat, 13 Feb 2021 ‘ 
                                                       ’09:48:38 GMT’, 
                                               ‘x-amzn-requestid’: ‘xxxxxxxxxxxxxxxxxxxxxxxx’}, 
                            ‘HTTPStatusCode’: 200, 
                            ‘RequestId’: ‘xxxxxxxxxxxxxxxxxxxxxxxxxxxxx’, 
                            ‘RetryAttempts’: 0}} 


必要な情報は「Average」「18.008333333336243」だけです。

それ以外の情報は必要ないので、必要な情報のみ抽出します。


■プログラム

import boto3 
import os 
from boto3.session import Session 
import datetime 
import pprint 
pp = pprint.PrettyPrinter(indent=4) 
 
accesskey = os.environ.get(“アクセスキー入力“) 
secretkey = os.environ.get(“シークレットアクセスキー入力“) 
 
session = Session(aws_access_key_id=accesskey, 
                  aws_secret_access_key=secretkey) 
 
cloud_watch = session.client(‘cloudwatch’, region_name=’ap-northeast-1‘) 
 
get_metric_statistics = cloud_watch.get_metric_statistics( 
    Namespace=’AWS/EC2′, 
    MetricName=’CPUUtilization’, 
    Dimensions=[ 
                   { 
                   ‘Name’: ‘InstanceId’, 
                   ‘Value’: ‘インスタンスID‘ 
                   }], 
    StartTime=datetime.datetime.utcnow() + datetime.timedelta(seconds=-600), 
    EndTime=datetime.datetime.utcnow(), 
    Period=300, 
    Statistics=[‘Average’] 

 
pp.pprint(get_metric_statistics) 
 
value = get_metric_statistics[‘Datapoints’] 
print(value) ← [{‘Timestamp’: datetime.datetime(2021, 2, 13, 13, 12, tzinfo=tzutc()), ‘Average’: 17.64166666666762, ‘Unit’: ‘Percent’}] 
print(value[0]) ← {‘Timestamp’: datetime.datetime(2021, 2, 13, 13, 12, tzinfo=tzutc()), ‘Average’: 17.64166666666762, ‘Unit’: ‘Percent’} 
print(value[0][‘Average’]) ← 17.64166666666762 


一見、複雑に見えても辞書型もリスト型も 1つずつ中に入っていけば目的の値にたどり着けます。

上記の場合は、value[0][‘Average’] で目的の値までたどり着けました。


よかったらシェアしてね!
  • URLをコピーしました!
  • URLをコピーしました!

この記事を書いた人

コメント

コメントする

AlphaOmega Captcha Medica  –  What Do You See?


このサイトはスパムを低減するために Akismet を使っています。コメントデータの処理方法の詳細はこちらをご覧ください