【さくらVPS】【Python】Django で Web アプリを作る(Webアプリ設定編)【Part.6】

公開日時:2017年11月03日 / 最終更新日時:2019年02月11日

今回も更にWebアプリケーションを作り込みます。


以下、今までの作業です。

【さくらVPS】【Python】Django で Web アプリを作る【Part.1】


【さくらVPS】【Python】Django で Web アプリを作る(Let's Encrypt SSL証明書設定)【Part.2】


【さくらVPS】【Python】Django で Web アプリを作る(Djangoインストール&設定)【Part.3】


【さくらVPS】【Python】Django で Web アプリを作る(Webアプリ構築編)【Part.4】


【さくらVPS】【Python】Django で Web アプリを作る(Webアプリ構築編)【Part.5】


Webアプリを作る場合はレンタルサーバーより「VPS」の方が自由度が高いのでお勧めです。

ちなみに、「さくらのVPS」は価格が安くてスペックがいいです。


さくらのVPSのスペックです。

月額    : 685円~

ディスク: SSD 20GB

CPU     : Intel Xeon CPU E5-2650v2 @ 2.60GHz 1個

メモリ  : 512MB


Webアプリを日本語環境、タイムゾーンをTokyoに変更する

初めに仮想環境に切り替えます。

[test@SAKURA_VPS ~]$ ls
django  scraping      テンプレート  ドキュメント  音楽  公開
pyenv   ダウンロード  デスクトップ  ビデオ        画像
[test@SAKURA_VPS ~]$ cd pyenv/
[test@SAKURA_VPS pyenv]$ ls
bin  include  lib  lib64  pip-selfcheck.json  pyvenv.cfg  site01
[test@SAKURA_VPS pyenv]$ source ./bin/activate ← 仮想環境に切り替えます。
(pyenv) [test@SAKURA_VPS pyenv]$ ← (pyenv)が表示され、仮想環境に切り替わったことが分かります。


「Hello World!」を表示する Web アプリを「日本語環境」、タイムゾーンを「Tokyo」に変更します。

settings.py ファイルは文字通り Web アプリの「セッティング(設定)」をするファイルです。

Djangoは「settings.py」ファイルを見て言語環境やタイムゾーンなどを設定します。

データベースは「'ENGINE': 'django.db.backends.sqlite3',」の部分で SQLite3 を選択しています。

(pyenv) [test@SAKURA_VPS site01]$ pwd
/home/test/pyenv/site01/site01
(pyenv) [test@SAKURA_VPS site01]$ vi settings.py
"""
Django settings for site01 project.

Generated by 'django-admin startproject' using Django 1.11.7.

For more information on this file, see
https://docs.djangoproject.com/en/1.11/topics/settings/

For the full list of settings and their values, see
https://docs.djangoproject.com/en/1.11/ref/settings/
"""

import os

# Build paths inside the project like this: os.path.join(BASE_DIR, ...)
BASE_DIR = os.path.dirname(os.path.dirname(os.path.abspath(__file__)))

# Quick-start development settings - unsuitable for production
# See https://docs.djangoproject.com/en/1.11/howto/deployment/checklist/

# SECURITY WARNING: keep the secret key used in production secret!
SECRET_KEY = 'qo&8gtxxxxxxxxxxxxxxxxxxxxxxkm**&lr8vj=m'

# SECURITY WARNING: don't run with debug turned on in production!
DEBUG = True

ALLOWED_HOSTS = []

# Application definition

INSTALLED_APPS = [
    'django.contrib.admin',
    'django.contrib.auth',
    'django.contrib.contenttypes',
    'django.contrib.sessions',
    'django.contrib.messages',
    'django.contrib.staticfiles',

    'helloworld', ← 追加します。
]

MIDDLEWARE = [
    'django.middleware.security.SecurityMiddleware',
    'django.contrib.sessions.middleware.SessionMiddleware',
    'django.middleware.common.CommonMiddleware',
    'django.middleware.csrf.CsrfViewMiddleware',
    'django.contrib.auth.middleware.AuthenticationMiddleware',
    'django.contrib.messages.middleware.MessageMiddleware',
    'django.middleware.clickjacking.XFrameOptionsMiddleware',
]

ROOT_URLCONF = 'site01.urls'

TEMPLATES = [
    {
        'BACKEND': 'django.template.backends.django.DjangoTemplates',
        'DIRS': [],
        'APP_DIRS': True,
        'OPTIONS': {
            'context_processors': [
                'django.template.context_processors.debug',
                'django.template.context_processors.request',
                'django.contrib.auth.context_processors.auth',
                'django.contrib.messages.context_processors.messages',
            ],
        },
    },
]

WSGI_APPLICATION = 'site01.wsgi.application'

# Database
# https://docs.djangoproject.com/en/1.11/ref/settings/#databases

DATABASES = {
    'default': {
        'ENGINE': 'django.db.backends.sqlite3', ← SQLite3を利用します。
        'NAME': os.path.join(BASE_DIR, 'db.sqlite3'),
    }
}

# Password validation
# https://docs.djangoproject.com/en/1.11/ref/settings/#auth-password-validators

AUTH_PASSWORD_VALIDATORS = [
    {
        'NAME': 'django.contrib.auth.password_validation.UserAttributeSimilarityValidator',
    },
    {
        'NAME': 'django.contrib.auth.password_validation.MinimumLengthValidator',
    },
    {
        'NAME': 'django.contrib.auth.password_validation.CommonPasswordValidator',
    },
    {
        'NAME': 'django.contrib.auth.password_validation.NumericPasswordValidator',
    },
]

# Internationalization
# https://docs.djangoproject.com/en/1.11/topics/i18n/

#LANGUAGE_CODE = 'en-us' ← コメントアウトします。
LANGUAGE_CODE = 'ja' ← 追加します。

#TIME_ZONE = 'UTC' ← コメントアウトします。
TIME_ZONE = 'Asia/Tokyo' ← 追加します。

USE_I18N = True

USE_L10N = True

USE_TZ = True

# Static files (CSS, JavaScript, Images)
# https://docs.djangoproject.com/en/1.11/howto/static-files/

STATIC_URL = '/static/'


Webアプリ用のテーブルを作成する

Webアプリケーションでは、データベースは SQLite3 を利用します。 

データベースにテーブルを作成するために以下のコマンドを実行します。

(pyenv) [test@SAKURA_VPS site01]$ pwd
/home/test/pyenv/site01
(pyenv) [test@SAKURA_VPS site01]$ python manage.py migrate
Operations to perform:
  Apply all migrations: admin, auth, contenttypes, sessions
Running migrations:
  Applying contenttypes.0001_initial... OK
  Applying auth.0001_initial... OK
  Applying admin.0001_initial... OK
  Applying admin.0002_logentry_remove_auto_add... OK
  Applying contenttypes.0002_remove_content_type_name... OK
  Applying auth.0002_alter_permission_name_max_length... OK
  Applying auth.0003_alter_user_email_max_length... OK
  Applying auth.0004_alter_user_username_opts... OK
  Applying auth.0005_alter_user_last_login_null... OK
  Applying auth.0006_require_contenttypes_0002... OK
  Applying auth.0007_alter_validators_add_error_messages... OK
  Applying auth.0008_alter_user_username_max_length... OK
  Applying sessions.0001_initial... OK
(pyenv) [test@SAKURA_VPS site01]$


ディレクトリ・ファイル構造の確認

現在のディレクトリ・ファイル構造の確認です。

[root@SAKURA_VPS site01]# pwd
/home/test/pyenv/site01
[root@SAKURA_VPS site01]# LANG=C tree
.
|-- db.sqlite3
|-- helloworld
|   |-- __init__.py
|   |-- __pycache__
|   |   |-- __init__.cpython-36.pyc
|   |   |-- admin.cpython-36.pyc
|   |   |-- models.cpython-36.pyc
|   |   |-- urls.cpython-36.pyc
|   |   `-- views.cpython-36.pyc
|   |-- admin.py
|   |-- apps.py
|   |-- migrations
|   |   |-- 0001_initial.py
|   |   |-- __init__.py
|   |   `-- __pycache__
|   |       `-- __init__.cpython-36.pyc
|   |-- models.py
|   |-- tests.py
|   |-- urls.py
|   `-- views.py
|-- manage.py
`-- site01
    |-- __init__.py
    |-- __pycache__
    |   |-- __init__.cpython-36.pyc
    |   |-- settings.cpython-36.pyc
    |   |-- urls.cpython-36.pyc
    |   `-- wsgi.cpython-36.pyc
    |-- settings.py
    |-- urls.py
    `-- wsgi.py

6 directories, 25 files
[root@SAKURA_VPS site01]#


models.pyファイルを編集する

「/home/test/pyenv/site01/helloworld/models.py」ファイルを編集します。

(pyenv) [test@SAKURA_VPS helloworld]$ pwd
/home/test/pyenv/site01/helloworld
(pyenv) [test@SAKURA_VPS helloworld]$ vi models.py
from django.db import models

# Create your models here.
class Add_Word(models.Model):
    word_text=models.CharField(max_length=140)
    date_time=models.DateTimeField('保存日')


変更を反映する

models.py ファイルを編集したら反映します。

(pyenv) [test@SAKURA_VPS helloworld]$ cd ..

(pyenv) [test@SAKURA_VPS site01]$ pwd
/home/test/pyenv/site01
(pyenv) [test@SAKURA_VPS site01]$ python manage.py makemigrations helloworld
Migrations for 'helloworld':
  helloworld/migrations/0001_initial.py
    - Create model Add_Word
(pyenv) [test@SAKURA_VPS site01]$ pwd
/home/test/pyenv/site01


Django の管理サイトを有効化する

Django には GUI の管理画面が付属しています。

管理画面を有効化します。

以下のコマンドで管理ツールを初期化します。

(pyenv) [test@SAKURA_VPS site01]$ pwd
/home/test/pyenv/site01
(pyenv) [test@SAKURA_VPS site01]$ python manage.py createsuperuser

You have 1 unapplied migration(s). Your project may not work properly until you apply the migrations for app(s): helloworld.
Run 'python manage.py migrate' to apply them.

Username (leave blank to use 'test'): test ← 任意のユーザー名を入力します。
Email address: test@test.com ← 任意のメールアドレスを入力します。
Password:      ← パスワードを入力します。
Password (again):  ← パスワードを入力します。
Superuser created successfully.


管理画面にアクセスをする

管理画面にアクセスをします。

以下のコマンドで Django 開発サーバーを起動します。

(pyenv) [test@SAKURA_VPS site01]$ pwd
/home/test/pyenv/site01
(pyenv) [test@SAKURA_VPS site01]$ python manage.py runserver
Performing system checks...

System check identified no issues (0 silenced).

You have 1 unapplied migration(s). Your project may not work properly until you apply the migrations for app(s): helloworld.
Run 'python manage.py migrate' to apply them.

November 03, 2017 - 17:33:56
Django version 1.11.7, using settings 'site01.settings'
Starting development server at http://127.0.0.1:8000/
Quit the server with CONTROL-C.


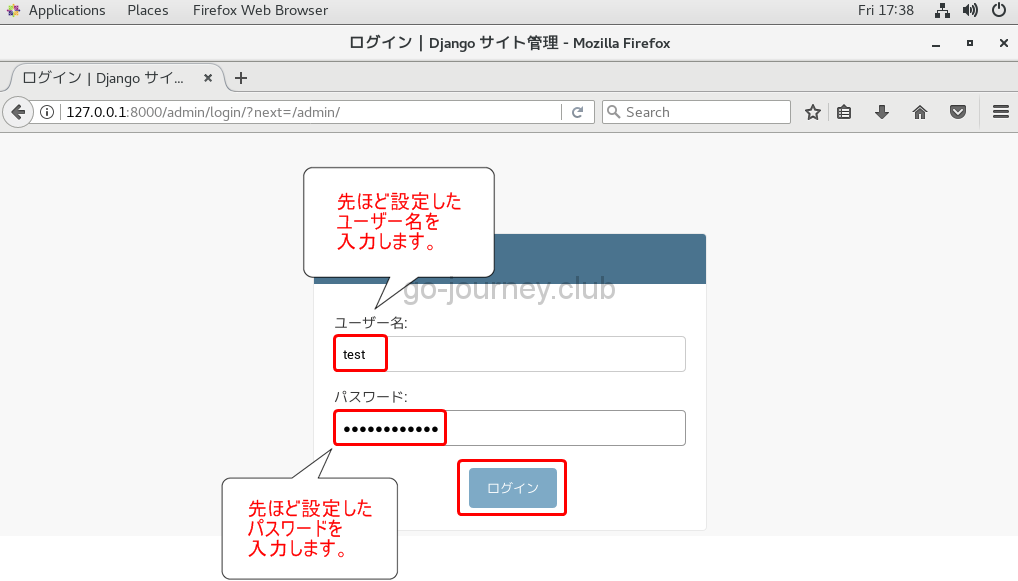
下図のように「http://127.0.0.1:8000/admin」へアクセスをします。

Django サイト管理のログイン画面が表示されます。

【さくらVPS】【Python】Django で Web アプリを作る(Webアプリ構築編)【Part.5】


ログイン画面で先ほど「python manage.py createsuperuser」コマンド実行時に入力した

を入力して「ログイン」ボタンをクリックします。
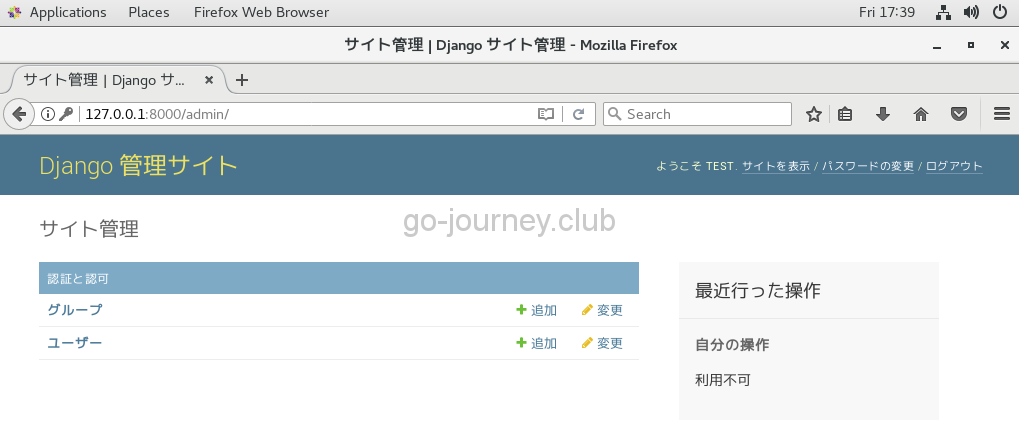
【さくらVPS】【Python】Django で Web アプリを作る(Webアプリ構築編)【Part.6】


下図のようにログインできれば成功です。

【さくらVPS】【Python】Django で Web アプリを作る(Webアプリ構築編)【Part.6】


参考文献

今回構築したDjango環境の参考文献です。

Amazonの「Kindle Unlimited」で購入しました。

1日で理解するDjango超基礎入門


今までの連載


【さくらVPS】【Python】Django で Web アプリを作る【Part.1】


【さくらVPS】【Python】Django で Web アプリを作る(Let's Encrypt SSL証明書設定)【Part.2】


【さくらVPS】【Python】Django で Web アプリを作る(Djangoインストール&設定)【Part.3】


【さくらVPS】【Python】Django で Web アプリを作る(Webアプリ構築編)【Part.4】


【さくらVPS】【Python】Django で Web アプリを作る(Webアプリ構築編)【Part.5】


Posted by 100%レンタルサーバーを使いこなすサイト管理人

コメントを残す

メールアドレスが公開されることはありません。 が付いている欄は必須項目です

AlphaOmega Captcha Medica  –  What Do You See?


このサイトはスパムを低減するために Akismet を使っています。コメントデータの処理方法の詳細はこちらをご覧ください

Secured By miniOrange