【図解】格安レンタルサーバーで見かける「SQLite」を WordPress で利用する手順


SQLite は「エスキューライト」と読みます。

とにかく軽量のデータベースです。

また、SQLite は「パブリックドメイン」です。

※パブリックドメインとは、「著作権が消滅した作品」「著作権を放棄した作品」の意味です。

ちなみに、「著作権フリー」とは作者のルールに従う範囲内なら使ってもいいですよという意味になるので、著作権を放棄した「パブリックドメイン」とは異なります。


今回は格安レンタルサーバーでよくセットで導入されている「SQLite」「WordPress」を構築する手順についてご紹介します。

SQLiteの特徴

SQLiteの特徴は以下です。

  • パブリックドメイン(著作権放棄)
  • 実は WordPress をインストールすることも可能
  • 軽い(サクサク動く)


SQLiteが使えるレンタルサーバー一覧

SQLiteが使えるレンタルサーバーは探すと結構あります。

しかもありがたいことに「MySQL」が入っていない一番安いプランでも使えるので、「無料」もしくは「月100円程度」のプランで利用することができます。

レンタルサーバープランSQLiteMySQL初期費用月額ディスク容量
バリューサーバーまるっと無料133円25GB
ロリポップ!エコノミー×無料100円10GB
ドメインキングPプラン934円100円20GB
エクストリムレンタルサーバーライト1,000円94円2GB
さくらのレンタルサーバライト×1,029円129円10GB
コアサーバーCORE-MINI無料198円60GB
エックスサーバーX103,000円900円200GB


SQLite が使えるおすすめのレンタルサーバーはなんと言っても「バリューサーバー」です。

「初期費用」「無料」「月額」「133円」と大変お得です。

なにより「25GB」と十分なディスク容量があるのが嬉しいです。

画像をたっぷりと使うサイトでも足りなくなることはないでしょう。

バリューサーバーの公式ページへ進む


次点は「ロリポップ!」です。

ロリポップも月額100円と安くていいですが、ディスク容量が10GBです。

それなら毎月30円程度上乗せしてバリューサーバーの「133円」プランの方が、25GBと2倍以上のディスク容量が使えるのでいいと思います。

しかし月額100円という価格も魅力です。

ロリポップ!の公式ページへ進む


SQLiteのインストール手順

上記レンタルサーバーにはすでに「SQLite」がインストール済みですが、もし「SQLite」がインストールされていない環境でもインストール手順は簡単です。

※ただしインストールは簡単でも root 権限(Administrator権限)が与えられていなければインストールできません。


まず初めに SQLite をインストールします。

yumコマンドでインストールします。

$ sudo yum install sqlite


以上で SQLite のインストールは完了です。


SQLiteのバージョンを確認します。

2017年7月現在、SQLite のバージョンは「3.7.17」です。

$ rpm -qa | grep sqlite
sqlite-3.7.17-8.el7.x86_64


続けて最新の WordPress をダウンロードして SQLite 上で動かすための設定をします。

WordPress のサイトを「SQLite」で構築する手順

「SQLite」をインストール、もしくは「SQLite」がインストールされている環境(上記のレンタルサーバー)で WordPress を構築する手順を解説します。


最新の SQLite Integration をダウンロードして解凍する

以下のURLにアクセスして最新の「SQLite Integration」を自分のパソコンにダウンロードします。

https://wordpress.org/plugins/sqlite-integration/

SQLite Integration


SQLite 最新版は下図の赤い線で囲まれている「Download」ボタンをクリックするとダウンロードできます。

SQLite Integration 最新版のダウンロード


「SQLite Integration」の zip ファイルをダウンロードしたら、下図のように解凍します。

※下図では「Lhaplus」を使っています。

SQLite Integration 最新版のダウンロード

 以上で SQLite のダウンロードは完了です。


最新の「日本語版 WordPress」をダウンロードして解凍する

次は最新の「WordPress」を自分のパソコンにダウンロードして展開します。

なぜ「SQLite Integration」「WordPress」を一旦自分のパソコンにダウンロードして解凍するのかというと、フォルダを追加したり、ファイルを書き換えてからレンタルサーバーへアップロードするからです。


以下のURLへアクセスします。

https://ja.wordpress.org/


赤い枠の「WordPress 4.X をダウンロード」をクリックして最新の「日本語版 WordPress」をダウンロードします。

日本語版 WordPress 最新版のダウンロード


ダウンロードが完了したら「wordpress-4.X-ja.zip」を解凍します。

日本語版 WordPress 最新版のダウンロード


自分のパソコン上で「SQLite」と「WordPress」を設定する

「SQLite」「WordPress」を解凍したら以下の手順で自分のパソコン上で設定をします。

設定が完了したらアップロードをします。

手順通りにやれば問題なく構築できるので焦らずにじっくりと作業しましょう。


1.sqlite-integration フォルダを wordpress/wp-content/plugins フォルダに移動する

「sqlite-integration.zip」ファイルを解凍すると「sqlite-integration」フォルダができますが、この「sqlite-integration」フォルダを右クリックして「コピー」を選択します。

格安レンタルサーバーで見かける「SQLite」を WordPress で利用する手順


下図のように「wordpress」-「wp-content」-「plugins」フォルダに移動して「sqlite-integration」フォルダを貼り付けます。

格安レンタルサーバーで見かける「SQLite」を WordPress で利用する手順


下図のように「sqlite-integration」フォルダが貼り付けられたことを確認します。

格安レンタルサーバーで見かける「SQLite」を WordPress で利用する手順


2.sqlite-integration フォルダの中にある db.php ファイルを wordpress/wp-content フォルダにコピーする

次に「wordpress」-「wp-content」-「plugins」-「sqlite-integration」フォルダに移動して下図のように「db.php」ファイルを「コピー」します。

格安レンタルサーバーで見かける「SQLite」を WordPress で利用する手順


「wordpress」-「wp-content」フォルダに移動して、下図のように「db.php」ファイルを「貼り付け」ます。

格安レンタルサーバーで見かける「SQLite」を WordPress で利用する手順


「wordpress」-「wp-content」フォルダに「db.php」ファイルが「貼り付け」られたことを確認します。

格安レンタルサーバーで見かける「SQLite」を WordPress で利用する手順


3.wordpress/wp-config-sample.php ファイルを wordpress/wp-config.php とリネームする

下図のように「wordpress」フォルダへ移動し「wp-config-sample.php」ファイルを選択して右クリックして「名前の変更」をクリックします。

格安レンタルサーバーで見かける「SQLite」を WordPress で利用する手順


下図のようにファイル名が「wp-config.php」に変更されていることを確認します。

格安レンタルサーバーで見かける「SQLite」を WordPress で利用する手順

wp-config.php ファイルを編集する

「wp-config.php」を開き、以下のように編集します。

「put your unique phrase here」を任意の「パスワード」に変更します。

また、「wp_」を任意の文字に変更します。

この「wp_」を変更する作業は、もしすでに WordPress をやっていた場合、上書きされることを防止するためなので、プレフィックスがかぶらないと分かっているならやらなくてもいいです。

よく分からない場合は念のために「wp_」を任意の文字に変更しておきましょう。

格安レンタルサーバーで見かける「SQLite」を WordPress で利用する手順


私の場合は以下のように設定しました。

格安レンタルサーバーで見かける「SQLite」を WordPress で利用する手順


以上で設定は完了です。

この後、ファイルをレンタルサーバーへアップロードします。

SQLite Integration をレンタルサーバーへアップロードする

設定が完了したので、あとはレンタルサーバーへアップロードします。

FTP ツールは「FFFTP」が有名ですが、今回のようにファイル数が多数あると「FFFTP」では「エラー」になる可能性があるため、「WinSCP」を利用します。

※WinSCP はファイルが多数あってもエラーになることはめったにないのでお勧めです。


WinSCPで所定のフォルダに「wordpress」フォルダをアップロードします。

私の場合は、さくらVPSの「/var/www/html」フォルダに「wordpress」フォルダをアップロードしました。

格安レンタルサーバーで見かける「SQLite」を WordPress で利用する手順


WordPressのインストール

今回は「/var/www/html」ディレクトリに「wordpress」フォルダをアップロードしたので、URLは「http://tk2-xxx-xxxx.vs.sakura.ne.jp/wordpress」になります。

ブラウザより上記URLにアクセスします。

格安レンタルサーバーで見かける「SQLite」を WordPress で利用する手順


「Index of」が表示されてしまいました。

設定が足りなかったようです。


「Index of」が表示される場合は「.htaccess」「/etc/httpd/conf/httpd.conf」ファイルを編集します。

今回の場合は「/etc/httpd/conf/httpd.conf」ファイルを編集します。


まず初めに失敗してもすぐに戻せるように「/etc/httpd/conf/httpd.conf」ファイルのバックアップを取得します。

# cd /etc/httpd/conf ← コンフィグファイルがあるディレクトリに移動します。

# ls
httpd.conf magic 

# cp -ip httpd.conf httpd.conf_20170713 ← 間違ったらいつでも戻せるように念のためにバックアップを取ります。


バックアップを取得したら「/etc/httpd/conf/httpd.conf」ファイルを編集します。

URLにアクセスした際に「Index of」が表示され、ファイルやディレクトリが丸見えになる場合は、「httpd.conf」ドキュメントルート(今回の場合は、/var/www/html)に「Options -Indexes」を設定します。

ドキュメントルート(document root)とは、ドメイン名でアクセスした場合のトップフォルダのことを言います。

たとえば、ドメインが「www.tama-chan.com」で、ドキュメントルートが「/var/www/html」とすると、「/var/www/html」「test.html」ファイルを置いた場合、「http://tamachan.com/test.html」でアクセスできます。

# vi httpd.conf


~省略~


# Further relax access to the default document root:
<Directory “/var/www/html”>
    #
    # Possible values for the Options directive are “None”, “All”,
    # or any combination of:
    # Indexes Includes FollowSymLinks SymLinksifOwnerMatch ExecCGI MultiViews
    #
    # Note that “MultiViews” must be named *explicitly* — “Options All”
    # doesn’t give it to you.
    #
    # The Options directive is both complicated and important. Please see
    # http://httpd.apache.org/docs/2.4/mod/core.html#options
    # for more information.
    #
    #Options Indexes FollowSymLinks ← デフォルトの「Options Indexes FollowSymLinks」をコメントアウトします。(#をつける)
    Options -Indexes ← 「Options -Indexes」を追加します。

    #
    # AllowOverride controls what directives may be placed in .htaccess files.
    # It can be “All”, “None”, or any combination of the keywords:
    # Options FileInfo AuthConfig Limit
    #
    AllowOverride None

    #
    # Controls who can get stuff from this server.
    #
    Require all granted
</Directory>


編集が終わったら「httpd.service」を再起動します。

# systemctl restart httpd.service ← httpd を再起動します。
# systemctl status httpd.service ← 正常に httpd が起動しているか確認します。
httpd.service – The Apache HTTP Server
Loaded: loaded (/usr/lib/systemd/system/httpd.service; enabled; vendor preset: disabled)
Active: active (running) since 木 2017-07-13 23:45:58 JST; 2s ago
Docs: man:httpd(8)
man:apachectl(8)
Process: 18983 ExecStop=/bin/kill -WINCH ${MAINPID} (code=exited, status=1/FAILURE)
Process: 7031 ExecReload=/usr/sbin/httpd $OPTIONS -k graceful (code=exited, status=0/SUCCESS)
Main PID: 19020 (httpd)
Status: “Processing requests…”
CGroup: /system.slice/httpd.service
tq19020 /usr/sbin/httpd -DFOREGROUND
tq19021 /usr/sbin/httpd -DFOREGROUND
tq19022 /usr/sbin/httpd -DFOREGROUND
tq19023 /usr/sbin/httpd -DFOREGROUND
tq19024 /usr/sbin/httpd -DFOREGROUND
mq19025 /usr/sbin/httpd -DFOREGROUND

7月 13 23:45:58 xxx-xxx-xxxxx.vs.sakura.ne.jp systemd[1]: Starting The Apache HTTP Server…
7月 13 23:45:58 xxx-xxx-xxxxx.vs.sakura.ne.jp systemd[1]: Started The Apache HTTP Server.
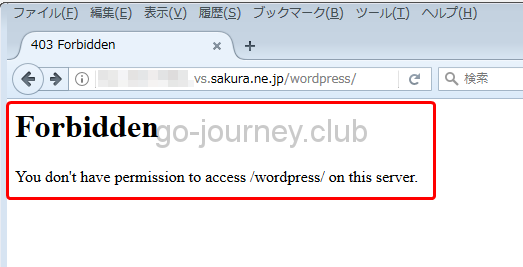


再度「URL」にアクセスしてみます。

今後は下図のように「Forbidden」が表示されました。

メッセージを読むと

「Forbidden

You dont’t have permission to access /wordpress/ on this server.」とあります。

つまり、「権限が足りません」ということです。

格安レンタルサーバーで見かける「SQLite」を WordPress で利用する手順


再度「/etc/httpd/conf/httpd.conf」を確認します。

# less /etc/httpd/conf/httpd.conf 

#
# DirectoryIndex: sets the file that Apache will serve if a directory
# is requested.
#
<IfModule dir_module>
    DirectoryIndex index.html ← index.htmlしかありません。(index.phpがありません)
</IfModule>

#


「Forbidden」が表示された原因は、

  1. Options -Indexes が設定されている
  2. DirectoryIndex に「index.php」が存在しない

です。

逆に「Options Indexes」が設定されていれば、DirectoryIndex に「index.php」が存在しなくてもファイル一覧が表示されてエラーにはなりません。

また、DirectoryIndex に「index.php」を設定していれば、「Options Indexes」が設定されていなくても通常通りサイトが表示されます。


Forbidden を消すために「DirectoryIndex」「index.php」を追加します。

且つ、「index.php」を一番先頭に置きます。


「httpd.conf」ファイルを修正したら、その都度 httpd を再起動します。

# systemctl restart httpd.service ← httpd を再起動します。

# systemctl status httpd.service ← 正常に httpd が起動しているか確認します。
httpd.service – The Apache HTTP Server
Loaded: loaded (/usr/lib/systemd/system/httpd.service; enabled; vendor preset: disabled)
Active: active (running) since 金 2017-07-14 00:45:49 JST; 1min 19s ago
Docs: man:httpd(8)
man:apachectl(8)
Process: 19358 ExecStop=/bin/kill -WINCH ${MAINPID} (code=exited, status=0/SUCCESS)
Process: 7031 ExecReload=/usr/sbin/httpd $OPTIONS -k graceful (code=exited, status=0/SUCCESS)
Main PID: 19362 (httpd)
Status: “Total requests: 6; Current requests/sec: 0; Current traffic: 0 B/sec”
CGroup: /system.slice/httpd.service
tq19362 /usr/sbin/httpd -DFOREGROUND
tq19363 /usr/sbin/httpd -DFOREGROUND
tq19364 /usr/sbin/httpd -DFOREGROUND
tq19365 /usr/sbin/httpd -DFOREGROUND
tq19366 /usr/sbin/httpd -DFOREGROUND
tq19367 /usr/sbin/httpd -DFOREGROUND
tq19368 /usr/sbin/httpd -DFOREGROUND
tq19369 /usr/sbin/httpd -DFOREGROUND
mq19370 /usr/sbin/httpd -DFOREGROUND

7月 14 00:45:49 xxx-xxx-xxxxx.vs.sakura.ne.jp systemd[1]: Starting The Apache HTTP Server…
7月 14 00:45:49 xxx-xxx-xxxxx.vs.sakura.ne.jp systemd[1]: Started The Apache HTTP Server.


再度アクセスをしてみると・・・

今度は以下のメッセージが表示されました。

「PHP PDO Extention is not loaded.

Your PHP installation appears to be missing the PDO extension which is required for this version of WordPress.」

格安レンタルサーバーで見かける「SQLite」を WordPress で利用する手順


単純に英文を翻訳すると「このバージョンの WordPress には PDO エクステンションが必要です」と言えます。

PDOエクステンション(PDO extension)をインストールする必要あります。


PDOエクステンションとは、PHPでデータベースへアクセスするためのクラスです。

つまり、WordPress が SQLite のデータベースへアクセスをするために PDO を利用しているということです。

その PDO がないためインストール作業が失敗しました。


PDOエクステンションのような拡張モジュールをインストールする際に「PECL(ピクルと読みます)」コマンドを使用します。

PECL(ピクル)は PHP の拡張モジュールをインストールするためのツールです。

この PECL をインストールために「yum install php-pear」コマンドを実行します。

php-pear とは、PHP で利用できるライブラリを提供するリポジトリ(ライブラリがたくさん管理されているファイルサーバーのようなもの)です。

php-pear をインストールすることで「PECL」を利用することができます。

# yum install php-pear
読み込んだプラグイン:fastestmirror, langpacks
base | 3.6 kB 00:00:00
elrepo | 2.9 kB 00:00:00
epel/x86_64/metalink | 5.8 kB 00:00:00
http://repos.fedorapeople.org/repos/sic/qt48/epel-7/x86_64/repodata/repomd.xml: [Errno 14] HTTPS Error 404 – Not Found
他のミラーを試します。
To address this issue please refer to the below knowledge base article

Red Hat Customer Portal

If above article doesn’t help to resolve this issue please create a bug on https://bugs.centos.org/

extras | 3.4 kB 00:00:00
groonga | 2.9 kB 00:00:00
mysql-connectors-community | 2.5 kB 00:00:00
mysql-tools-community | 2.5 kB 00:00:00
mysql57-community | 2.5 kB 00:00:00
updates | 3.4 kB 00:00:00
(1/2): extras/7/x86_64/primary_db | 190 kB 00:00:00
(2/2): updates/7/x86_64/primary_db | 7.7 MB 00:00:00
Loading mirror speeds from cached hostfile
* base: ftp.tsukuba.wide.ad.jp
* elrepo: ftp.ne.jp
* epel: ftp.riken.jp
* extras: ftp.tsukuba.wide.ad.jp
* updates: ftp.tsukuba.wide.ad.jp
依存性の解決をしています
–> トランザクションの確認を実行しています。
—> パッケージ php-pear.noarch 1:1.9.4-21.el7 を インストール
–> 依存性の処理をしています: php-xml のパッケージ: 1:php-pear-1.9.4-21.el7.noarch
–> 依存性の処理をしています: php-posix のパッケージ: 1:php-pear-1.9.4-21.el7.noarch
–> トランザクションの確認を実行しています。
—> パッケージ php-process.x86_64 0:5.4.16-42.el7 を インストール
—> パッケージ php-xml.x86_64 0:5.4.16-42.el7 を インストール
–> 依存性解決を終了しました。

依存性を解決しました

==============================================================================================================================================================================
Package アーキテクチャー バージョン リポジトリー 容量
==============================================================================================================================================================================
インストール中:
php-pear noarch 1:1.9.4-21.el7 base 357 k
依存性関連でのインストールをします:
php-process x86_64 5.4.16-42.el7 base 55 k
php-xml x86_64 5.4.16-42.el7 base 125 k

トランザクションの要約
==============================================================================================================================================================================
インストール 1 パッケージ (+2 個の依存関係のパッケージ)

総ダウンロード容量: 538 k
インストール容量: 2.6 M
Is this ok [y/d/N]: y
Downloading packages:
(1/3): php-xml-5.4.16-42.el7.x86_64.rpm | 125 kB 00:00:00
(2/3): php-process-5.4.16-42.el7.x86_64.rpm | 55 kB 00:00:00
(3/3): php-pear-1.9.4-21.el7.noarch.rpm | 357 kB 00:00:00
——————————————————————————————————————————————————————————
合計 800 kB/s | 538 kB 00:00:00
Running transaction check
Running transaction test
Transaction test succeeded
Running transaction
インストール中 : php-process-5.4.16-42.el7.x86_64 1/3
インストール中 : php-xml-5.4.16-42.el7.x86_64 2/3
インストール中 : 1:php-pear-1.9.4-21.el7.noarch 3/3
検証中 : php-xml-5.4.16-42.el7.x86_64 1/3
検証中 : php-process-5.4.16-42.el7.x86_64 2/3
検証中 : 1:php-pear-1.9.4-21.el7.noarch 3/3

インストール:
php-pear.noarch 1:1.9.4-21.el7

依存性関連をインストールしました:
php-process.x86_64 0:5.4.16-42.el7 php-xml.x86_64 0:5.4.16-42.el7

完了しました!


これでPECLコマンドが使用できるようになりました。

早速、pecl コマンドで「PDO」をインストールします。

# pecl install pdo
WARNING: “pecl/PDO” is deprecated in favor of “channel://http://svn.php.net/viewvc/php/php-src/trunk/ext/pdo//ext/PDO”
WARNING: channel “pecl.php.net” has updated its protocols, use “pecl channel-update pecl.php.net” to update
downloading PDO-1.0.3.tgz …
Starting to download PDO-1.0.3.tgz (52,613 bytes)
…..done: 52,613 bytes
12 source files, building
running: phpize
Can’t find PHP headers in /usr/include/php
The php-devel package is required for use of this command.
ERROR: `phpize’ failed ← エラーになりました。
#


エラーメッセージを確認すると「The php-devel package is required」とあります。

つまり「php-devel」をインストールする必要があります。

# yum install php-devel ← 「php-devel」をインストールします。
読み込んだプラグイン:fastestmirror, langpacks
http://repos.fedorapeople.org/repos/sic/qt48/epel-7/x86_64/repodata/repomd.xml: [Errno 14] HTTPS Error 404 – Not Found
他のミラーを試します。
To address this issue please refer to the below knowledge base article

Red Hat Customer Portal

If above article doesn’t help to resolve this issue please create a bug on https://bugs.centos.org/

Loading mirror speeds from cached hostfile
* base: ftp.tsukuba.wide.ad.jp
* elrepo: ftp.ne.jp
* epel: ftp.riken.jp
* extras: ftp.tsukuba.wide.ad.jp
* updates: ftp.tsukuba.wide.ad.jp
依存性の解決をしています
–> トランザクションの確認を実行しています。
—> パッケージ php-devel.x86_64 0:5.4.16-42.el7 を インストール
–> 依存性解決を終了しました。

依存性を解決しました

==============================================================================================================================================================================
Package アーキテクチャー バージョン リポジトリー 容量
==============================================================================================================================================================================
インストール中:
php-devel x86_64 5.4.16-42.el7 base 601 k

トランザクションの要約
==============================================================================================================================================================================
インストール 1 パッケージ

総ダウンロード容量: 601 k
インストール容量: 4.0 M
Is this ok [y/d/N]: y
Downloading packages:
php-devel-5.4.16-42.el7.x86_64.rpm | 601 kB 00:00:00
Running transaction check
Running transaction test
Transaction test succeeded
Running transaction
インストール中 : php-devel-5.4.16-42.el7.x86_64 1/1
検証中 : php-devel-5.4.16-42.el7.x86_64 1/1

インストール:
php-devel.x86_64 0:5.4.16-42.el7

完了しました!


php-devel をインストールしたので再度 pecl コマンドで PDO をインストールします。

# pecl install pdo ← 再度挑戦します。
WARNING: “pecl/PDO” is deprecated in favor of “channel://http://svn.php.net/viewvc/php/php-src/trunk/ext/pdo//ext/PDO”
WARNING: channel “pecl.php.net” has updated its protocols, use “pecl channel-update pecl.php.net” to update
downloading PDO-1.0.3.tgz …
Starting to download PDO-1.0.3.tgz (52,613 bytes)
…..done: 52,613 bytes
12 source files, building
running: phpize
Configuring for:
PHP Api Version: 20100412
Zend Module Api No: 20100525
Zend Extension Api No: 220100525
building in /var/tmp/pear-build-rootyLQcqQ/PDO-1.0.3
running: /var/tmp/PDO/configure
checking for grep that handles long lines and -e… /usr/bin/grep
checking for egrep… /usr/bin/grep -E
checking for a sed that does not truncate output… /usr/bin/sed
checking for cc… cc
checking whether the C compiler works… yes
checking for C compiler default output file name… a.out
checking for suffix of executables…
checking whether we are cross compiling… no
checking for suffix of object files… o
checking whether we are using the GNU C compiler… yes
checking whether cc accepts -g… yes
checking for cc option to accept ISO C89… none needed
checking how to run the C preprocessor… cc -E
checking for icc… no
checking for suncc… no
checking whether cc understands -c and -o together… yes
checking for system library directory… lib
checking if compiler supports -R… no
checking if compiler supports -Wl,-rpath,… yes
checking build system type… x86_64-unknown-linux-gnu
checking host system type… x86_64-unknown-linux-gnu
checking target system type… x86_64-unknown-linux-gnu
checking for PHP prefix… /usr
checking for PHP includes… -I/usr/include/php -I/usr/include/php/main -I/usr/include/php/TSRM -I/usr/include/php/Zend -I/usr/include/php/ext -I/usr/include/php/ext/date/lib
checking for PHP extension directory… /usr/lib64/php/modules
checking for PHP installed headers prefix… /usr/include/php
checking if debug is enabled… no
checking if zts is enabled… no
checking for re2c… no
configure: WARNING: You will need re2c 0.13.4 or later if you want to regenerate PHP parsers.
checking for gawk… gawk
checking whether to enable PDO support… yes, shared
checking how to print strings… printf
checking for a sed that does not truncate output… (cached) /usr/bin/sed
checking for fgrep… /usr/bin/grep -F
checking for ld used by cc… /usr/bin/ld
checking if the linker (/usr/bin/ld) is GNU ld… yes
checking for BSD- or MS-compatible name lister (nm)… /usr/bin/nm -B
checking the name lister (/usr/bin/nm -B) interface… BSD nm
checking whether ln -s works… yes
checking the maximum length of command line arguments… 1572864
checking whether the shell understands some XSI constructs… yes
checking whether the shell understands “+=”… yes
checking how to convert x86_64-unknown-linux-gnu file names to x86_64-unknown-linux-gnu format… func_convert_file_noop
checking how to convert x86_64-unknown-linux-gnu file names to toolchain format… func_convert_file_noop
checking for /usr/bin/ld option to reload object files… -r
checking for objdump… objdump
checking how to recognize dependent libraries… pass_all
checking for dlltool… no
checking how to associate runtime and link libraries… printf %s\n
checking for ar… ar
checking for archiver @FILE support… @
checking for strip… strip
checking for ranlib… ranlib
checking for gawk… (cached) gawk
checking command to parse /usr/bin/nm -B output from cc object… ok
checking for sysroot… no
checking for mt… no
checking if : is a manifest tool… no
checking for ANSI C header files… yes
checking for sys/types.h… yes
checking for sys/stat.h… yes
checking for stdlib.h… yes
checking for string.h… yes
checking for memory.h… yes
checking for strings.h… yes
checking for inttypes.h… yes
checking for stdint.h… yes
checking for unistd.h… yes
checking for dlfcn.h… yes
checking for objdir… .libs
checking if cc supports -fno-rtti -fno-exceptions… no
checking for cc option to produce PIC… -fPIC -DPIC
checking if cc PIC flag -fPIC -DPIC works… yes
checking if cc static flag -static works… no
checking if cc supports -c -o file.o… yes
checking if cc supports -c -o file.o… (cached) yes
checking whether the cc linker (/usr/bin/ld -m elf_x86_64) supports shared libraries… yes
checking whether -lc should be explicitly linked in… no
checking dynamic linker characteristics… GNU/Linux ld.so
checking how to hardcode library paths into programs… immediate
checking whether stripping libraries is possible… yes
checking if libtool supports shared libraries… yes
checking whether to build shared libraries… yes
checking whether to build static libraries… no
configure: creating ./config.status
config.status: creating config.h
config.status: executing libtool commands
running: make
/bin/sh /var/tmp/pear-build-rootyLQcqQ/PDO-1.0.3/libtool –mode=compile cc -I. -I/var/tmp/PDO -DPHP_ATOM_INC -I/var/tmp/pear-build-rootyLQcqQ/PDO-1.0.3/include -I/var/tmp/pear-build-rootyLQcqQ/PDO-1.0.3/main -I/var/tmp/PDO -I/usr/include/php -I/usr/include/php/main -I/usr/include/php/TSRM -I/usr/include/php/Zend -I/usr/include/php/ext -I/usr/include/php/ext/date/lib -DHAVE_CONFIG_H -g -O2 -c /var/tmp/PDO/pdo.c -o pdo.lo
libtool: compile: cc -I. -I/var/tmp/PDO -DPHP_ATOM_INC -I/var/tmp/pear-build-rootyLQcqQ/PDO-1.0.3/include -I/var/tmp/pear-build-rootyLQcqQ/PDO-1.0.3/main -I/var/tmp/PDO -I/usr/include/php -I/usr/include/php/main -I/usr/include/php/TSRM -I/usr/include/php/Zend -I/usr/include/php/ext -I/usr/include/php/ext/date/lib -DHAVE_CONFIG_H -g -O2 -c /var/tmp/PDO/pdo.c -fPIC -DPIC -o .libs/pdo.o
/bin/sh /var/tmp/pear-build-rootyLQcqQ/PDO-1.0.3/libtool –mode=compile cc -I. -I/var/tmp/PDO -DPHP_ATOM_INC -I/var/tmp/pear-build-rootyLQcqQ/PDO-1.0.3/include -I/var/tmp/pear-build-rootyLQcqQ/PDO-1.0.3/main -I/var/tmp/PDO -I/usr/include/php -I/usr/include/php/main -I/usr/include/php/TSRM -I/usr/include/php/Zend -I/usr/include/php/ext -I/usr/include/php/ext/date/lib -DHAVE_CONFIG_H -g -O2 -c /var/tmp/PDO/pdo_dbh.c -o pdo_dbh.lo
libtool: compile: cc -I. -I/var/tmp/PDO -DPHP_ATOM_INC -I/var/tmp/pear-build-rootyLQcqQ/PDO-1.0.3/include -I/var/tmp/pear-build-rootyLQcqQ/PDO-1.0.3/main -I/var/tmp/PDO -I/usr/include/php -I/usr/include/php/main -I/usr/include/php/TSRM -I/usr/include/php/Zend -I/usr/include/php/ext -I/usr/include/php/ext/date/lib -DHAVE_CONFIG_H -g -O2 -c /var/tmp/PDO/pdo_dbh.c -fPIC -DPIC -o .libs/pdo_dbh.o
/var/tmp/PDO/pdo_dbh.c: In function ‘pdo_stmt_instantiate’:
/var/tmp/PDO/pdo_dbh.c:410:8: error: ‘zval’ has no member named ‘refcount’
object->refcount = 1;
^
/var/tmp/PDO/pdo_dbh.c:411:8: error: ‘zval’ has no member named ‘is_ref’
object->is_ref = 1;
^
/var/tmp/PDO/pdo_dbh.c: In function ‘pdo_stmt_construct’:
/var/tmp/PDO/pdo_dbh.c:424:2: error: too few arguments to function ‘std_object_handlers.write_property’
std_object_handlers.write_property(object, &z_key, query_string TSRMLS_CC);
^
/var/tmp/PDO/pdo_dbh.c:435:6: error: ‘zend_fcall_info’ has no member named ‘object_pp’
fci.object_pp = &object;
^
/var/tmp/PDO/pdo_dbh.c:458:6: error: ‘zend_fcall_info_cache’ has no member named ‘object_pp’
fcc.object_pp = &object;
^
/var/tmp/PDO/pdo_dbh.c: In function ‘zim_PDO_setAttribute’:
/var/tmp/PDO/pdo_dbh.c:752:12: error: ‘zval’ has no member named ‘refcount’
(*item)->refcount++;
^
/var/tmp/PDO/pdo_dbh.c: In function ‘zim_PDO_getAttribute’:
/var/tmp/PDO/pdo_dbh.c:818:28: error: ‘zval’ has no member named ‘refcount’
dbh->def_stmt_ctor_args->refcount++;
^
/var/tmp/PDO/pdo_dbh.c: In function ‘pdo_hash_methods’:
/var/tmp/PDO/pdo_dbh.c:1126:20: warning: assignment discards ‘const’ qualifier from pointer target type [enabled by default]
ifunc->arg_info = funcs->arg_info + 1;
^
/var/tmp/PDO/pdo_dbh.c:1128:26: error: ‘const struct _zend_arg_info’ has no member named ‘required_num_args’
if (funcs->arg_info[0].required_num_args == -1) {
^
/var/tmp/PDO/pdo_dbh.c:1131:50: error: ‘const struct _zend_arg_info’ has no member named ‘required_num_args’
ifunc->required_num_args = funcs->arg_info[0].required_num_args;
^
/var/tmp/PDO/pdo_dbh.c:1133:9: error: ‘zend_internal_function’ has no member named ‘pass_rest_by_reference’
ifunc->pass_rest_by_reference = funcs->arg_info[0].pass_by_reference;
^
/var/tmp/PDO/pdo_dbh.c:1134:9: error: ‘zend_internal_function’ has no member named ‘return_reference’
ifunc->return_reference = funcs->arg_info[0].return_reference;
^
/var/tmp/PDO/pdo_dbh.c:1134:48: error: ‘const struct _zend_arg_info’ has no member named ‘return_reference’
ifunc->return_reference = funcs->arg_info[0].return_reference;
^
/var/tmp/PDO/pdo_dbh.c:1139:9: error: ‘zend_internal_function’ has no member named ‘pass_rest_by_reference’
ifunc->pass_rest_by_reference = 0;
^
/var/tmp/PDO/pdo_dbh.c:1140:9: error: ‘zend_internal_function’ has no member named ‘return_reference’
ifunc->return_reference = 0;
^
/var/tmp/PDO/pdo_dbh.c: In function ‘pdo_dbh_init’:
/var/tmp/PDO/pdo_dbh.c:1242:37: warning: assignment from incompatible pointer type [enabled by default]
pdo_dbh_object_handlers.get_method = dbh_method_get;
^
/var/tmp/PDO/pdo_dbh.c: In function ‘pdo_dbh_new’:
/var/tmp/PDO/pdo_dbh.c:1413:37: error: ‘zend_class_entry’ has no member named ‘default_properties’
zend_hash_copy(dbh->properties, &ce->default_properties, (copy_ctor_func_t) zval_add_ref, (void *) &tmp, sizeof(zval *));
^
make: *** [pdo_dbh.lo] エラー 1
ERROR: `make’ failed ← make が失敗したようです。


make は C 言語のソースファイルをコンパイルして実行ファイルを作成するコンパイルツールです。

**.c ファイルを読み込んでコンパイルする際に失敗しているようです。


八方ふさがりになりましたが、調べたら yum コマンドで PDO がインストールできることが分かりました。

早速 yum で PDO をインストールしました。

# yum install php-pdo
読み込んだプラグイン:fastestmirror, langpacks
http://repos.fedorapeople.org/repos/sic/qt48/epel-7/x86_64/repodata/repomd.xml: [Errno 14] HTTPS Error 404 – Not Found
他のミラーを試します。
To address this issue please refer to the below knowledge base article

Red Hat Customer Portal

If above article doesn’t help to resolve this issue please create a bug on https://bugs.centos.org/

Loading mirror speeds from cached hostfile
* base: ftp.tsukuba.wide.ad.jp
* elrepo: ftp.ne.jp
* epel: ftp.riken.jp
* extras: ftp.tsukuba.wide.ad.jp
* updates: ftp.tsukuba.wide.ad.jp
依存性の解決をしています
–> トランザクションの確認を実行しています。
—> パッケージ php-pdo.x86_64 0:5.4.16-42.el7 を インストール
–> 依存性解決を終了しました。

依存性を解決しました

==============================================================================================================================================================================
Package アーキテクチャー バージョン リポジトリー 容量
==============================================================================================================================================================================
インストール中:
php-pdo x86_64 5.4.16-42.el7 base 98 k

トランザクションの要約
==============================================================================================================================================================================
インストール 1 パッケージ

総ダウンロード容量: 98 k
インストール容量: 192 k
Is this ok [y/d/N]: y
Downloading packages:
php-pdo-5.4.16-42.el7.x86_64.rpm | 98 kB 00:00:00
Running transaction check
Running transaction test
Transaction test succeeded
Running transaction
インストール中 : php-pdo-5.4.16-42.el7.x86_64 1/1
検証中 : php-pdo-5.4.16-42.el7.x86_64 1/1

インストール:
php-pdo.x86_64 0:5.4.16-42.el7

完了しました!


yum コマンドで簡単に PDO をインストールできました。


再度 httpd を再起動します。

systemctl restart httpd.service ← httpd を再起動します。

systemctl status httpd.service ← 正常に httpd が起動しているか確認します。

httpd.service – The Apache HTTP Server
Loaded: loaded (/usr/lib/systemd/system/httpd.service; enabled; vendor preset: disabled)
Active: active (running) since 金 2017-07-14 22:10:10 JST; 5s ago
Docs: man:httpd(8)
man:apachectl(8)
Process: 30746 ExecStop=/bin/kill -WINCH ${MAINPID} (code=exited, status=0/SUCCESS)
Process: 7031 ExecReload=/usr/sbin/httpd $OPTIONS -k graceful (code=exited, status=0/SUCCESS)
Main PID: 30750 (httpd)
Status: “Processing requests…”
CGroup: /system.slice/httpd.service
tq30750 /usr/sbin/httpd -DFOREGROUND
tq30751 /usr/sbin/httpd -DFOREGROUND
tq30752 /usr/sbin/httpd -DFOREGROUND
tq30753 /usr/sbin/httpd -DFOREGROUND
tq30754 /usr/sbin/httpd -DFOREGROUND
mq30755 /usr/sbin/httpd -DFOREGROUND

7月 14 22:10:10 xxx-xxx-xxxxx.vs.sakura.ne.jp systemd[1]: Starting The Apache HTTP Server…
7月 14 22:10:10 xxx-xxx-xxxxx.vs.sakura.ne.jp systemd[1]: Started The Apache HTTP Server.


URLへアクセスします。

ようやく WordPress のインストール画面が表示されました。

ここまで長かったです(笑)

格安レンタルサーバーで見かける「SQLite」を WordPress で利用する手順


必要な項目を入力して「WordPressをインストール」をクリックします。

格安レンタルサーバーで見かける「SQLite」を WordPress で利用する手順


インストールが完了したら「ログイン」をクリックします。

格安レンタルサーバーで見かける「SQLite」を WordPress で利用する手順


先ほど設定した「ユーザー名」「パスワード」を入力して「ログイン」をクリックします。

【図解】格安レンタルサーバーで見かける「SQLite」を WordPress で利用する手順


問題なくログインができました。

【図解】格安レンタルサーバーで見かける「SQLite」を WordPress で利用する手順


WordPressのサイトも問題なく表示できました。

【図解】格安レンタルサーバーで見かける「SQLite」を WordPress で利用する手順


まとめ

実際に WordPress を SQLite で動かす設定をしましたが、大変でした。

ただ、大変だった理由が、そもそも CentOS7 を必要最小限でインストールしていたため必要なパッケージが多数足りなかったからでした。

そのためエラーが多発しました。

しかしレンタルサーバーならあらかじめ必要なパッケージが入っているので、この記事のようにファイルを編集してからレンタルサーバーへアップロードすれば問題なく WordPress を構築できるでしょう。


月額100円程度で「SQLite」付きのレンタルサーバーをレンタルすることができます。

WordPress でのブログやサイトの練習用としてもいいかもしれません。

レンタルサーバープランSQLiteMySQL初期費用月額ディスク容量
バリューサーバーまるっと無料133円25GB
ロリポップ!エコノミー×無料100円10GB
ドメインキングPプラン934円100円20GB
エクストリムレンタルサーバーライト1,000円94円2GB
さくらのレンタルサーバライト×1,029円129円10GB
コアサーバーCORE-MINI無料198円60GB
エックスサーバーX103,000円900円200GB


もちろん、将来アクセスが増えてきたら MySQL に引っ越す方がいいでしょう。


よかったらシェアしてね!
  • URLをコピーしました!
  • URLをコピーしました!

この記事を書いた人

コメント

コメントする

AlphaOmega Captcha Medica  –  What Do You See?


このサイトはスパムを低減するために Akismet を使っています。コメントデータの処理方法の詳細はこちらをご覧ください