find コマンドの使い方について解説します。
環境は「CentOS 6 系」もしくは「CentOS 7 系」です。
目次
過去のファイルを削除する
find コマンドの使い方として多いのではないでしょうか。
- cron で定期的にバックアップスクリプトを実行し、その後過去のバックアップファイルを削除する
個人的には以下の使い方をしているエンジニアが多いと思います。
- ログファイル ← ログローテートを利用する
- バックアップファイル ← find コマンドで日付をチェックして削除する
バックアップスクリプトでよく利用する find コマンドのオプションは「-mtime」ですが、他にも以下の種類のオプションがあります。
- -mtime ← ファイルの最終内容更新日時(何日前か?)
- -mmin ← ファイルの最終内容更新日時(何分前か?)
- -atime ← ファイルの最終アクセス日時(何日前か?)
- -amin ← ファイルの最終アクセス日時(何分前か?)
- -ctime ← ファイルの最終ステータス変更日時(何日前か?)
- -cmin ← ファイルの最終ステータス変更日時(何分前か?)
「time」と「min」の 2 種類があり、「m」と「a」と「c」の 3 種類があります。
更に期間の特定方法が 3 種類あります。
一番分かりやすくてよく使う「-mtime」で説明します。
現在時刻を「現在」とすると、以下のようになります。
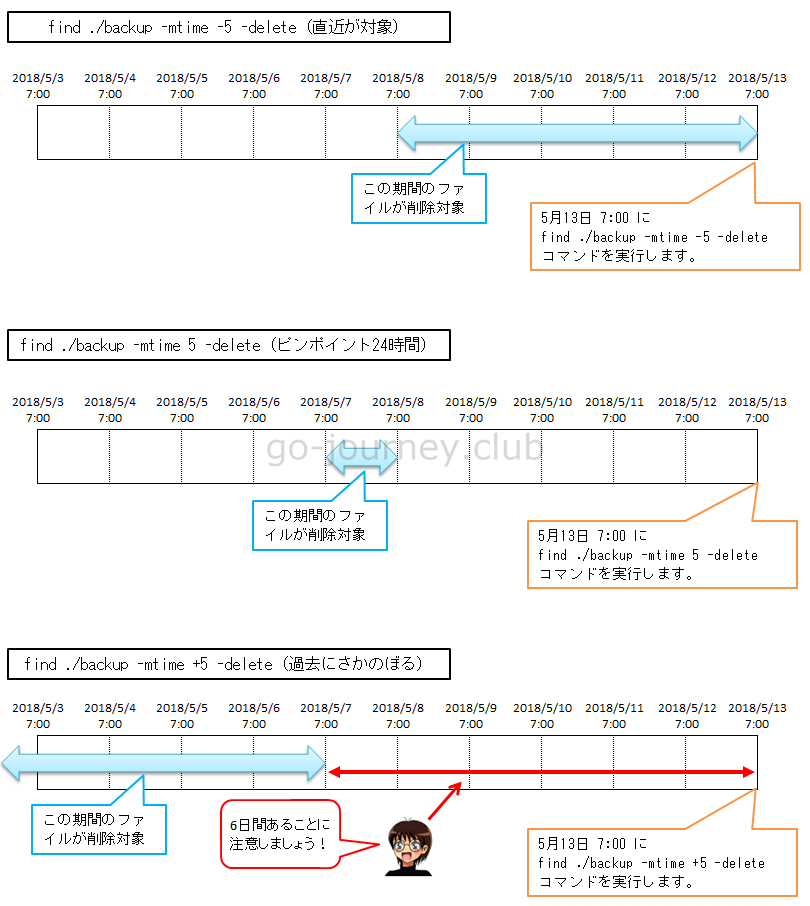
- -mtime -n ← n 日前 ~ 現在 に更新されたファイル
- -mtime n ← n 日前に更新されたファイル
- -mtime +n ← n 日前から過去に更新されたファイル
find コマンドの「-mtime」や「+」「-」を言葉で説明すると非常に分かりやすいので図にしてみました。
注意点は、「コマンドを実行した時刻が基準となる」というところです。
つまり、朝 07:00 に「find ./backup -mtime -5 -delete」コマンドを実行すると 2018年5月8日の「07:00」までが対象になります。
※00:00が基準ではありません。実行した時刻です。
タイムスタンプが異なるファイルをいくつか作成します。
|
[root@SAKURA_VPS test]# touch -t 05130700 2018-0513-0700 |
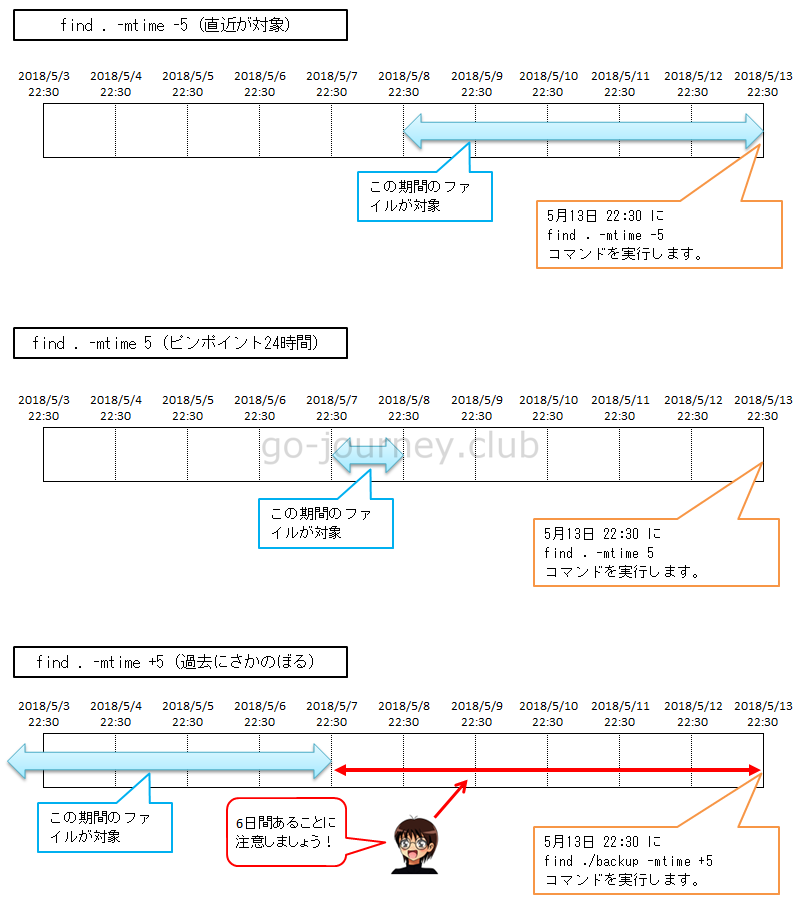
以下のコマンドを実行してみます。
コマンド実行時間は「2018年5月13日22:30」です。
find . -mtime -5
find . -mtime 5
find . -mtime +5
|
[root@SAKURA_VPS test]# date [root@SAKURA_VPS test]# find . -mtime -5 |
コマンド実行結果と下図の期間を比べてみてください。コマンドの実行結果が図の期間で出力されていることが分かります。
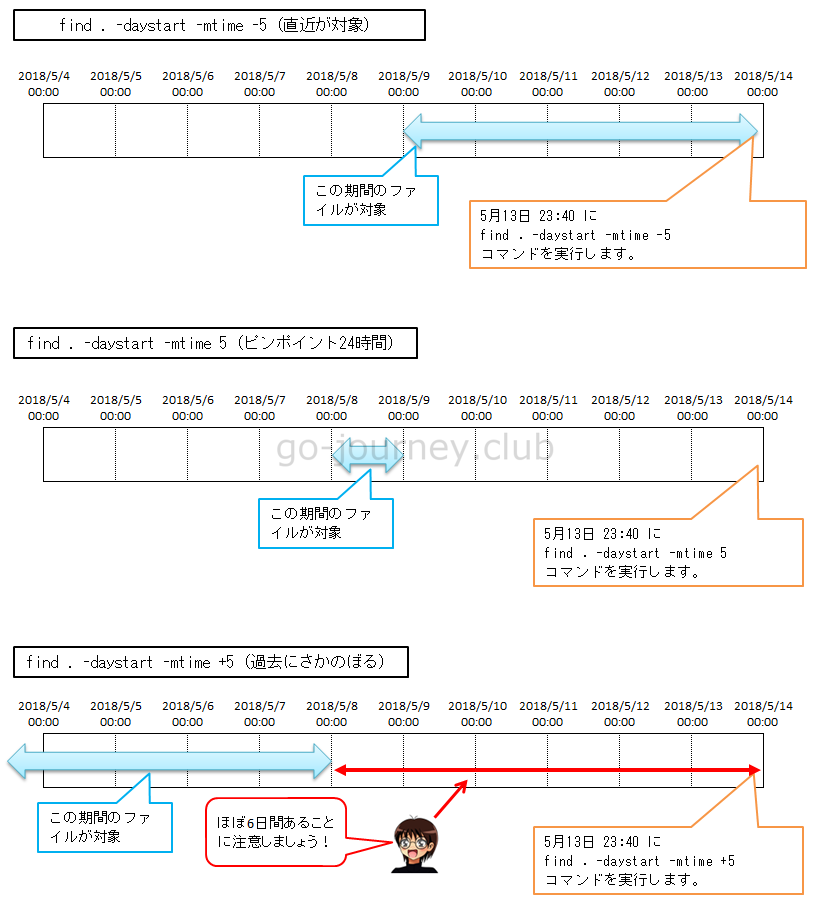
-daystart オプションもあるが、便利だが少々ややこしいので注意
先ほどコマンドを実行した時間を基準とすると解説しましたが、他に「-daystart」オプションがあります。
この「-daystart」オプションが便利ですが、少々ややこしい(メンバー間でヒューマンエラーを確実に発生させる)ので注意が必要です。
まずは「man find」の画面のスナップショットです。

この man コマンドの結果を素直に読むと、以下の 2 つの説明があります。
- コマンド実行当日の 0 時にする。
- -daystart を指定すると、時間計算の基準が今日の 24:00 になる。
当たり前ですが「00:00」と「24:00」では 1 日異なります。
この「-daystart」オプションの解釈の仕方がメンバー間で異なると様々な障害・トラブルを引き起こしそうです。
※一番いい方法は、このようなメンバー間で確実に認識の違いを生み出すようなややこしい設定は使わないようにすることです。
実際に動作確認をしてみます。
タイムスタンプが異なるファイルをいくつか作成します。
|
[root@SAKURA_VPS test]# touch -t 05130700 2018-0513-0700 |
以下のコマンドを実行してみます。
コマンドを実行した時刻は「2018年5月13日23:38」です。
|
[root@SAKURA_VPS test]# date [root@SAKURA_VPS test]# find . -daystart -mtime -5 |
コマンド実行結果が下図の期間と一致していることを確認します。
結論
man コマンドの結果を素直に読むと、以下の 2 つの説明がありました。
- コマンド実行当日の 0 時にする。
- -daystart を指定すると、時間計算の基準が今日の 24:00 になる。
実際にコマンドを実行して動作検証をしてみたところ、動作的には「-daystart を指定すると、時間計算の基準が今日の 24:00 になる。」が正しいことが分かりました。
CRON と find コマンドで 1 週間前以上のログを削除する
今回は logrotate を利用せずに CRON と find コマンドを利用して 1 週間のログを削除する設定をします。
cron は「/etc/crontab」を利用します。
- 対象のディレクトリ ← /var/log
- 対象のオブジェクト ← ファイルのみ(ディレクトリは対象外)
- いつのタイムスタンプを削除するのか ← 1週間以上(7日以上、168時間以上)昔のファイルを削除
■find コマンドオプション
- -type b ← ブロックデバイスファイル
- -type c ← キャラクタデバイスファイル
- -type d ← ディレクトリ
- -type p ← 名前付きパイプ
- -type f ← 通常ファイル
- -type l ← シンボリックリンク
- -type s ← ソケットファイル
■対象を delete オプションで削除する
-delete オプション
|
-delete
If the removal failed, an error message is issued.
If -delete fails, find’s exit status will be nonzero (when it eventually exits).
Use of -delete automatically turns on the `-depth’ option.
Warnings: Don’t forget that the find command line is evaluated as an expression, so putting -delete first will make find try to delete everything below the starting points you specified.
When testing a find command line that you later intend to use with -delete, you should explicitly specify -depth in order to avoid later surprises.
Because -delete implies -depth, you cannot usefully use -prune and -delete together. |
■crontab を実行する際は $PATH が設定されていないため注意
トラブル防止のため、コマンドは必ずフルパスで記述します。
■階層を指定して不測の事態を防ぐ
- -maxdepth 0 ← カレントディレクトリのみ対象とします。
■findコマンド
|
[root@redhat7 log]# /bin/find /var/log/* -maxdepth 0 -mtime +6 -type f -delete |
※-deleteを試す前に、-printで動作検証をするとミスを防止できます。
|
[root@redhat7 log]# /bin/find /var/log/* -maxdepth 0 -mtime +6 -type f -print /var/log/boot.log |
xargs ls -l で日付の確認もできます。
|
[root@redhat7 ~]# /bin/find /var/log/* -maxdepth 0 -mtime +6 -type f -print | xargs /bin/ls -l |
■/etc/crontab
|
SHELL=/bin/bash |
まとめ
図解と実際にファイルを作成してコマンドを実行してみたことで自分自身も find コマンドの期間の指定方法について整理できました。
特にメンバーが多くいるような組織の場合はキチンと図解して認識を統一しておかないと様々なトラブルが発生します。