【Python】【機械学習】scikit-learn のインストールと XOR 演算プログラム


現在、ソシム株式会社「クジラ飛行机」著の「Pythonによるスクレイピング&機械学習 開発テクニック BeautifulSoup、scikit-learn、TensorFlow を使ってみよう」で、機械学習を勉強しています。


インフラ系エンジニアでプログラマーとしての業務経験がありませんが、どこまで学習が進むか、どこまで理解できるかチャレンジしようと思っています。

Pythonによるスクレイピング&機械学習 開発テクニック BeautifulSoup,scikit-learn,TensorFlowを使ってみよう


scikit-learn のインストール

scikit-learn「サイキット・ラーン」と読みます。

scikit-learn は Python の機械学習ライブラリです。


機械学習について以前簡単に説明しましたので参照してください。


機械学習とは?


scikit-learn は以下のように分類が豊富にあります。

■分類

  • サポートベクターマシン
  • ランダムフォレスト
  • Gradient Boosting
  • k近傍法
  • DBSCAN

■回帰

■クラスタリング

■次元削除


scikit-learn は pip コマンドで簡単にインストールできる

機械学習初心者にとって「scikit-learn」をお勧めするのは pip コマンドで簡単にインストールができ、機械学習の環境を構築できるからです。


今回は「さくらVPS」にインストールしてみました。


最初に環境を確認します。

Python 3.6 を使います。

[root@SAKURA_VPS ~]# python3.6
Python 3.6.2 (default, Jul 18 2017, 22:59:34)
[GCC 4.8.5 20150623 (Red Hat 4.8.5-11)] on linux
Type “help”, “copyright”, “credits” or “license” for more information.
>>> exit()
[root@SAKURA_VPS ~]#


pip コマンドの確認です。

pip コマンドは「pip3.6」コマンドを利用します。

[root@SAKURA_VPS ~]# pip3.6 -V
pip 9.0.1 from /usr/lib/python3.6/site-packages (python 3.6)
[root@SAKURA_VPS ~]#


pip3.6 コマンドでインストールをします。

scikit-learn、scipy、matplotlib、scikit-image をインストールします。

[root@SAKURA_VPS ~]# pip3.6 install -U scikit-learn scipy matplotlib scikit-image
Collecting scikit-learn
  Downloading scikit_learn-0.19.0-cp36-cp36m-manylinux1_x86_64.whl (12.4MB)
    100% |????????????????????????????????| 12.4MB 87kB/s
Collecting scipy
  Downloading scipy-0.19.1-cp36-cp36m-manylinux1_x86_64.whl (48.2MB)
    100% |????????????????????????????????| 48.2MB 20kB/s
Collecting matplotlib
  Downloading matplotlib-2.0.2-cp36-cp36m-manylinux1_x86_64.whl (14.6MB)
    100% |????????????????????????????????| 14.6MB 82kB/s
Collecting scikit-image
  Downloading scikit_image-0.13.0-cp36-cp36m-manylinux1_x86_64.whl (34.0MB)
    100% |????????????????????????????????| 34.0MB 31kB/s
Collecting numpy>=1.8.2 (from scipy)
  Downloading numpy-1.13.1-cp36-cp36m-manylinux1_x86_64.whl (17.0MB)
    100% |????????????????????????????????| 17.0MB 71kB/s
Collecting cycler>=0.10 (from matplotlib)
  Using cached cycler-0.10.0-py2.py3-none-any.whl
Collecting pytz (from matplotlib)
  Using cached pytz-2017.2-py2.py3-none-any.whl
Collecting six>=1.10 (from matplotlib)
  Using cached six-1.10.0-py2.py3-none-any.whl
Collecting python-dateutil (from matplotlib)
  Using cached python_dateutil-2.6.1-py2.py3-none-any.whl
Collecting pyparsing!=2.0.0,!=2.0.4,!=2.1.2,!=2.1.6,>=1.5.6 (from matplotlib)
  Using cached pyparsing-2.2.0-py2.py3-none-any.whl
Collecting PyWavelets>=0.4.0 (from scikit-image)
  Downloading PyWavelets-0.5.2-cp36-cp36m-manylinux1_x86_64.whl (5.7MB)
    100% |????????????????????????????????| 5.7MB 219kB/s
Collecting networkx>=1.8 (from scikit-image)
  Using cached networkx-1.11-py2.py3-none-any.whl
Collecting pillow>=2.1.0 (from scikit-image)
  Downloading Pillow-4.2.1-cp36-cp36m-manylinux1_x86_64.whl (5.8MB)
    100% |????????????????????????????????| 5.8MB 207kB/s
Collecting decorator>=3.4.0 (from networkx>=1.8->scikit-image)
  Using cached decorator-4.1.2-py2.py3-none-any.whl
Collecting olefile (from pillow>=2.1.0->scikit-image)
  Using cached olefile-0.44.zip
Building wheels for collected packages: olefile
  Running setup.py bdist_wheel for olefile … done
  Stored in directory: /root/.cache/pip/wheels/20/58/49/cc7bd00345397059149a10b0259ef38b867935ea2ecff99a9b
Successfully built olefile
Installing collected packages: scikit-learn, numpy, scipy, six, cycler, pytz, python-dateutil, pyparsing, matplotlib, PyWavelets, decorator, networkx, olefile, pillow, scikit-image
Successfully installed PyWavelets-0.5.2 cycler-0.10.0 decorator-4.1.2 matplotlib-2.0.2 networkx-1.11 numpy-1.13.1 olefile-0.44 pillow-4.2.1 pyparsing-2.2.0 python-dateutil-2.6.1 pytz-2017.2 scikit-image-0.13.0 scikit-learn-0.19.0 scipy-0.19.1 six-1.10.0
[root@SAKURA_VPS ~]#


pandas もインストールします。

[root@SAKURA_VPS ~]# pip3.6 install pandas
Collecting pandas
  Downloading pandas-0.20.3-cp36-cp36m-manylinux1_x86_64.whl (24.5MB)
    100% |????????????????????????????????| 24.5MB 47kB/s
Requirement already satisfied: python-dateutil>=2 in /usr/lib/python3.6/site-packages (from pandas)
Requirement already satisfied: pytz>=2011k in /usr/lib/python3.6/site-packages (from pandas)
Requirement already satisfied: numpy>=1.7.0 in /usr/lib64/python3.6/site-packages (from pandas)
Requirement already satisfied: six>=1.5 in /usr/lib/python3.6/site-packages (from python-dateutil>=2->pandas)
Installing collected packages: pandas
Successfully installed pandas-0.20.3
[root@SAKURA_VPS ~]#


padas はデータ解析を支援するライブラリです。

データの読み込みや分割を行います。


XOR 演算プログラム

機械学習で XOR 演算をやってみます。


XOR 演算とは?

XOR は「エックスオア」と読みます。

XOR演算

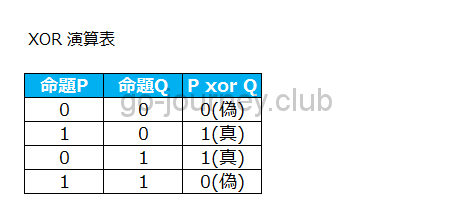
上図が「XOR演算表」になりますが、2つの値を入力した場合、どちらかが「真」でどちらかが「偽」の場合のみ、結果が「真」になります。

逆に両方が「真」、両方が「偽」の場合は結果が「偽」になるという性質があります。


この不思議な論理演算を機械学習プログラムで表現しました。


XOR 演算プログラム

[root@SAKURA_VPS ai]# vi xor-train.py
from sklearn import svm

# XOR の演算結果・学習器に与える入力データ
xor_data = [
    # P,Q,result
    [0,0,0],
    [0,1,1],
    [1,0,1],
    [1,1,0]
]

# 学習させるためにデータとラベルに分ける
data = []
label = []
for row in xor_data:
    p = row[0]
    q = row[1]
    r = row[2]
    data.append([p,q])
    label.append(r)

# データの学習
clf = svm.SVC()
clf.fit(data, label)

# データを予測
pre = clf.predict(data)
print(“予測結果:”, pre)

# 正解と合っているか結果を確認
ok = 0; total = 0
for idx, answer in enumerate(label):
    p = pre[idx]
    if p == answer: ok += 1
    total += 1

print(“正解率:”, ok, “/”, total, “=”, ok/total)


上記プログラムは以下の書籍を参考にしています。

Pythonによるスクレイピング&機械学習 開発テクニック BeautifulSoup,scikit-learn,TensorFlowを使ってみよう


※ちなみに vi、vim エディタで Python プログラムを書くと、コメントアウト行が青で見にくく感じることがあります。

その場合は自分の好きな色にカスタマイズすることができますので試してみてください。


【Linux】root の vi にカラー(色)を付ける、(root以外でも)vi の色をカスタマイズする(コメントアウトなど)


プログラムを実行してみる

プログラムを作成したら実行してみます。

[root@SAKURA_VPS ai]# python3.6 xor-train.py
予測結果: [0 1 1 0]
正解率: 4 / 4 = 1.0


なるほど。

難しいですね(笑)

正解率: 4 / 4 = 1.0」なので正解率は100%、全問正解です。


予測結果: [0 1 1 0]」は、[P=0, Q=1, result=1, 特に意味なし、フォーマット上のあまり=0] ということだと思います。


つまり scikit-learn の fit() メソッドが4列なので結果も4列で出力されているだけで、クッションの0だと思います。


ただ「~と思う」だと全然違ってしまう可能性があるため、調べました。


scikit-learn fit() メソッド

fit() メソッドとは

  • データを与えて学習させる(トレーニングさせる)
    → xor_data のデータを与えています。
  • 第一引数に学習するデータの配列、第二引数にラベルの配列を与える
    → clf.fit(data, label) の部分です。
  • 学習が完了したら、データを与えられなくても「それらしい」回答を作ることができる
    → 予測結果: [0 1 1 0] の部分です。プログラムが勝手に?データを考えて回答をしています。P=0,Q=1 の場合、XOR計算をすると「1(真)」が返ってきますが、プログラムの結果もそうなっています。

です。


ただ、そうはいってもまだまだ敷居が高いです。


まとめ

Pythonプログラミングは私の一生の趣味になると思いますので!?、諦めずに勉強し続けます。


現在勉強中のテキスト


Python 初心者でも飽きずに勉強できると思います。

インターネット上の情報をプログラムで取得する Web スクレイピングのテクニックもあり、今後記事にする予定ですが夏目漱石の書籍を題材に「形態素解析」をするテクニックも解説しています。

Pythonによるスクレイピング&機械学習 開発テクニック BeautifulSoup,scikit-learn,TensorFlowを使ってみよう


数学初心者向けです。Amazonでは有識者の方からなぜか酷評ですが(ビギナー向けだとか内容が薄いとか)、初心者にとっては解説が丁寧なので分かりやすいです。

ディープラーニングがわかる数学入門


よかったらシェアしてね!
  • URLをコピーしました!
  • URLをコピーしました!

この記事を書いた人

コメント

コメントする

AlphaOmega Captcha Medica  –  What Do You See?


このサイトはスパムを低減するために Akismet を使っています。コメントデータの処理方法の詳細はこちらをご覧ください