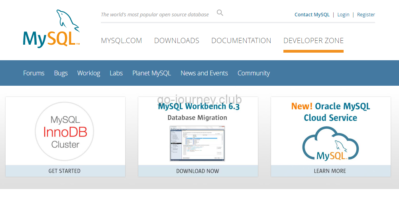
DOWNLOADS ページに移行すると以下のように多数の種類の MySQL Server があります。
Oracle MySQL Cloud Service (commercial)
MySQL Enterprise Edition (commercial)
MySQL Cluster CGE (commercial)
MySQL Community Edition (GPL)
※「commercial」は「有償」という意味です。
今回はGPL(無償)の「MySQL Community Edition (GPL)」をインストールします。
ページに下の方に「MySQL Community Edition(GPL)」のダウンロードリンクがあるのでクリックをします。
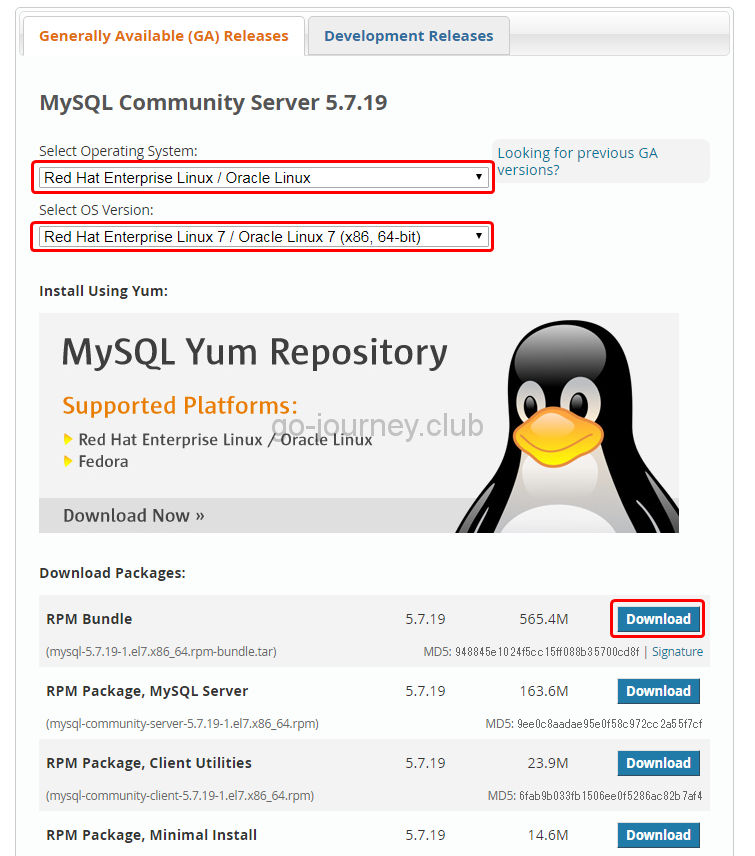
「MySQL Community Downloads」ページに移動したら「DOWNLOAD」リンクをクリックします。
下図のように OS とアーキテクチャを選択します。
今回は CentOS7 で 64bit なので「Red Hat Enterprise Linux / Oracle Linux」で「Red Hat Enterprise Linux 7 / Oracle Linux 7 (x86, 64-bit)」を選択します。
パッケージは一番確実な「Red Hat Enterprise Linux 7 / Oracle Linux 7 (x86, 64-bit), RPM Bundle」をダウンロードします。
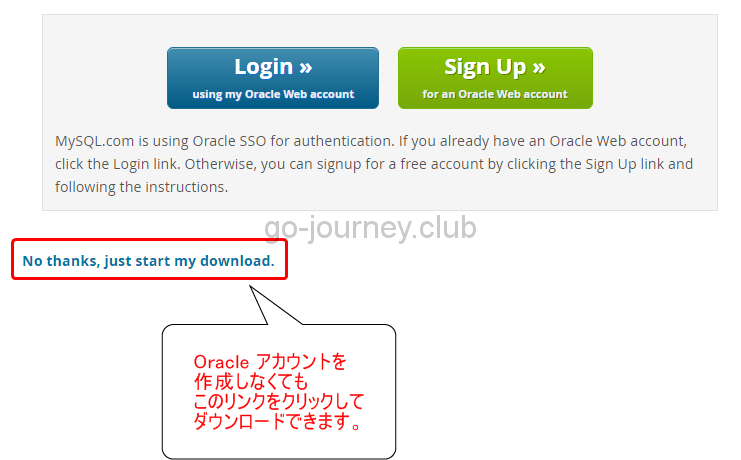
「Download」ボタンをクリックすると下図のようにログインを促すページに移動しますが、Oracle アカウントを持っている場合はログインしてダウンロードをしてもいいですし、Oracle アカウントを持ってなくて、特に作る必要もない場合は「No thanks, just start my download.」リンクをクリックすることでパッケージをダウンロードすることができます。
MySQL Server の自動起動の設定がされていることを確認し、手動で MySQL Server を起動します。
[root@cent07 test]# systemctl list-unit-files | grep mysqld
mysqld.service enabled
mysqld@.service disabled
[root@cent07 test]# systemctl status mysqld.service
● mysqld.service – MySQL Server
Loaded: loaded (/usr/lib/systemd/system/mysqld.service; enabled; vendor preset: disabled)
Active: inactive (dead)
Docs: man:mysqld(8)
http://dev.mysql.com/doc/refman/en/using-systemd.html
[root@cent07 test]# systemctl start mysqld.service
[root@cent07 test]# systemctl status mysqld.service ● mysqld.service – MySQL Server
Loaded: loaded (/usr/lib/systemd/system/mysqld.service; enabled; vendor preset: disabled)
Active: active (running) since 土 2017-09-16 00:29:00 JST; 2s ago
Docs: man:mysqld(8)
http://dev.mysql.com/doc/refman/en/using-systemd.html
Process: 2603 ExecStart=/usr/sbin/mysqld –daemonize –pid-file=/var/run/mysqld/mysqld.pid $MYSQLD_OPT S (code=exited, status=0/SUCCESS)
Process: 2530 ExecStartPre=/usr/bin/mysqld_pre_systemd (code=exited, status=0/SUCCESS)
Main PID: 2606 (mysqld)
CGroup: /system.slice/mysqld.service
mq2606 /usr/sbin/mysqld –daemonize –pid-file=/var/run/mysqld/mysqld.pid
9月 16 00:28:53 cent07 systemd[1]: Starting MySQL Server…
9月 16 00:29:00 cent07 systemd[1]: Started MySQL Server.
Zabbix 用のデータベースを MySQL Server に作成する
Zabbix 用のデータベースを作成します。
[root@cent07 ~]# grep “temporary password” /var/log/mysqld.log
2017-09-15T15:28:57.427643Z 1 [Note] A temporary password is generated for root@localhost: %/&Ghq!a&6(j ← ここに表示されるパスワードが初期パスワードです。後程変更します。
[root@cent07 ~]# mysql_secure_installation
Securing the MySQL server deployment.
Enter password for user root: ← ここに初期パスワードを入力します。
The existing password for the user account root has expired. Please set a new password.
New password: ← ここに新しいパスワードを入力します。
Re-enter new password: ← ここに新しいパスワードを入力します。
The ‘validate_password’ plugin is installed on the server.
The subsequent steps will run with the existing configuration
of the plugin.
Using existing password for root.
Estimated strength of the password: 100 ← パスワード要件を満たしていて、且つパスワード強度が高いと100と出るので、このまま続けます。
Do you wish to continue with the password provided?(Press y|Y for Yes, any other key for No) : y
By default, a MySQL installation has an anonymous user,
allowing anyone to log into MySQL without having to have
a user account created for them. This is intended only for
testing, and to make the installation go a bit smoother.
You should remove them before moving into a production
environment.
Remove anonymous users? (Press y|Y for Yes, any other key for No) : y
Success.
Normally, root should only be allowed to connect from
‘localhost’. This ensures that someone cannot guess at
the root password from the network.
Disallow root login remotely? (Press y|Y for Yes, any other key for No) : y
Success.
By default, MySQL comes with a database named ‘test’ that
anyone can access. This is also intended only for testing,
and should be removed before moving into a production
environment.
Remove test database and access to it? (Press y|Y for Yes, any other key for No) : y
– Dropping test database…
Success.
– Removing privileges on test database…
Success.
Reloading the privilege tables will ensure that all changes
made so far will take effect immediately.
Reload privilege tables now? (Press y|Y for Yes, any other key for No) : y
Success.
All done!
[root@cent07 ~]#
Zabbix 用のデータベースを作成して権限を割り当てます。
[root@cent07 test]# mysql -uroot -p
Enter password:
Welcome to the MySQL monitor. Commands end with ; or \g.
Your MySQL connection id is 9
Server version: 5.7.19 MySQL Community Server (GPL)
Copyright (c) 2000, 2017, Oracle and/or its affiliates. All rights reserved.
Oracle is a registered trademark of Oracle Corporation and/or its
affiliates. Other names may be trademarks of their respective
owners.
Type ‘help;’ or ‘\h’ for help. Type ‘\c’ to clear the current input statement.
mysql> create database zabbix character set utf8;
Query OK, 1 row affected (0.00 sec)
mysql> grant all privileges on zabbix.* to zabbix@localhost identified by ‘xxxxxxxxxxxx’;
Query OK, 0 rows affected, 1 warning (0.00 sec)
mysql> exit
Bye
[root@cent07 test]#
Zabbix 用のテーブル作成の SQL 文を実行します。
[root@cent07 ~]# zcat /usr/share/doc/zabbix-server-mysql-3.4.1/create.sql.gz | mysql -uroot -p zabbix
Enter password:
[root@cent07 ~]#
ちなみに SQL 文は以下のようになっています。
[root@cent07 ~]# less /usr/share/doc/zabbix-server-mysql-3.4.1/create.sql.gz
CREATE TABLE `users` (
`userid` bigint unsigned NOT NULL,
`alias` varchar(100) DEFAULT ” NOT NULL,
`name` varchar(100) DEFAULT ” NOT NULL,
`surname` varchar(100) DEFAULT ” NOT NULL,
`passwd` char(32) DEFAULT ” NOT NULL,
`url` varchar(255) DEFAULT ” NOT NULL,
`autologin` integer DEFAULT ‘0’ NOT NULL,
`autologout` varchar(32) DEFAULT ’15m’ NOT NULL,
`lang` varchar(5) DEFAULT ‘en_GB’ NOT NULL,
`refresh` varchar(32) DEFAULT ’30s’ NOT NULL,
`type` integer DEFAULT ‘1’ NOT NULL,
`theme` varchar(128) DEFAULT ‘default’ NOT NULL,
`attempt_failed` integer DEFAULT 0 NOT NULL,
`attempt_ip` varchar(39) DEFAULT ” NOT NULL,
`attempt_clock` integer DEFAULT 0 NOT NULL,
`rows_per_page` integer DEFAULT 50 NOT NULL,
PRIMARY KEY (userid)
) ENGINE=InnoDB;
CREATE UNIQUE INDEX `users_1` ON `users` (`alias`);
~ 省略 ~
テーブルが作成されているか確認します。
[root@cent07 ~]# mysql -uroot -p zabbix
Enter password:
Reading table information for completion of table and column names
You can turn off this feature to get a quicker startup with -A
Welcome to the MySQL monitor. Commands end with ; or \g.
Your MySQL connection id is 12
Server version: 5.7.19 MySQL Community Server (GPL)
Copyright (c) 2000, 2017, Oracle and/or its affiliates. All rights reserved.
Oracle is a registered trademark of Oracle Corporation and/or its
affiliates. Other names may be trademarks of their respective
owners.
Type ‘help;’ or ‘\h’ for help. Type ‘\c’ to clear the current input statement.
mysql> describe users;
+—————-+———————+——+—–+———+——-+
| Field | Type | Null | Key | Default | Extra |
+—————-+———————+——+—–+———+——-+
| userid | bigint(20) unsigned | NO | PRI | NULL | |
| alias | varchar(100) | NO | UNI | | |
| name | varchar(100) | NO | | | |
| surname | varchar(100) | NO | | | |
| passwd | char(32) | NO | | | |
| url | varchar(255) | NO | | | |
| autologin | int(11) | NO | | 0 | |
| autologout | varchar(32) | NO | | 15m | |
| lang | varchar(5) | NO | | en_GB | |
| refresh | varchar(32) | NO | | 30s | |
| type | int(11) | NO | | 1 | |
| theme | varchar(128) | NO | | default | |
| attempt_failed | int(11) | NO | | 0 | |
| attempt_ip | varchar(39) | NO | | | |
| attempt_clock | int(11) | NO | | 0 | |
| rows_per_page | int(11) | NO | | 50 | |
+—————-+———————+——+—–+———+——-+
16 rows in set (0.00 sec)
mysql>
mysql> exit
Bye
[root@cent07 zabbix-server-mysql-3.4.1]#
問題なさそうです。
Zabbix インストール前の事前準備(Apache インストール&設定)
Apache がインストールされていない場合はインストールします。
現在の環境の確認をします。
[root@cent07 ~]# rpm -qa | grep httpd httpd-2.4.6-67.el7.centos.2.x86_64 ← Apache は既にインストール済みでした。 httpd-manual-2.4.6-67.el7.centos.2.noarch httpd-tools-2.4.6-67.el7.centos.2.x86_64
[root@cent07 ~]# systemctl status httpd ● httpd.service – The Apache HTTP Server
Loaded: loaded (/usr/lib/systemd/system/httpd.service; enabled; vendor preset: disabled)
Active: active (running) since 土 2017-09-16 06:58:07 JST; 49min ago
Docs: man:httpd(8)
man:apachectl(8)
Main PID: 998 (httpd)
Status: “Total requests: 0; Current requests/sec: 0; Current traffic: 0 B/sec”
CGroup: /system.slice/httpd.service
tq 998 /usr/sbin/httpd -DFOREGROUND
tq1049 /usr/sbin/httpd -DFOREGROUND
tq1074 /usr/sbin/httpd -DFOREGROUND
tq1075 /usr/sbin/httpd -DFOREGROUND
tq1076 /usr/sbin/httpd -DFOREGROUND
tq1077 /usr/sbin/httpd -DFOREGROUND
mq1078 /usr/sbin/httpd -DFOREGROUND
9月 16 06:58:02 cent07 systemd[1]: Starting The Apache HTTP Server…
9月 16 06:58:05 cent07 httpd[998]: AH00558: httpd: Could not reliably determine the server’s fu…sage
9月 16 06:58:07 cent07 systemd[1]: Started The Apache HTTP Server.
Hint: Some lines were ellipsized, use -l to show in full.
[root@cent07 ~]#
[root@cent07 ~]# systemctl enable zabbix-server.service
Created symlink from /etc/systemd/system/multi-user.target.wants/zabbix-server.service to /usr/lib/syste md/system/zabbix-server.service.
MySQL Server を起動します。
[root@cent07 ~]# systemctl start zabbix-server.service
Job for zabbix-server.service failed because a configured resource limit was exceeded. See “systemctl st
atus zabbix-server.service” and “journalctl -xe” for details.
[root@cent07 ~]# systemctl status zabbix-server.service
● zabbix-server.service – Zabbix Server
Loaded: loaded (/usr/lib/systemd/system/zabbix-server.service; enabled; vendor preset: disabled)
Active: activating (auto-restart) (Result: resources) since 土 2017-09-16 07:51:46 JST; 9s ago
Process: 1420 ExecStart=/usr/sbin/zabbix_server -c $CONFFILE (code=exited, status=0/SUCCESS)
9月 16 07:51:46 cent07 systemd[1]: zabbix-server.service never wrote its PID file. Failing.
9月 16 07:51:46 cent07 systemd[1]: Failed to start Zabbix Server.
9月 16 07:51:46 cent07 systemd[1]: Unit zabbix-server.service entered failed state.
9月 16 07:51:46 cent07 systemd[1]: zabbix-server.service failed.
更に詳しいログを確認します。
[root@cent07 ~]# journalctl -xe
— Defined-By: systemd
— Support: http://lists.freedesktop.org/mailman/listinfo/systemd-devel
—
— Unit zabbix-agent.service has finished shutting down.
9月 16 07:54:19 cent07 polkitd[628]: Unregistered Authentication Agent for unix-process:1468:339608 (system bus name :1.43, object path /org/freedesktop/PolicyKit1/AuthenticationAgent, locale ja_JP.UTF-8) (disconnected from bus)
9月 16 07:54:20 cent07 systemd[1]: zabbix-server.service holdoff time over, scheduling restart.
9月 16 07:54:20 cent07 systemd[1]: Starting Zabbix Server…
— Subject: Unit zabbix-server.service has begun start-up
— Defined-By: systemd
— Support: http://lists.freedesktop.org/mailman/listinfo/systemd-devel
—
— Unit zabbix-server.service has begun starting up.
9月 16 07:54:20 cent07 systemd[1]: PID file /run/zabbix/zabbix_server.pid not readable (yet?) after start.
9月 16 07:54:20 cent07 systemd[1]: zabbix-server.service never wrote its PID file. Failing.
9月 16 07:54:20 cent07 systemd[1]: Failed to start Zabbix Server.
— Subject: Unit zabbix-server.service has failed
— Defined-By: systemd
— Support: http://lists.freedesktop.org/mailman/listinfo/systemd-devel
—
— Unit zabbix-server.service has failed.
—
— The result is failed.
9月 16 07:54:20 cent07 systemd[1]: Unit zabbix-server.service entered failed state.
9月 16 07:54:20 cent07 systemd[1]: zabbix-server.service failed.
9月 16 07:54:28 cent07 polkitd[628]: Registered Authentication Agent for unix-process:1480:340536 (system bus name :1.44 [/usr/bin/pkttyagent –notify-fd 5 –fallback], object path /org/freedesktop/PolicyKit1/AuthenticationAgent, locale ja_JP.UTF-8)
9月 16 07:54:30 cent07 systemd[1]: zabbix-server.service holdoff time over, scheduling restart.
9月 16 07:54:30 cent07 systemd[1]: Starting Zabbix Server…
— Subject: Unit zabbix-server.service has begun start-up
— Defined-By: systemd
— Support: http://lists.freedesktop.org/mailman/listinfo/systemd-devel
—
— Unit zabbix-server.service has begun starting up.
9月 16 07:54:30 cent07 systemd[1]: PID file /run/zabbix/zabbix_server.pid not readable (yet?) after start.
9月 16 07:54:30 cent07 systemd[1]: zabbix-server.service never wrote its PID file. Failing.
9月 16 07:54:30 cent07 systemd[1]: Failed to start Zabbix Server.
— Subject: Unit zabbix-server.service has failed
— Defined-By: systemd
— Support: http://lists.freedesktop.org/mailman/listinfo/systemd-devel
—
— Unit zabbix-server.service has failed.
—
— The result is failed.
9月 16 07:54:30 cent07 systemd[1]: Unit zabbix-server.service entered failed state.
9月 16 07:54:30 cent07 systemd[1]: zabbix-server.service failed.
9月 16 07:54:30 cent07 polkitd[628]: Unregistered Authentication Agent for unix-process:1480:340536 (system bus name :1.44, object path /org/freedesktop/PolicyKit1/AuthenticationAgent, locale ja_JP.UTF-8) (disconnected from bus)
SELINUX の確認
SELINUX の設定を確認したところ「Enforcing」になっていました。
そのため「Disabled」に変更します。
[root@cent07 ~]# vi /etc/selinux/config
# This file controls the state of SELinux on the system.
# SELINUX= can take one of these three values:
# enforcing – SELinux security policy is enforced.
# permissive – SELinux prints warnings instead of enforcing.
# disabled – No SELinux policy is loaded. #SELINUX=enforcing ← コメントアウトします。 SELINUX=disabled← 新規で追加します。
# SELINUXTYPE= can take one of three two values:
# targeted – Targeted processes are protected,
# minimum – Modification of targeted policy. Only selected processes are protected.
# mls – Multi Level Security protection.
SELINUXTYPE=targeted
設定を変更後、OS をリブートします。
[root@cent07 ~]# reboot
OS リブート後に Zabbix Server が起動しているか確認します。
Last login: Sat Sep 16 06:58:37 2017 from 192.168.1.3
[test@cent07 ~]$
[test@cent07 ~]$ systemctl status zabbix-server ● zabbix-server.service – Zabbix Server
Loaded: loaded (/usr/lib/systemd/system/zabbix-server.service; enabled; vendor preset: disabled)
Active: active (running) since 土 2017-09-16 08:17:45 JST; 19min ago
Process: 979 ExecStart=/usr/sbin/zabbix_server -c $CONFFILE (code=exited, status=0/SUCCESS)
Main PID: 1017 (zabbix_server)
CGroup: /system.slice/zabbix-server.service
mq1017 /usr/sbin/zabbix_server -c /etc/zabbix/zabbix_server.conf
[test@cent07 ~]$
今度は起動していました。
SELINUX が原因でした。
Zabbix Server の初期設定
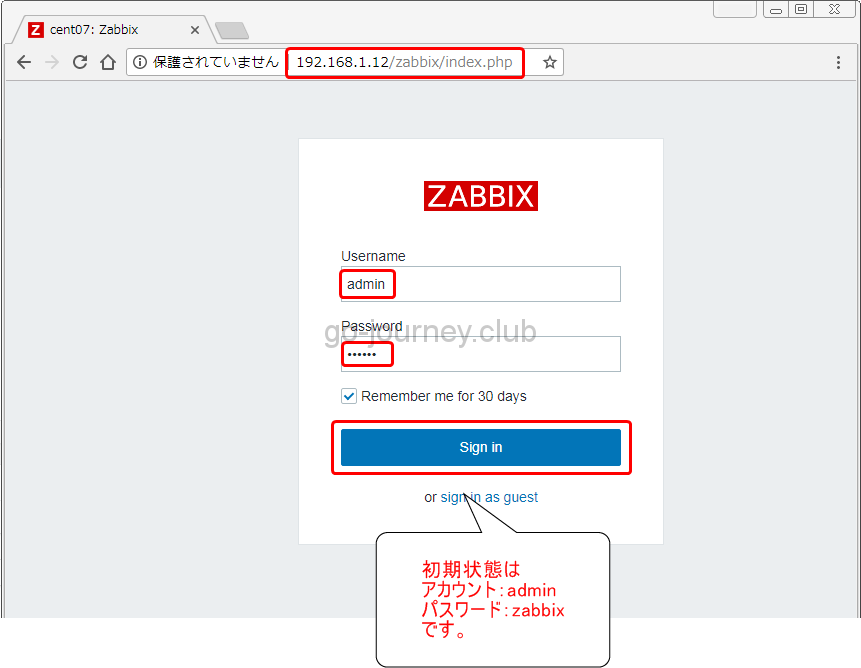
ブラウザを起動して URL を入力します。
【例】
IP アドレスが 192.168.1.12 の場合は、ブラウザの URL 欄に
http://192.168.1.12/zabbix
と入力します。
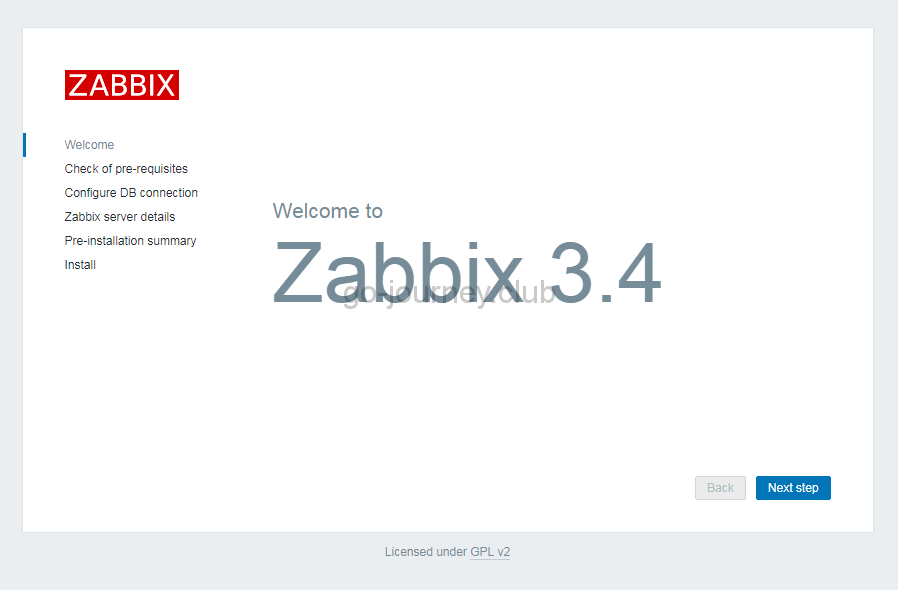
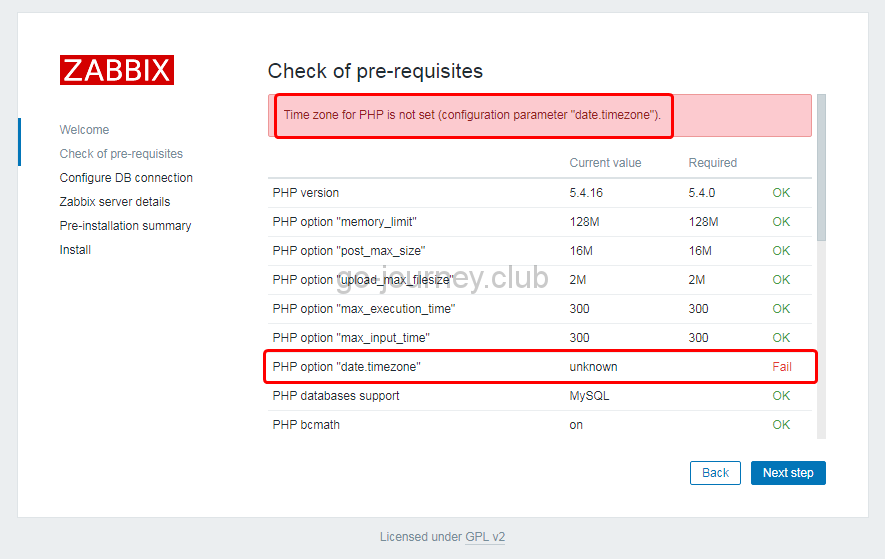
下図のようなインストール画面が表示されるので「Next step」ボタンをクリックします。
設定が足りないようです。
「Time zone for PHP is not set (configuration parameter “date.timezone”).」のメッセージです。
9月 16 09:20:09 cent07 systemd[1]: Starting The Apache HTTP Server…
9月 16 09:20:10 cent07 httpd[1310]: AH00558: httpd: Could not reliably determine the server’s f…sage
9月 16 09:20:10 cent07 systemd[1]: Started The Apache HTTP Server.
Hint: Some lines were ellipsized, use -l to show in full.
[root@cent07 ~]#
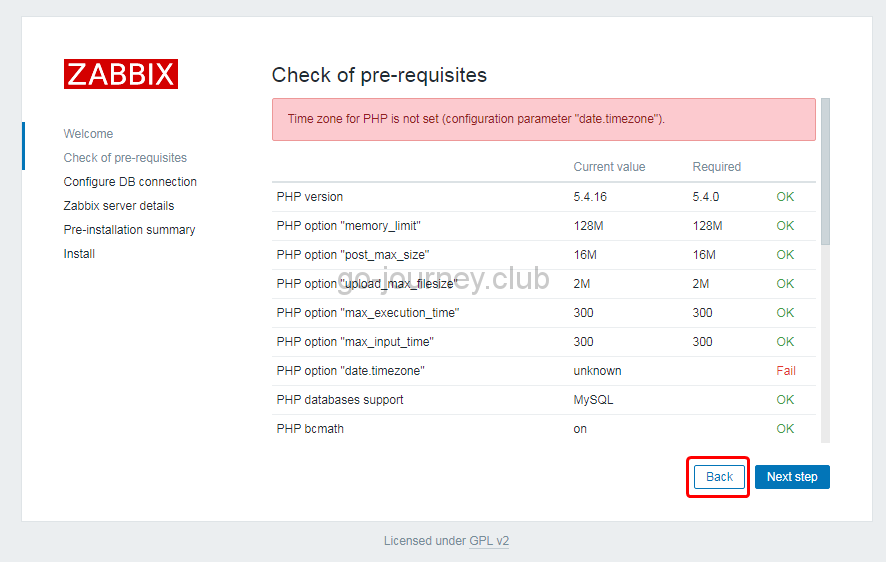
設定を反映させたら、一旦「Back」ボタンで戻ります。
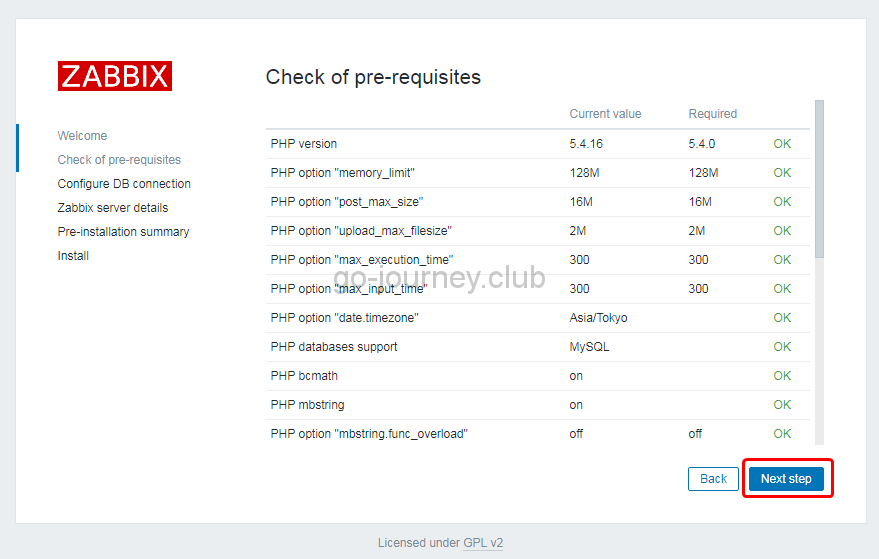
再度、「Next step」ボタンをクリックします。
今度は問題なさそうです。
「Next step」ボタンをクリックします。
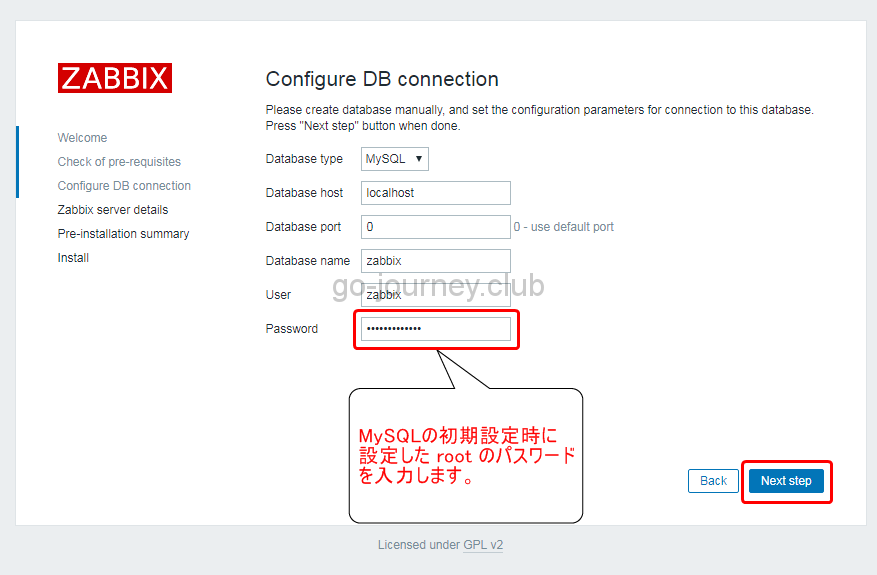
データベースへの接続設定を入力します。
パスワードは MySQL の初期設定時に設定した root のパスワードを入力します。
設定後に「Next step」ボタンをクリックします。
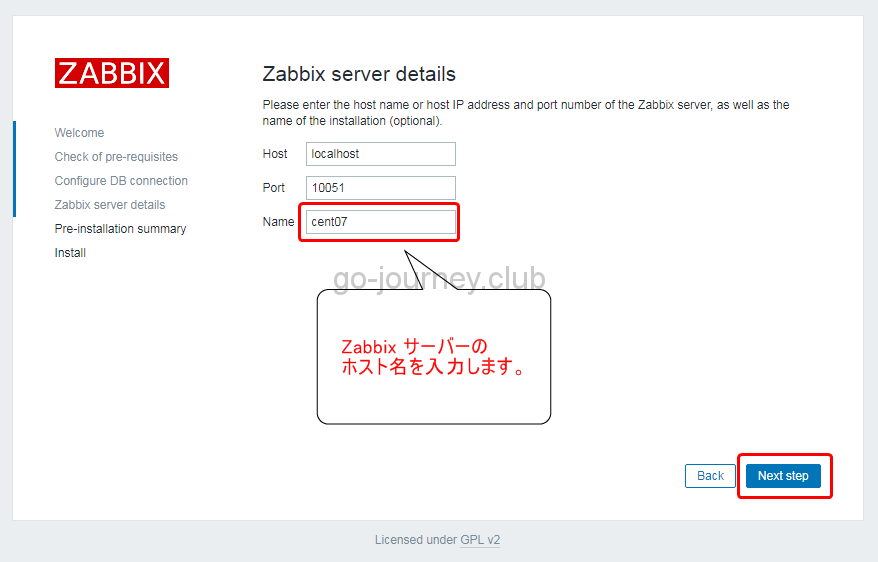
Zabbix サーバーの「ホスト名」を入力して「Next step」ボタンをクリックします。
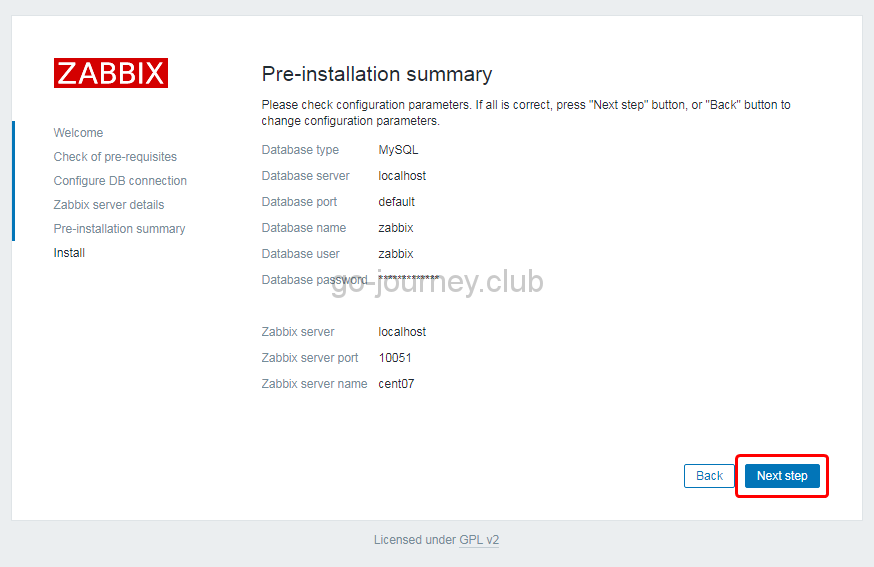
設定を確認して「Next step」ボタンをクリックします。
問題なくインストールが完了したら下図のように「Congratulations! You have successfully installed Zabbix frontend」と表示されるので「Finish」ボタンをクリックします。
9月 16 08:17:38 cent07 systemd[1]: Starting firewalld – dynamic firewall daemon…
9月 16 08:17:40 cent07 systemd[1]: Started firewalld – dynamic firewall daemon.
9月 16 08:17:41 cent07 firewalld[671]: WARNING: ICMP type ‘beyond-scope’ is not supported by th…pv6.
9月 16 08:17:41 cent07 firewalld[671]: WARNING: beyond-scope: INVALID_ICMPTYPE: No supported IC…ime.
9月 16 08:17:41 cent07 firewalld[671]: WARNING: ICMP type ‘failed-policy’ is not supported by t…pv6.
9月 16 08:17:41 cent07 firewalld[671]: WARNING: failed-policy: INVALID_ICMPTYPE: No supported I…ime.
9月 16 08:17:41 cent07 firewalld[671]: WARNING: ICMP type ‘reject-route’ is not supported by th…pv6.
9月 16 08:17:41 cent07 firewalld[671]: WARNING: reject-route: INVALID_ICMPTYPE: No supported IC…ime.
9月 16 09:04:53 cent07 systemd[1]: Stopping firewalld – dynamic firewall daemon…
9月 16 09:04:54 cent07 systemd[1]: Stopped firewalld – dynamic firewall daemon.
Hint: Some lines were ellipsized, use -l to show in full.
[root@cent07 ~]#
/var/log/zabbix/zabbix_server.log を確認します。
そしたらエラーの原因がそのまま表示されていました。
「connection to database ‘zabbix’ failed: [1045] Access denied for user ‘zabbix’@’localhost’ (using password: NO)」です。
[root@cent07 ~]# tail /var/log/zabbix/zabbix_server.log
1454:20170916:120436.723 [Z3001] connection to database ‘zabbix’ failed: [1045] Access denied for user ‘zabbix’@’localhost’ (using password: NO)
1454:20170916:120436.723 database is down: reconnecting in 10 seconds
1454:20170916:120446.723 [Z3001] connection to database ‘zabbix’ failed: [1045] Access denied for user ‘zabbix’@’localhost’ (using password: NO)
1454:20170916:120446.724 database is down: reconnecting in 10 seconds
1454:20170916:120456.724 [Z3001] connection to database ‘zabbix’ failed: [1045] Access denied for user ‘zabbix’@’localhost’ (using password: NO)
1454:20170916:120456.724 database is down: reconnecting in 10 seconds
1454:20170916:120506.725 [Z3001] connection to database ‘zabbix’ failed: [1045] Access denied for user ‘zabbix’@’localhost’ (using password: NO)
1454:20170916:120506.725 database is down: reconnecting in 10 seconds
1454:20170916:120516.726 [Z3001] connection to database ‘zabbix’ failed: [1045] Access denied for user ‘zabbix’@’localhost’ (using password: NO)
1454:20170916:120516.726 database is down: reconnecting in 10 seconds
1454:20170916:120526.726 [Z3001] connection to database ‘zabbix’ failed: [1045] Access denied for user ‘zabbix’@’localhost’ (using password: NO)
1454:20170916:120526.727 database is down: reconnecting in 10 seconds
1454:20170916:120536.727 [Z3001] connection to database ‘zabbix’ failed: [1045] Access denied for user ‘zabbix’@’localhost’ (using password: NO)
1454:20170916:120536.727 database is down: reconnecting in 10 seconds
1454:20170916:120546.728 [Z3001] connection to database ‘zabbix’ failed: [1045] Access denied for user ‘zabbix’@’localhost’ (using password: NO)
1454:20170916:120546.728 database is down: reconnecting in 10 seconds
1454:20170916:120556.729 [Z3001] connection to database ‘zabbix’ failed: [1045] Access denied for user ‘zabbix’@’localhost’ (using password: NO)
1454:20170916:120556.729 database is down: reconnecting in 10 seconds
1454:20170916:120606.729 [Z3001] connection to database ‘zabbix’ failed: [1045] Access denied for user ‘zabbix’@’localhost’ (using password: NO)
1454:20170916:120606.730 database is down: reconnecting in 10 seconds
1454:20170916:120616.730 [Z3001] connection to database ‘zabbix’ failed: [1045] Access denied for user ‘zabbix’@’localhost’ (using password: NO)
1454:20170916:120616.730 database is down: reconnecting in 10 seconds
/etc/zabbix/zabbix_server.conf の修正
/etc/zabbix/zabbix_server.conf の DB 部分を確認して修正します。
/etc/zabbix/zabbix_server.conf では DB へのパスワードを設定する箇所がありますが、デフォルトでは「パスワード」は設定されていないため(当たり前ですが・・・)設定をする必要があります。
### Option: DBHost
# Database host name.
# If set to localhost, socket is used for MySQL.
# If set to empty string, socket is used for PostgreSQL.
#
# Mandatory: no
# Default:
# DBHost=localhost
### Option: DBName
# Database name.
# For SQLite3 path to database file must be provided. DBUser and DBPassword are ignored.
#
# Mandatory: yes
# Default:
# DBName=
DBName=zabbix
### Option: DBSchema
# Schema name. Used for IBM DB2 and PostgreSQL.
#
# Mandatory: no
# Default:
# DBSchema=
### Option: DBUser
# Database user. Ignored for SQLite.
#
# Mandatory: no
# Default:
# DBUser=
DBUser=zabbix
### Option: DBPassword
# Database password. Ignored for SQLite.
# Comment this line if no password is used.
#
# Mandatory: no
# Default:
# DBPassword=
### Option: DBSocket
# Path to MySQL socket.
#
# Mandatory: no
# Default:
# DBSocket=/tmp/mysql.sock
### Option: DBPort
# Database port when not using local socket. Ignored for SQLite.
#
# Mandatory: no
# Range: 1024-65535
# Default (for MySQL):
# DBPort=3306
Zabbix Server を再起動します。
[root@cent07 zabbix]# systemctl restart zabbix-server
[root@cent07 zabbix]# systemctl status zabbix-server ● zabbix-server.service – Zabbix Server
Loaded: loaded (/usr/lib/systemd/system/zabbix-server.service; enabled; vendor preset: disabled)
Active: active (running) since 土 2017-09-16 12:53:43 JST; 5s ago
Process: 1726 ExecStop=/bin/kill -SIGTERM $MAINPID (code=exited, status=0/SUCCESS)
Process: 1728 ExecStart=/usr/sbin/zabbix_server -c $CONFFILE (code=exited, status=0/SUCCESS)
Main PID: 1730 (zabbix_server)
CGroup: /system.slice/zabbix-server.service
tq1730 /usr/sbin/zabbix_server -c /etc/zabbix/zabbix_server.conf
tq1731 /usr/sbin/zabbix_server: configuration syncer [waiting 60 sec for processes]
tq1732 /usr/sbin/zabbix_server: alerter #1 started
tq1733 /usr/sbin/zabbix_server: alerter #2 started
tq1734 /usr/sbin/zabbix_server: alerter #3 started
再度 /var/log/zabbix/zabbix_server.log を確認します。
エラーは出なくなりました。
[root@cent07 zabbix]# tail /var/log/zabbix/zabbix_server.log
1659:20170916:125341.719 Got signal [signal:15(SIGTERM),sender_pid:1726,sender_uid:0,reason:0]. Exiting …
1659:20170916:125343.720 syncing history data…
1659:20170916:125343.720 syncing history data done
1659:20170916:125343.720 syncing trend data…
1659:20170916:125343.721 syncing trend data done
1659:20170916:125343.721 Zabbix Server stopped. Zabbix 3.4.1 (revision 71734).
1730:20170916:125343.754 Starting Zabbix Server. Zabbix 3.4.1 (revision 71734).
1730:20170916:125343.754 ****** Enabled features ******
1730:20170916:125343.754 SNMP monitoring: YES
1730:20170916:125343.754 IPMI monitoring: YES
1730:20170916:125343.754 Web monitoring: YES
1730:20170916:125343.754 VMware monitoring: YES
1730:20170916:125343.754 SMTP authentication: YES
1730:20170916:125343.754 Jabber notifications: YES
1730:20170916:125343.754 Ez Texting notifications: YES
1730:20170916:125343.754 ODBC: YES
1730:20170916:125343.754 SSH2 support: YES
1730:20170916:125343.754 IPv6 support: YES
1730:20170916:125343.754 TLS support: YES
1730:20170916:125343.754 ******************************
1730:20170916:125343.755 using configuration file: /etc/zabbix/zabbix_server.conf
1730:20170916:125343.765 current database version (mandatory/optional): 03040000/03040000
1730:20170916:125343.765 required mandatory version: 03040000
1730:20170916:125343.777 server #0 started [main process]
1742:20170916:125343.795 server #12 started [history syncer #4]
1744:20170916:125343.796 server #14 started [proxy poller #1]
1745:20170916:125343.798 server #15 started [self-monitoring #1]
1747:20170916:125343.799 server #17 started [poller #1]
1750:20170916:125343.809 server #20 started [poller #4]
1743:20170916:125343.820 server #13 started [escalator #1]
1735:20170916:125343.823 server #5 started [housekeeper #1]
1736:20170916:125343.823 server #6 started [timer #1]
1731:20170916:125343.823 server #1 started [configuration syncer #1]
1732:20170916:125343.824 server #2 started [alerter #1]
1733:20170916:125343.824 server #3 started [alerter #2]
1737:20170916:125343.824 server #7 started [http poller #1]
1738:20170916:125343.825 server #8 started [discoverer #1]
1739:20170916:125343.835 server #9 started [history syncer #1]
1741:20170916:125343.835 server #11 started [history syncer #3]
1746:20170916:125343.836 server #16 started [task manager #1]
1748:20170916:125343.836 server #18 started [poller #2]
1734:20170916:125343.847 server #4 started [alerter #3]
1740:20170916:125343.847 server #10 started [history syncer #2]
1749:20170916:125343.848 server #19 started [poller #3]
1751:20170916:125343.863 server #21 started [poller #5]
1760:20170916:125343.875 server #30 started [preprocessing manager #1]
1755:20170916:125343.875 server #25 started [trapper #3]
1756:20170916:125343.878 server #26 started [trapper #4]
1754:20170916:125343.881 server #24 started [trapper #2]
1757:20170916:125343.884 server #27 started [trapper #5]
1753:20170916:125343.887 server #23 started [trapper #1]
1758:20170916:125343.890 server #28 started [icmp pinger #1]
1759:20170916:125343.890 server #29 started [alert manager #1]
1752:20170916:125343.890 server #22 started [unreachable poller #1]
1762:20170916:125344.076 server #32 started [preprocessing worker #2]
1763:20170916:125344.084 server #33 started [preprocessing worker #3]
1761:20170916:125344.091 server #31 started [preprocessing worker #1]
1755:20170916:125443.892 cannot send list of active checks to “127.0.0.1”: host [Zabbix server] not monitored
[root@cent07 zabbix]#


コメント