【VMware 6.5】【CentOS 7】VMware Tools(vmware-tools)のインストール

CentOS 7 の仮想マシンに VMware ESXi 6.5 での「Vmware Tools(vmware-tools)」のインストール手順です。

基本的に VMware ESXi 6.0 でも、CentOS 7 でも CentOS 6 でも手順は変わりません。

仮想マシンを新規作成した後は「VMware Tools」をインストールしましょう。


VMware Toolsとは?


以下のページに詳しく解説をしています。


【VMware】VMware Tools(vmware-tools)とは?


VMware Tools をインストールした環境

今回インストールした環境です。

他のバージョンでも基本的に手順は一緒です。

  • ホスト:VMware vSphere 6.5 ESXi Hypervisor
  • 仮想マシン:CentOS 7


VMware Tools のダウンロード手順

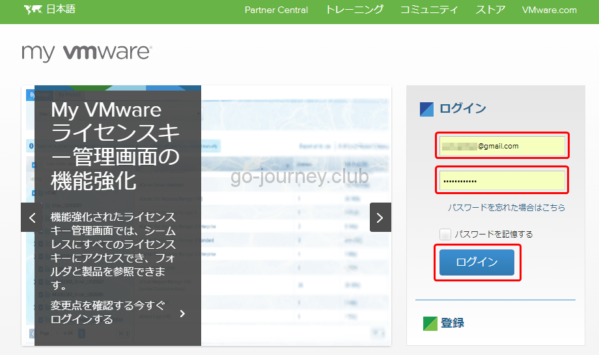
以下の URL より「my vmware」へログインして vmware-tools をダウンロードします。

https://my.vmware.com/jp/group/vmware/home


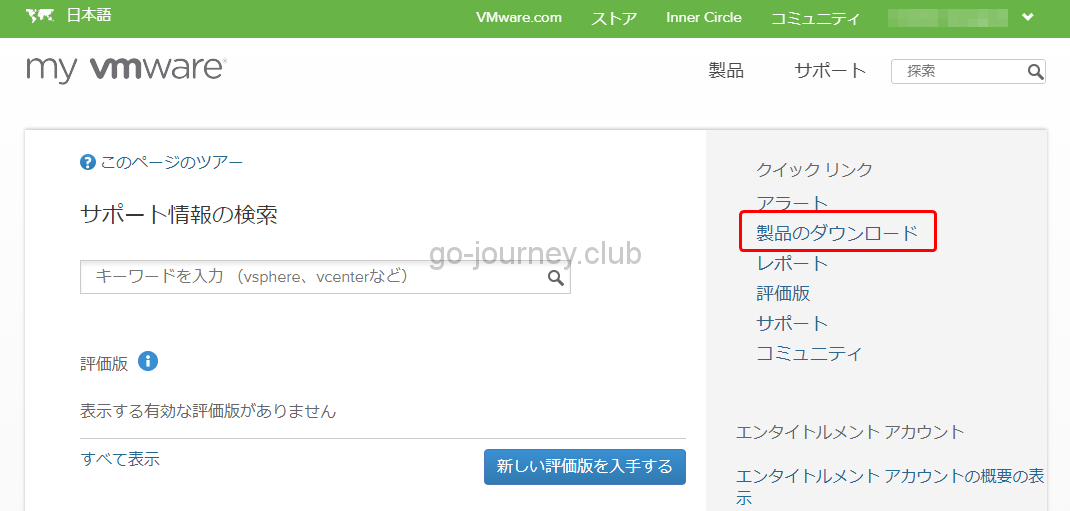
「製品のダウンロード」をクリックします。


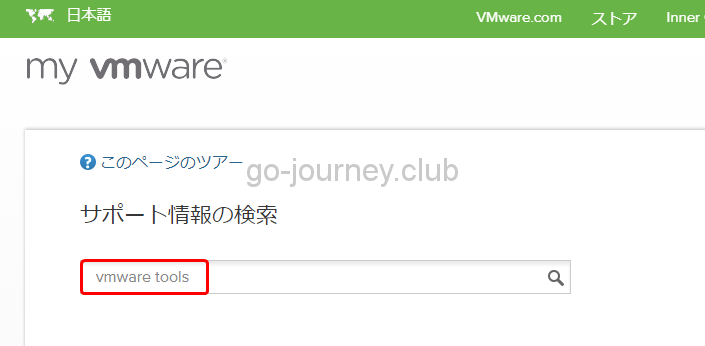
「vmware tools」と入力して「Enter」キーを押下して検索します。
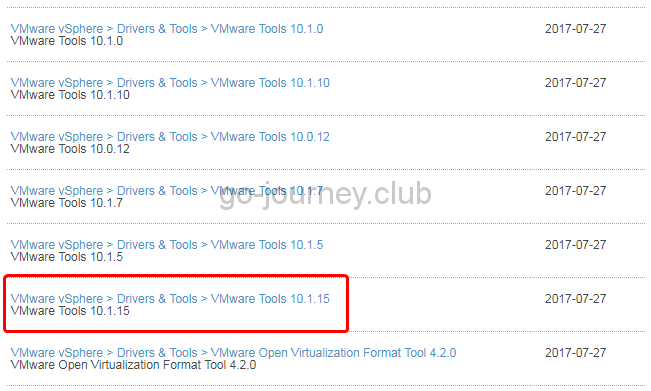
【VMware 6.5】VMware Tools(vmware-tools)のインストール


以下のように検索結果が表示されます。

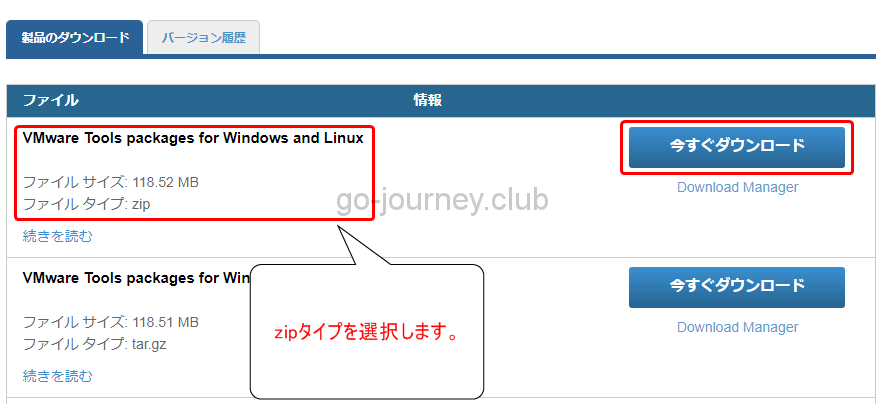
検索結果の中から一番バージョンの高い「VMware Tools」を選択します。

※下図では2017年10月現在で一番高いバージョンの「VMware Tools 10.1.15」を選択しています。

【VMware 6.5】VMware Tools(vmware-tools)のインストール


「VMware Tools packages for Windows and Linux」「zipタイプ」「今すぐダウンロード」ボタンをクリックして自身のパソコン上にダウンロードします。

※tarコマンドで解凍したい場合は「ファイルタイプ:tar.gz」を選択します。

【VMware 6.5】VMware Tools(vmware-tools)のインストール


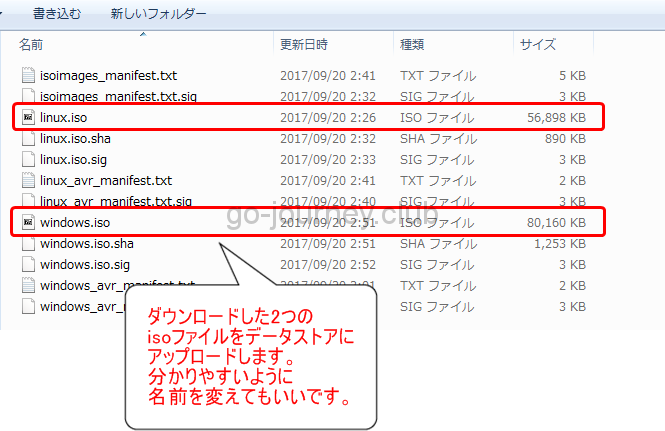
自分のパソコン上でダウンロードした zip ファイル(今回の場合は、VMware-Tools-10.1.15-core-6677369.zip)を展開します。

展開すると「Linux用ISO(linux.iso)」「Windows用ISO(windows.iso)」ファイルが作成されるので、2つのISOファイルをデータストアにアップロードします。

※isoファイル名を分かりやすいように「linux_vmware-tools_10.1.15.iso」「windows_vmware-tools_10.1.15.iso」などに変更してもいいです。

【VMware 6.5】VMware Tools(vmware-tools)のインストール


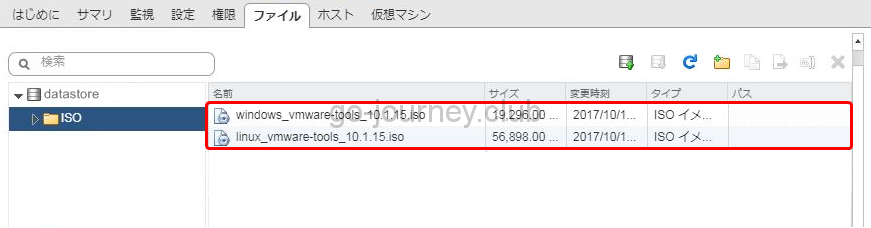
下図のようにデータストアにISOファイルをアップデートします。

※分かりやすいようにデータストアに「ISO」フォルダを作成してアップロードしました。

【VMware 6.5】VMware Tools(vmware-tools)のインストール


VMware Tools のマウント手順

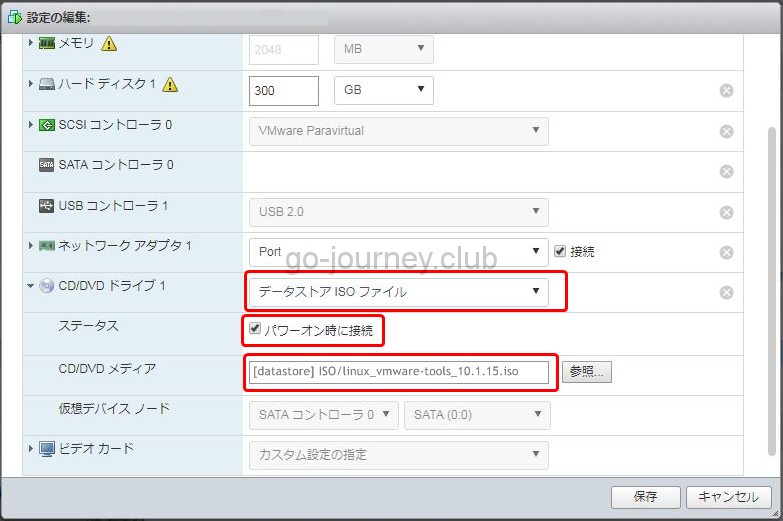
VMware ESXi管理画面にログインして、下図を参考に対象の仮想マシンの「設定の編集」画面を開きデータストアにアップロードした「VMware Tools」の ISO ファイルをマウントします。

  • CD/DVD ドライブ ← 「データストア ISO ファイル」を選択します。
  • スタータス    ← 「パワーオン時に接続」にチェックを入れます。
  • CD/DVD メディア ← 実際にデータストアに保存しているISOファイルのパスを入力します。今回の例ではデータストア[datastore]のISOフォルダ配下にある linux_vmware-tools_10.1.15.iso ファイルを選択しています。

【VMware 6.5】VMware Tools(vmware-tools)のインストール


Teratermなどを使用して仮想マシンにログインします。

「vmware-tools」をマウントします。

[root@test ~]# cd /mnt
[root@test mnt]# ls
[root@test mnt]# mkdir cdrom ← /mntディレクトリ配下に「cdrom」ディレクトリを作成します。
[root@test mnt]# ls
cdrom
[root@test mnt]# mount -t iso9660 /dev/cdrom /mnt/cdrom/ ← /mnt/cdrom ディレクトリに ISO ファイルをマウントします。
mount: /dev/sr0 is write-protected, mounting read-only ← リードオンリーでマウントされました。
[root@test mnt]# cd /mnt/cdrom/
[root@test cdrom]# ls
VMwareTools-10.1.7-5541682.tar.gz run_upgrader.sh vmware-tools-upgrader-64 ← 「VMwareTools-10.1.7-5541682.tar.gz」に「VMware-Tools」が入っています。
manifest.txt vmware-tools-upgrader-32
[root@test cdrom]# cp -ip VMwareTools-10.1.7-5541682.tar.gz /root ← 「VMwareTools-10.1.7-5541682.tar.gz」を展開するため一旦ホームディレクトリにコピーします。
[root@test cdrom]# cd
[root@test ~]# ls
VMwareTools-10.1.7-5541682.tar.gz anaconda-ks.cfg
[root@test ~]# tar zxvf VMwareTools-10.1.7-5541682.tar.gz ← 「VMwareTools-10.1.7-5541682.tar.gz」を展開します。


~省略~


[root@test ~]# ls
VMwareTools-10.1.7-5541682.tar.gz anaconda-ks.cfg vmware-tools-distrib
[root@test ~]# cd vmware-tools-distrib/
[root@test vmware-tools-distrib]# ls
FILES INSTALL bin caf doc etc installer lib vgauth vmware-install.pl ← この「.pl」ファイルを Perl を使ってインストールします。


※ISOファイルをマウントするので mount コマンドで「mount -t iso9660」とタイプを指定しています。

iso9660とは、一般的なCDROMの形式です。

ISO 9660 とは1988年にISOで標準化されたCD-ROMのファイルシステムの形式です。もともとCD-ROM用に制定されましたが、DVDやBD(Blu-ray Disc:ブルーレイディスク)でも利用することができます。


VMware Tools インストールの事前準備手順

「vmware-install.pl」をインストールするために環境が必要になります。

そのため「VMware Tools」インストール前に事前準備をします。


VMware Tools をインストールするためにPerlをインストールする

「Perl」をインストールします。

すでに Perl をインストール済みの場合は次に進みます。

[root@test vmware-tools-distrib]# yum install perl ← yum コマンドで perl をインストールします。
読み込んだプラグイン:fastestmirror
Loading mirror speeds from cached hostfile
* base: www.ftp.ne.jp
* extras: www.ftp.ne.jp
* updates: www.ftp.ne.jp
依存性の解決をしています
–> トランザクションの確認を実行しています。
—> パッケージ perl.x86_64 4:5.16.3-292.el7 を インストール
–> 依存性の処理をしています: perl-libs = 4:5.16.3-292.el7 のパッケージ: 4:perl-5.16.3-292.el7.x86_64
–> 依存性の処理をしています: perl(Socket) >= 1.3 のパッケージ: 4:perl-5.16.3-292.el7.x86_64
–> 依存性の処理をしています: perl(Scalar::Util) >= 1.10 のパッケージ: 4:perl-5.16.3-292.el7.x86_64
–> 依存性の処理をしています: perl-macros のパッケージ: 4:perl-5.16.3-292.el7.x86_64
–> 依存性の処理をしています: perl-libs のパッケージ: 4:perl-5.16.3-292.el7.x86_64
–> 依存性の処理をしています: perl(threads::shared) のパッケージ: 4:perl-5.16.3-292.el7.x86_64
–> 依存性の処理をしています: perl(threads) のパッケージ: 4:perl-5.16.3-292.el7.x86_64
–> 依存性の処理をしています: perl(constant) のパッケージ: 4:perl-5.16.3-292.el7.x86_64
–> 依存性の処理をしています: perl(Time::Local) のパッケージ: 4:perl-5.16.3-292.el7.x86_64
–> 依存性の処理をしています: perl(Time::HiRes) のパッケージ: 4:perl-5.16.3-292.el7.x86_64
–> 依存性の処理をしています: perl(Storable) のパッケージ: 4:perl-5.16.3-292.el7.x86_64
–> 依存性の処理をしています: perl(Socket) のパッケージ: 4:perl-5.16.3-292.el7.x86_64
–> 依存性の処理をしています: perl(Scalar::Util) のパッケージ: 4:perl-5.16.3-292.el7.x86_64
–> 依存性の処理をしています: perl(Pod::Simple::XHTML) のパッケージ: 4:perl-5.16.3-292.el7.x86_64
–> 依存性の処理をしています: perl(Pod::Simple::Search) のパッケージ: 4:perl-5.16.3-292.el7.x86_64
–> 依存性の処理をしています: perl(Getopt::Long) のパッケージ: 4:perl-5.16.3-292.el7.x86_64
–> 依存性の処理をしています: perl(Filter::Util::Call) のパッケージ: 4:perl-5.16.3-292.el7.x86_64
–> 依存性の処理をしています: perl(File::Temp) のパッケージ: 4:perl-5.16.3-292.el7.x86_64
–> 依存性の処理をしています: perl(File::Spec::Unix) のパッケージ: 4:perl-5.16.3-292.el7.x86_64
–> 依存性の処理をしています: perl(File::Spec::Functions) のパッケージ: 4:perl-5.16.3-292.el7.x86_64
–> 依存性の処理をしています: perl(File::Spec) のパッケージ: 4:perl-5.16.3-292.el7.x86_64
–> 依存性の処理をしています: perl(File::Path) のパッケージ: 4:perl-5.16.3-292.el7.x86_64
–> 依存性の処理をしています: perl(Exporter) のパッケージ: 4:perl-5.16.3-292.el7.x86_64
–> 依存性の処理をしています: perl(Cwd) のパッケージ: 4:perl-5.16.3-292.el7.x86_64
–> 依存性の処理をしています: perl(Carp) のパッケージ: 4:perl-5.16.3-292.el7.x86_64
–> 依存性の処理をしています: libperl.so()(64bit) のパッケージ: 4:perl-5.16.3-292.el7.x86_64
–> トランザクションの確認を実行しています。
—> パッケージ perl-Carp.noarch 0:1.26-244.el7 を インストール
—> パッケージ perl-Exporter.noarch 0:5.68-3.el7 を インストール
—> パッケージ perl-File-Path.noarch 0:2.09-2.el7 を インストール
—> パッケージ perl-File-Temp.noarch 0:0.23.01-3.el7 を インストール
—> パッケージ perl-Filter.x86_64 0:1.49-3.el7 を インストール
—> パッケージ perl-Getopt-Long.noarch 0:2.40-2.el7 を インストール
–> 依存性の処理をしています: perl(Pod::Usage) >= 1.14 のパッケージ: perl-Getopt-Long-2.40-2.el7.noarch
–> 依存性の処理をしています: perl(Text::ParseWords) のパッケージ: perl-Getopt-Long-2.40-2.el7.noarch
—> パッケージ perl-PathTools.x86_64 0:3.40-5.el7 を インストール
—> パッケージ perl-Pod-Simple.noarch 1:3.28-4.el7 を インストール
–> 依存性の処理をしています: perl(Pod::Escapes) >= 1.04 のパッケージ: 1:perl-Pod-Simple-3.28-4.el7.noarch
–> 依存性の処理をしています: perl(Encode) のパッケージ: 1:perl-Pod-Simple-3.28-4.el7.noarch
—> パッケージ perl-Scalar-List-Utils.x86_64 0:1.27-248.el7 を インストール
—> パッケージ perl-Socket.x86_64 0:2.010-4.el7 を インストール
—> パッケージ perl-Storable.x86_64 0:2.45-3.el7 を インストール
—> パッケージ perl-Time-HiRes.x86_64 4:1.9725-3.el7 を インストール
—> パッケージ perl-Time-Local.noarch 0:1.2300-2.el7 を インストール
—> パッケージ perl-constant.noarch 0:1.27-2.el7 を インストール
—> パッケージ perl-libs.x86_64 4:5.16.3-292.el7 を インストール
—> パッケージ perl-macros.x86_64 4:5.16.3-292.el7 を インストール
—> パッケージ perl-threads.x86_64 0:1.87-4.el7 を インストール
—> パッケージ perl-threads-shared.x86_64 0:1.43-6.el7 を インストール
–> トランザクションの確認を実行しています。
—> パッケージ perl-Encode.x86_64 0:2.51-7.el7 を インストール
—> パッケージ perl-Pod-Escapes.noarch 1:1.04-292.el7 を インストール
—> パッケージ perl-Pod-Usage.noarch 0:1.63-3.el7 を インストール
–> 依存性の処理をしています: perl(Pod::Text) >= 3.15 のパッケージ: perl-Pod-Usage-1.63-3.el7.noarch
–> 依存性の処理をしています: perl-Pod-Perldoc のパッケージ: perl-Pod-Usage-1.63-3.el7.noarch
—> パッケージ perl-Text-ParseWords.noarch 0:3.29-4.el7 を インストール
–> トランザクションの確認を実行しています。
—> パッケージ perl-Pod-Perldoc.noarch 0:3.20-4.el7 を インストール
–> 依存性の処理をしています: perl(parent) のパッケージ: perl-Pod-Perldoc-3.20-4.el7.noarch
–> 依存性の処理をしています: perl(HTTP::Tiny) のパッケージ: perl-Pod-Perldoc-3.20-4.el7.noarch
—> パッケージ perl-podlators.noarch 0:2.5.1-3.el7 を インストール
–> トランザクションの確認を実行しています。
—> パッケージ perl-HTTP-Tiny.noarch 0:0.033-3.el7 を インストール
—> パッケージ perl-parent.noarch 1:0.225-244.el7 を インストール
–> 依存性解決を終了しました。


依存性を解決しました


=======================================================================================================
Package アーキテクチャー バージョン リポジトリー 容量
=======================================================================================================


インストール中:
perl x86_64 4:5.16.3-292.el7 base 8.0 M
依存性関連でのインストールをします:
perl-Carp noarch 1.26-244.el7 base 19 k
perl-Encode x86_64 2.51-7.el7 base 1.5 M
perl-Exporter noarch 5.68-3.el7 base 28 k
perl-File-Path noarch 2.09-2.el7 base 26 k
perl-File-Temp noarch 0.23.01-3.el7 base 56 k
perl-Filter x86_64 1.49-3.el7 base 76 k
perl-Getopt-Long noarch 2.40-2.el7 base 56 k
perl-HTTP-Tiny noarch 0.033-3.el7 base 38 k
perl-PathTools x86_64 3.40-5.el7 base 82 k
perl-Pod-Escapes noarch 1:1.04-292.el7 base 51 k
perl-Pod-Perldoc noarch 3.20-4.el7 base 87 k
perl-Pod-Simple noarch 1:3.28-4.el7 base 216 k
perl-Pod-Usage noarch 1.63-3.el7 base 27 k
perl-Scalar-List-Utils x86_64 1.27-248.el7 base 36 k
perl-Socket x86_64 2.010-4.el7 base 49 k
perl-Storable x86_64 2.45-3.el7 base 77 k
perl-Text-ParseWords noarch 3.29-4.el7 base 14 k
perl-Time-HiRes x86_64 4:1.9725-3.el7 base 45 k
perl-Time-Local noarch 1.2300-2.el7 base 24 k
perl-constant noarch 1.27-2.el7 base 19 k
perl-libs x86_64 4:5.16.3-292.el7 base 688 k
perl-macros x86_64 4:5.16.3-292.el7 base 43 k
perl-parent noarch 1:0.225-244.el7 base 12 k
perl-podlators noarch 2.5.1-3.el7 base 112 k
perl-threads x86_64 1.87-4.el7 base 49 k
perl-threads-shared x86_64 1.43-6.el7 base 39 k


トランザクションの要約
=======================================================================================================
インストール 1 パッケージ (+26 個の依存関係のパッケージ)

総ダウンロード容量: 11 M
インストール容量: 36 M

Is this ok [y/d/N]: y

Downloading packages:
(1/27): perl-Exporter-5.68-3.el7.noarch.rpm | 28 kB 00:00:00
(2/27): perl-Encode-2.51-7.el7.x86_64.rpm | 1.5 MB 00:00:00
(3/27): perl-File-Path-2.09-2.el7.noarch.rpm | 26 kB 00:00:00
(4/27): perl-File-Temp-0.23.01-3.el7.noarch.rpm | 56 kB 00:00:00
(5/27): perl-Filter-1.49-3.el7.x86_64.rpm | 76 kB 00:00:00
(6/27): perl-Getopt-Long-2.40-2.el7.noarch.rpm | 56 kB 00:00:00
(7/27): perl-HTTP-Tiny-0.033-3.el7.noarch.rpm | 38 kB 00:00:00
(8/27): perl-PathTools-3.40-5.el7.x86_64.rpm | 82 kB 00:00:00
(9/27): perl-Pod-Escapes-1.04-292.el7.noarch.rpm | 51 kB 00:00:00
(10/27): perl-5.16.3-292.el7.x86_64.rpm | 8.0 MB 00:00:00
(11/27): perl-Pod-Perldoc-3.20-4.el7.noarch.rpm | 87 kB 00:00:00
(12/27): perl-Pod-Simple-3.28-4.el7.noarch.rpm | 216 kB 00:00:00
(13/27): perl-Pod-Usage-1.63-3.el7.noarch.rpm | 27 kB 00:00:00
(14/27): perl-Scalar-List-Utils-1.27-248.el7.x86_64.rpm | 36 kB 00:00:00
(15/27): perl-Socket-2.010-4.el7.x86_64.rpm | 49 kB 00:00:00
(16/27): perl-Storable-2.45-3.el7.x86_64.rpm | 77 kB 00:00:00
(17/27): perl-Text-ParseWords-3.29-4.el7.noarch.rpm | 14 kB 00:00:00
(18/27): perl-Time-HiRes-1.9725-3.el7.x86_64.rpm | 45 kB 00:00:00
(19/27): perl-Time-Local-1.2300-2.el7.noarch.rpm | 24 kB 00:00:00
(20/27): perl-constant-1.27-2.el7.noarch.rpm | 19 kB 00:00:00
(21/27): perl-libs-5.16.3-292.el7.x86_64.rpm | 688 kB 00:00:00
(22/27): perl-macros-5.16.3-292.el7.x86_64.rpm | 43 kB 00:00:00
(23/27): perl-parent-0.225-244.el7.noarch.rpm | 12 kB 00:00:00
(24/27): perl-podlators-2.5.1-3.el7.noarch.rpm | 112 kB 00:00:00
(25/27): perl-threads-1.87-4.el7.x86_64.rpm | 49 kB 00:00:00
(26/27): perl-threads-shared-1.43-6.el7.x86_64.rpm | 39 kB 00:00:00
(27/27): perl-Carp-1.26-244.el7.noarch.rpm | 19 kB 00:00:05
——————————————————————————————————-

合計 2.0 MB/s | 11 MB 00:00:05


Running transaction check
Running transaction test
Transaction test succeeded
Running transaction

インストール中 : 1:perl-parent-0.225-244.el7.noarch 1/27
インストール中 : perl-HTTP-Tiny-0.033-3.el7.noarch 2/27
インストール中 : perl-podlators-2.5.1-3.el7.noarch 3/27
インストール中 : perl-Pod-Perldoc-3.20-4.el7.noarch 4/27
インストール中 : 1:perl-Pod-Escapes-1.04-292.el7.noarch 5/27
インストール中 : perl-Text-ParseWords-3.29-4.el7.noarch 6/27
インストール中 : perl-Encode-2.51-7.el7.x86_64 7/27
インストール中 : perl-Pod-Usage-1.63-3.el7.noarch 8/27
インストール中 : 4:perl-macros-5.16.3-292.el7.x86_64 9/27
インストール中 : 4:perl-libs-5.16.3-292.el7.x86_64 10/27
インストール中 : perl-Storable-2.45-3.el7.x86_64 11/27
インストール中 : perl-Exporter-5.68-3.el7.noarch 12/27
インストール中 : perl-constant-1.27-2.el7.noarch 13/27
インストール中 : perl-Time-Local-1.2300-2.el7.noarch 14/27
インストール中 : perl-Socket-2.010-4.el7.x86_64 15/27
インストール中 : perl-Carp-1.26-244.el7.noarch 16/27
インストール中 : 4:perl-Time-HiRes-1.9725-3.el7.x86_64 17/27
インストール中 : perl-PathTools-3.40-5.el7.x86_64 18/27
インストール中 : perl-Scalar-List-Utils-1.27-248.el7.x86_64 19/27
インストール中 : perl-File-Temp-0.23.01-3.el7.noarch 20/27
インストール中 : perl-File-Path-2.09-2.el7.noarch 21/27
インストール中 : perl-threads-shared-1.43-6.el7.x86_64 22/27
インストール中 : perl-threads-1.87-4.el7.x86_64 23/27
インストール中 : perl-Filter-1.49-3.el7.x86_64 24/27
インストール中 : 1:perl-Pod-Simple-3.28-4.el7.noarch 25/27
インストール中 : perl-Getopt-Long-2.40-2.el7.noarch 26/27
インストール中 : 4:perl-5.16.3-292.el7.x86_64 27/27

検証中 : perl-HTTP-Tiny-0.033-3.el7.noarch 1/27
検証中 : perl-threads-shared-1.43-6.el7.x86_64 2/27
検証中 : perl-Storable-2.45-3.el7.x86_64 3/27
検証中 : perl-Exporter-5.68-3.el7.noarch 4/27
検証中 : perl-constant-1.27-2.el7.noarch 5/27
検証中 : perl-PathTools-3.40-5.el7.x86_64 6/27
検証中 : 4:perl-macros-5.16.3-292.el7.x86_64 7/27
検証中 : 1:perl-parent-0.225-244.el7.noarch 8/27
検証中 : 4:perl-5.16.3-292.el7.x86_64 9/27
検証中 : perl-File-Temp-0.23.01-3.el7.noarch 10/27
検証中 : 1:perl-Pod-Simple-3.28-4.el7.noarch 11/27
検証中 : perl-Time-Local-1.2300-2.el7.noarch 12/27
検証中 : 4:perl-libs-5.16.3-292.el7.x86_64 13/27
検証中 : perl-Pod-Perldoc-3.20-4.el7.noarch 14/27
検証中 : perl-Socket-2.010-4.el7.x86_64 15/27
検証中 : perl-Carp-1.26-244.el7.noarch 16/27
検証中 : 4:perl-Time-HiRes-1.9725-3.el7.x86_64 17/27
検証中 : perl-Scalar-List-Utils-1.27-248.el7.x86_64 18/27
検証中 : 1:perl-Pod-Escapes-1.04-292.el7.noarch 19/27
検証中 : perl-Pod-Usage-1.63-3.el7.noarch 20/27
検証中 : perl-Encode-2.51-7.el7.x86_64 21/27
検証中 : perl-podlators-2.5.1-3.el7.noarch 22/27
検証中 : perl-Getopt-Long-2.40-2.el7.noarch 23/27
検証中 : perl-File-Path-2.09-2.el7.noarch 24/27
検証中 : perl-threads-1.87-4.el7.x86_64 25/27
検証中 : perl-Filter-1.49-3.el7.x86_64 26/27
検証中 : perl-Text-ParseWords-3.29-4.el7.noarch 27/27


インストール:
perl.x86_64 4:5.16.3-292.el7


依存性関連をインストールしました:
perl-Carp.noarch 0:1.26-244.el7 perl-Encode.x86_64 0:2.51-7.el7
perl-Exporter.noarch 0:5.68-3.el7 perl-File-Path.noarch 0:2.09-2.el7
perl-File-Temp.noarch 0:0.23.01-3.el7 perl-Filter.x86_64 0:1.49-3.el7
perl-Getopt-Long.noarch 0:2.40-2.el7 perl-HTTP-Tiny.noarch 0:0.033-3.el7
perl-PathTools.x86_64 0:3.40-5.el7 perl-Pod-Escapes.noarch 1:1.04-292.el7
perl-Pod-Perldoc.noarch 0:3.20-4.el7 perl-Pod-Simple.noarch 1:3.28-4.el7
perl-Pod-Usage.noarch 0:1.63-3.el7 perl-Scalar-List-Utils.x86_64 0:1.27-248.el7
perl-Socket.x86_64 0:2.010-4.el7 perl-Storable.x86_64 0:2.45-3.el7
perl-Text-ParseWords.noarch 0:3.29-4.el7 perl-Time-HiRes.x86_64 4:1.9725-3.el7
perl-Time-Local.noarch 0:1.2300-2.el7 perl-constant.noarch 0:1.27-2.el7
perl-libs.x86_64 4:5.16.3-292.el7 perl-macros.x86_64 4:5.16.3-292.el7
perl-parent.noarch 1:0.225-244.el7 perl-podlators.noarch 0:2.5.1-3.el7
perl-threads.x86_64 0:1.87-4.el7 perl-threads-shared.x86_64 0:1.43-6.el7


完了しました!
[root@test vmware-tools-distrib]#


VMware Tools をインストールするために「ifconfig」コマンドが必要なのでインストールする

今回の環境は「CentOS7」のためデフォルトでは「ifconfig」コマンドがありません。

そのため「ifconfig」コマンドをインストールします。

ifconfig コマンドは「net-tools」に含まれています。

[root@test ~]# yum install net-tools

読み込んだプラグイン:fastestmirror
Loading mirror speeds from cached hostfile
* base: www.ftp.ne.jp
* extras: www.ftp.ne.jp
* updates: www.ftp.ne.jp
依存性の解決をしています
–> トランザクションの確認を実行しています。
—> パッケージ net-tools.x86_64 0:2.0-0.22.20131004git.el7 を インストール
–> 依存性解決を終了しました。


依存性を解決しました

=======================================================================================================
Package アーキテクチャー バージョン リポジトリー 容量
=======================================================================================================


インストール中:
net-tools x86_64 2.0-0.22.20131004git.el7 base 305 k


トランザクションの要約
=======================================================================================================
インストール 1 パッケージ

総ダウンロード容量: 305 k
インストール容量: 917 k


Is this ok [y/d/N]: y


Downloading packages:
net-tools-2.0-0.22.20131004git.el7.x86_64.rpm | 305 kB 00:00:00
Running transaction check
Running transaction test
Transaction test succeeded
Running transaction


インストール中 : net-tools-2.0-0.22.20131004git.el7.x86_64 1/1
検証中 : net-tools-2.0-0.22.20131004git.el7.x86_64 1/1


インストール:
net-tools.x86_64 0:2.0-0.22.20131004git.el7


完了しました!
[root@test ~]#


後ほど必要になるので「ifconfig」コマンドのパスを確認しておきます。

「ifconfig」の場所は「/sbin/ifconfig」です。

[root@test ~]# which ifconfig
/sbin/ifconfig
[root@test ~]#


VMware Tools をインストールするために「gcc」をインストールする

VMware Tools をインストールする際にコンパイルが必要になるため「gcc」をインストールします。

[root@test ~]# yum install gcc
読み込んだプラグイン:fastestmirror
Loading mirror speeds from cached hostfile
* base: www.ftp.ne.jp
* extras: www.ftp.ne.jp
* updates: www.ftp.ne.jp
依存性の解決をしています
–> トランザクションの確認を実行しています。
—> パッケージ gcc.x86_64 0:4.8.5-16.el7 を インストール
–> 依存性の処理をしています: cpp = 4.8.5-16.el7 のパッケージ: gcc-4.8.5-16.el7.x86_64
–> 依存性の処理をしています: glibc-devel >= 2.2.90-12 のパッケージ: gcc-4.8.5-16.el7.x86_64
–> 依存性の処理をしています: libmpfr.so.4()(64bit) のパッケージ: gcc-4.8.5-16.el7.x86_64
–> 依存性の処理をしています: libmpc.so.3()(64bit) のパッケージ: gcc-4.8.5-16.el7.x86_64
–> トランザクションの確認を実行しています。
—> パッケージ cpp.x86_64 0:4.8.5-16.el7 を インストール
—> パッケージ glibc-devel.x86_64 0:2.17-196.el7 を インストール
–> 依存性の処理をしています: glibc-headers = 2.17-196.el7 のパッケージ: glibc-devel-2.17-196.el7.x86_64
–> 依存性の処理をしています: glibc-headers のパッケージ: glibc-devel-2.17-196.el7.x86_64
—> パッケージ libmpc.x86_64 0:1.0.1-3.el7 を インストール
—> パッケージ mpfr.x86_64 0:3.1.1-4.el7 を インストール
–> トランザクションの確認を実行しています。
—> パッケージ glibc-headers.x86_64 0:2.17-196.el7 を インストール
–> 依存性の処理をしています: kernel-headers >= 2.2.1 のパッケージ: glibc-headers-2.17-196.el7.x86_64
–> 依存性の処理をしています: kernel-headers のパッケージ: glibc-headers-2.17-196.el7.x86_64
–> トランザクションの確認を実行しています。
—> パッケージ kernel-headers.x86_64 0:3.10.0-693.2.2.el7 を インストール
–> 依存性解決を終了しました。

依存性を解決しました

=======================================================================================================
Package アーキテクチャー バージョン リポジトリー 容量
=======================================================================================================
インストール中:
gcc x86_64 4.8.5-16.el7 base 16 M
依存性関連でのインストールをします:
cpp x86_64 4.8.5-16.el7 base 5.9 M
glibc-devel x86_64 2.17-196.el7 base 1.1 M
glibc-headers x86_64 2.17-196.el7 base 675 k
kernel-headers x86_64 3.10.0-693.2.2.el7 updates 6.0 M
libmpc x86_64 1.0.1-3.el7 base 51 k
mpfr x86_64 3.1.1-4.el7 base 203 k

トランザクションの要約
=======================================================================================================
インストール 1 パッケージ (+6 個の依存関係のパッケージ)

総ダウンロード容量: 30 M
インストール容量: 60 M
Is this ok [y/d/N]: y
Downloading packages:
(1/7): glibc-headers-2.17-196.el7.x86_64.rpm | 675 kB 00:00:00
(2/7): libmpc-1.0.1-3.el7.x86_64.rpm | 51 kB 00:00:00
(3/7): glibc-devel-2.17-196.el7.x86_64.rpm | 1.1 MB 00:00:00
(4/7): mpfr-3.1.1-4.el7.x86_64.rpm | 203 kB 00:00:00
(5/7): gcc-4.8.5-16.el7.x86_64.rpm | 16 MB 00:00:01
(6/7): cpp-4.8.5-16.el7.x86_64.rpm | 5.9 MB 00:00:01
(7/7): kernel-headers-3.10.0-693.2.2.el7.x86_64.rpm | 6.0 MB 00:00:01
——————————————————————————————————-
合計 18 MB/s | 30 MB 00:00:01
Running transaction check
Running transaction test
Transaction test succeeded
Running transaction
インストール中 : mpfr-3.1.1-4.el7.x86_64 1/7
インストール中 : libmpc-1.0.1-3.el7.x86_64 2/7
インストール中 : cpp-4.8.5-16.el7.x86_64 3/7
インストール中 : kernel-headers-3.10.0-693.2.2.el7.x86_64 4/7
インストール中 : glibc-headers-2.17-196.el7.x86_64 5/7
インストール中 : glibc-devel-2.17-196.el7.x86_64 6/7
インストール中 : gcc-4.8.5-16.el7.x86_64 7/7
検証中 : kernel-headers-3.10.0-693.2.2.el7.x86_64 1/7
検証中 : mpfr-3.1.1-4.el7.x86_64 2/7
検証中 : glibc-headers-2.17-196.el7.x86_64 3/7
検証中 : cpp-4.8.5-16.el7.x86_64 4/7
検証中 : gcc-4.8.5-16.el7.x86_64 5/7
検証中 : glibc-devel-2.17-196.el7.x86_64 6/7
検証中 : libmpc-1.0.1-3.el7.x86_64 7/7

インストール:
gcc.x86_64 0:4.8.5-16.el7

依存性関連をインストールしました:
cpp.x86_64 0:4.8.5-16.el7 glibc-devel.x86_64 0:2.17-196.el7
glibc-headers.x86_64 0:2.17-196.el7 kernel-headers.x86_64 0:3.10.0-693.2.2.el7
libmpc.x86_64 0:1.0.1-3.el7 mpfr.x86_64 0:3.1.1-4.el7

完了しました!
[root@test ~]#


gccのパスを確認しておきます。

[root@test ~]# which gcc
/bin/gcc
[root@test ~]#


VMware Tools のインストール手順

事前準備が出来たら「VMware Tools」をインストールします。

基本デフォルトの設定で問題ありません。

[root@test vmware-tools-distrib]# perl vmware-install.pl
open-vm-tools packages are available from the OS vendor and VMware recommends
using open-vm-tools packages. See http://kb.vmware.com/kb/2073803 for more
information.
Do you still want to proceed with this installation? [no] yes

Creating a new VMware Tools installer database using the tar4 format.

Installing VMware Tools.

In which directory do you want to install the binary files?
[/usr/bin]

What is the directory that contains the init directories (rc0.d/ to rc6.d/)?
[/etc/rc.d]

What is the directory that contains the init scripts?
[/etc/rc.d/init.d]

In which directory do you want to install the daemon files?
[/usr/sbin]

In which directory do you want to install the library files?
[/usr/lib/vmware-tools]

The path “/usr/lib/vmware-tools” does not exist currently. This program is
going to create it, including needed parent directories. Is this what you want?
[yes]

In which directory do you want to install the common agent library files?
[/usr/lib]

In which directory do you want to install the common agent transient files?
[/var/lib]

In which directory do you want to install the documentation files?
[/usr/share/doc/vmware-tools]

The path “/usr/share/doc/vmware-tools” does not exist currently. This program
is going to create it, including needed parent directories. Is this what you
want? [yes]

The installation of VMware Tools 10.1.7 build-5541682 for Linux completed
successfully. You can decide to remove this software from your system at any
time by invoking the following command: “/usr/bin/vmware-uninstall-tools.pl”.

Before running VMware Tools for the first time, you need to configure it by
invoking the following command: “/usr/bin/vmware-config-tools.pl”. Do you want
this program to invoke the command for you now? [yes]

Setup is unable to find the “ifconfig” program on your machine. Please make
sure it is installed. Do you want to specify the location of this program by
hand? [yes]

What is the location of the “ifconfig” program on your
machine?

The answer “” is invalid. It must be the complete name of a binary file.

What is the location of the “ifconfig” program on your
machine? /sbin/ifconfig

Initializing…

Making sure services for VMware Tools are stopped.

The module vmci has already been installed on this system by another installer
or package and will not be modified by this installer.

The module vsock has already been installed on this system by another installer
or package and will not be modified by this installer.

The module vmxnet3 has already been installed on this system by another
installer or package and will not be modified by this installer.

The module pvscsi has already been installed on this system by another
installer or package and will not be modified by this installer.

The module vmmemctl has already been installed on this system by another
installer or package and will not be modified by this installer.

The VMware Host-Guest Filesystem allows for shared folders between the host OS
and the guest OS in a Fusion or Workstation virtual environment. Do you wish
to enable this feature? [no]

Before you can compile modules, you need to have the following installed…

make
gcc
kernel headers of the running kernel

Searching for GCC…
The path “” is not valid path to the gcc binary.
Would you like to change it? [yes] yes

What is the location of the gcc program on your machine? /bin/gcc

The path “/bin/gcc” appears to be a valid path to the gcc binary.
Would you like to change it? [no] yes

What is the location of the gcc program on your machine? [/bin/gcc]

The path “/bin/gcc” appears to be a valid path to the gcc binary.
Would you like to change it? [no] no

Searching for a valid kernel header path…
The path “” is not a valid path to the 3.10.0-693.2.2.el7.x86_64 kernel
headers.
Would you like to change it? [yes] no

WARNING: This program cannot compile any modules for the following reason(s)…

kernel. Please ensure that the header files for the running kernel are
installed on this sytem.

[ Press Enter key to continue ]

The filesystem driver (vmhgfs module) is used only for the shared folder
feature. The rest of the software provided by VMware Tools is designed to work
independently of this feature.

If you wish to have the shared folders feature, you can install the driver by
running vmware-config-tools.pl again after making sure that gcc, binutils, make
and the kernel sources for your running kernel are installed on your machine.
These packages are available on your distribution’s installation CD.
[ Press Enter key to continue ]

The vmxnet driver is no longer supported on kernels 3.3 and greater. Please
upgrade to a newer virtual NIC. (e.g., vmxnet3 or e1000e)

The vmblock enables dragging or copying files between host and guest in a
Fusion or Workstation virtual environment. Do you wish to enable this feature?
[no]

VMware automatic kernel modules enables automatic building and installation of
VMware kernel modules at boot that are not already present. This feature can
be enabled/disabled by re-running vmware-config-tools.pl.

Would you like to enable VMware automatic kernel modules?
[yes]

Do you want to enable Guest Authentication (vgauth)? Enabling vgauth is needed
if you want to enable Common Agent (caf). [yes]

Do you want to enable Common Agent (caf)? [yes]

No X install found.

Creating a new initrd boot image for the kernel.
Generating the key and certificate files.
Successfully generated the key and certificate files.
SELinux setup: The ‘semanage’ utility was not found.
There was an error setting up the SELinux security context for VMware Tools.
Please make sure SELinux is set up correctly.

The configuration of VMware Tools 10.1.7 build-5541682 for Linux for this
running kernel completed successfully.

You must restart your X session before any mouse or graphics changes take
effect.

You can now run VMware Tools by invoking “/usr/bin/vmware-toolbox-cmd” from the
command line.

To enable advanced X features (e.g., guest resolution fit, drag and drop, and
file and text copy/paste), you will need to do one (or more) of the following:
1. Manually start /usr/bin/vmware-user
2. Log out and log back into your desktop session
3. Restart your X session.

Enjoy,

[root@test vmware-tools-distrib]#


仮想マシン OS の再起動

VMware Tools をインストールしたら仮想マシンを再起動します。

[root@test vmware-tools-distrib]# reboot
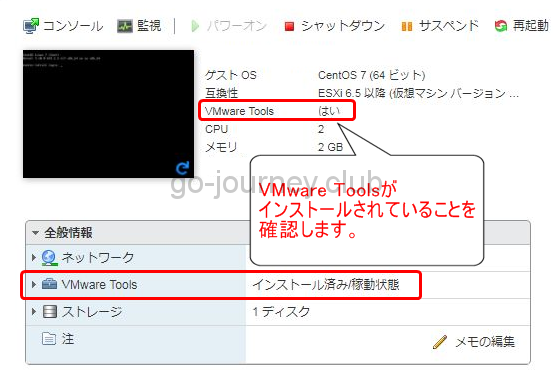


VMware Tools の確認

再度 VMware vSphere 6.5 ESXi Hypervisor にログインして VMware Tools のバージョンを確認します。

【VMware 6.5】VMware Tools(vmware-tools)のインストール


まとめ

VMware Toolsをインストールしなくても最低限稼働はしますが、より仮想環境下の仮想マシンのパフォーマンスを引き出すために「VMware Tools」をインストールしておきましょう。


よかったらシェアしてね!
  • URLをコピーしました!
  • URLをコピーしました!

この記事を書いた人

コメント

コメントする

AlphaOmega Captcha Medica  –  What Do You See?


このサイトはスパムを低減するために Akismet を使っています。コメントデータの処理方法の詳細はこちらをご覧ください