Officeツールというと「Microsoft Office」が有名です。
Word、Excel、PowerPoint など日常業務で使用している方が大半だと思います。

ただしオフィス系アプリは「Microsoft Office」だけではなく
他にも以下のようなオフィス系アプリがあります。
- Apache OpenOffice(無料)
- WPS Office(旧 KINGSOFT Office)(6,480円~)
- Polaris Office(3,430円~)
- ThinkFree Office(3,480円~)
- Lotus Symphony(無料)
- SoftMaker FreeOffice(無料)
目次
オフィスソフトとは
オフィスソフトとは、一言で言うと「Microsoft Office のようなアプリ」のことを言います。
- Word のようなワープロソフト
- Excel のような表計算ソフト
- PowerPoint のようなプレゼンテーションソフト
などです。
上記のように「無料オフィスソフト」から「格安オフィスソフト」など様々な種類のオフィスソフトが提供されていますが、今回は Linux でも利用できてしかも無料ソフトの「LibreOffice」をご紹介します。
LibreOffice 5.3インストール手順
まずは最新の LibreOffice の新規インストール手順からです。
今回は以下の構成で LibreOffice をインストールします。
LibreOffice 構成
以下の構成で LibreOffice をインストールします。
OS:CentOS7
LibreOffice:5.3(最新版)
LibreOffice Linux 版のダウンロード
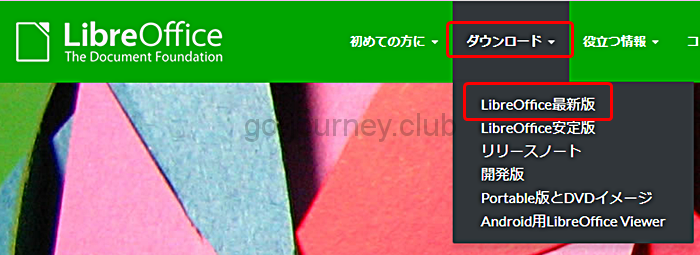
以下のURLにアクセスします。
上部のメニューより「ダウンロード」–「LibreOffice最新版」をクリックします。
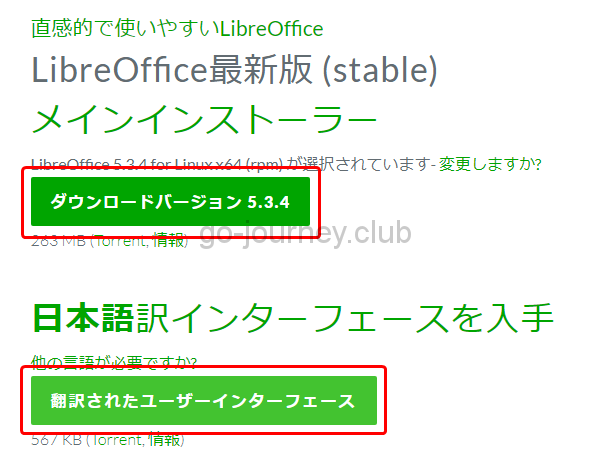
下図のように「Linux x64(rpm)」をクリックします。
※「Linux x64(rpm)」は rpm 形式で LibreOffice を簡単にインストールすることができます。

下図のように「ダウンロードバージョン 5.3.4」をクリックします。
クリックすると別ページに移動しますが、何もしなくても数秒後にダウンロードが開始されます。
※ファイル名は「LibreOffice_5.3.4_Linux_x86-64_rpm.tar.gz」です。(5.3.4の場合)
ファイルサイズは「263MB」と大きめなので気長に待ちます。
別ページに移動したら、再度下図のページに戻り日本語表記用のファイルをダウンロードします。
LibreOffice は「英語」表記なので、「日本語」表記に変更するために下図の「翻訳されたユーザーインターフェース」をクリックします。
LibreOffice パッケージのアップロード
ダウンロードした LibreOffice 5.3 Linux 版パッケージを Linux マシンにアップロードします。
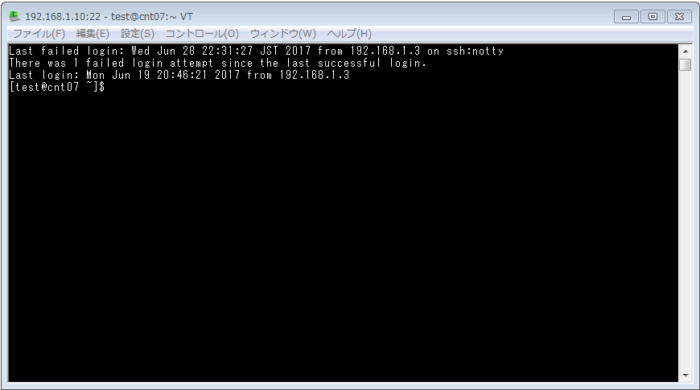
TeratermでLinuxマシンにログインします。
Teraterm のメニューより「ファイル」–「SSH SCP」をクリックします。
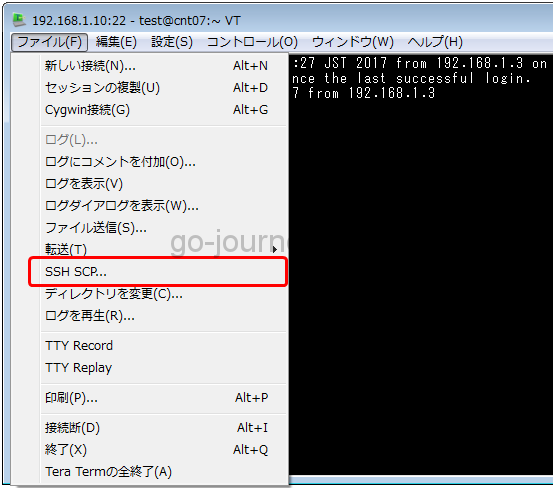
「TTSSH:Secure File Copy」画面が表示されるので四角いアイコンをクリックします。
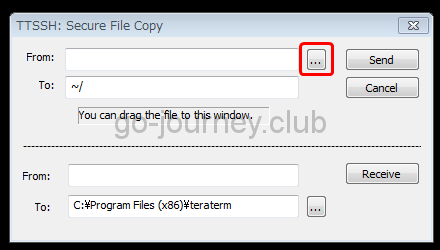
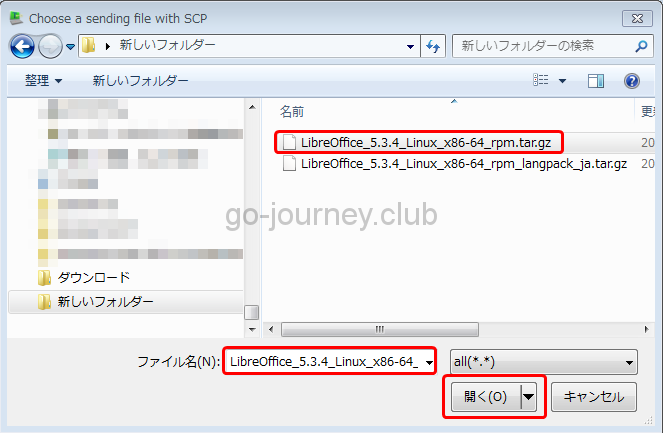
ダウンロードした LibreOffice パッケージファイル(LibreOffice_5.3.4_Linux_x86-64_rpm.tar.gz)を選択して「開く」をクリックします。
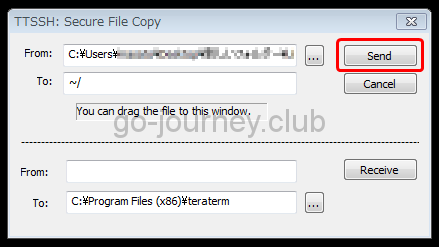
「Send」をクリックします。
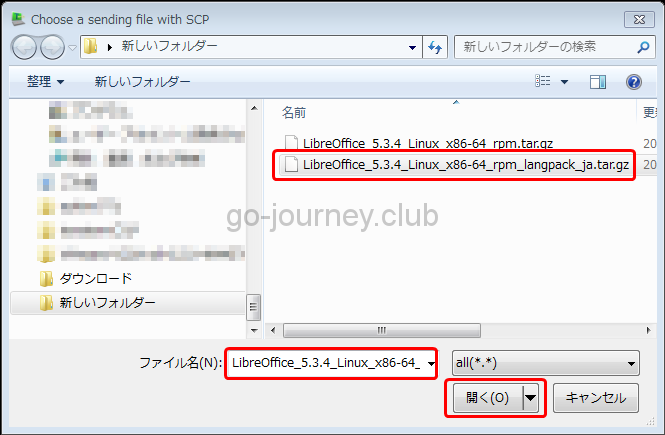
同様に日本語化パッケージ(LibreOffice_5.3.4_Linux_x86-64_rpm_langpack_ja.tar.gz)も Linux マシンにアップロードします。
再度 Teraterm のメニューより「ファイル」–「SSH SCP」をクリックします。
「TTSSH:Secure File Copy」画面が表示されるので四角いアイコンをクリックします。
ダウンロードした日本語化パッケージ(LibreOffice_5.3.4_Linux_x86-64_rpm_langpack_ja.tar.gz)を選択して「開く」をクリックします。
「Send」をクリックします。
アップロードしたファイルを確認します。
|
[test@cnt07 ~]$ ls |
LibreOffice パッケージの展開
LibreOffice パッケージをアップロードしたら tar コマンドで展開します。
|
[test@cnt07 ~]$ tar zxvf LibreOffice_5.3.4_Linux_x86-64_rpm.tar.gz ← tar コマンドで LigreOffice 5.3 の tar.gz ファイルを展開します。 [test@cnt07 ~]$ tar zxvf LibreOffice_5.3.4_Linux_x86-64_rpm_langpack_ja.tar.gz ← tar コマンドで LigreOffice 5.3 の日本語化パッケージの tar.gz ファイルを展開します。 |
LibreOffice 5.3 のインストール
パッケージを展開したらインストールを行います。
|
[test@cnt07 ~]$ ls ← パッケージが展開されていることを確認します。
====================================================================== For the latest updates to this readme file, see http://www.libreoffice.org/welcome/readme.html This file contains important information about the LibreOffice software. You are recommended to read this information very carefully before starting installation. The LibreOffice community is responsible for the development of this product, and invites you to consider participating as a community member. If you are a new user, you can visit the LibreOffice site, where you will find lots of information about the LibreOffice project and the communities that exist around it. Go to http://www.libreoffice.org/.
Is LibreOffice Really Free for Any User? LibreOffice is free for use by everybody. You may take this copy of LibreOffice and install it on as many computers as you like, and use it for any purpose you like (including commercial, government, public administration and educational use). For further details see the license text packaged with this LibreOffice download.
Why is LibreOffice Free for Any User? You can use this copy of LibreOffice free of charge because individual contributors and corporate sponsors have designed, developed, tested, translated, documented, supported, marketed, and helped in many other ways to make LibreOffice what it is today – the world’s leading Open Source productivity software for home and office. If you appreciate their efforts, and would like to ensure that LibreOffice continues to be available far into the future, please consider contributing to the project – see http://www.documentfoundation.org/contribution/ for details. Everyone can make a contribution of some kind.
———————————————————————- LibreOffice requires a recent version of Java Runtime Environment (JRE) for full functionality. JRE is not part of the LibreOffice installation package, it should be installed separately. LibreOfficeには、最新のJava Runtime Environment(JRE)が必要です。 JREはLibreOfficeインストールパッケージの一部ではありません。別途インストールする必要があります。 ↑LibreOfficeをインストールする前に最新の JRE をインストールする必要があることが分かりました。
System Requirements As a general rule, you are recommended to install LibreOffice via the installation methods recommended by your particular Linux distribution (such as the Ubuntu Software Center, in the case of Ubuntu Linux). This is because it is usually the simplest way to obtain an installation that is optimally integrated into your system. Indeed, LibreOffice may well be already installed by default when you originally install your Linux operating system. This “stand-alone” LibreOffice installer is provided for users in need of previews, having special needs, and for out-of-the-ordinary cases. * Linux Kernel version 2.6.18 or higher; ↑上記のバージョンが必要になります。
There is a wide variety of Linux distributions, and there may be different installation options (KDE vs Gnome, etc.) available from the same Linux vendor. 多種多様なLinuxディストリビューションがあり、同じLinuxベンダーから入手可能なインストールオプション(KDEとGnomeなど)が異なる場合があります。
Some distributions ship with their own “native” version of LibreOffice, which may have different features from this community-supplied version of LibreOffice. 一部のディストリビューションには、独自の「オリジナル」バージョンのLibreOfficeが付属しています.
In many cases, you can install the community-supplied LibreOffice alongside a native version. LibreOfficeのこのコミュニティ提供バージョンとは異なる機能を備えている場合があります。
However, you may prefer to remove the “native” version before installing this community-supplied version. ただし、このコミュニティ提供のバージョンをインストールする前に、「ネイティブ」バージョンを削除することをお勧めします。
For details on how to do that, please consult the user help resources provided by your particular Linux vendor. It is a recommended best practice to back-up your system and data before you remove or install software. Please make sure you have enough free memory in the temporary directory on your system, and please ensure that read, write and run access rights have been granted. Close all other programs before starting the installation process.
Installation of LibreOffice on Fedora, openSUSE, Mandriva and other Linux systems using RPM packages When you unpack the downloaded archive, you will see that the contents have been decompressed into a sub-directory. ダウンロードしたアーカイブを解凍すると、内容がサブディレクトリに解凍されたことがわかります。
Open a file manager window, and change directory to the one starting with “LibreOffice_”, followed by the version number and some platform information. ファイルマネージャウィンドウを開き、 “LibreOffice_”で始まるディレクトリに変更し、続いてバージョン番号とプラットフォーム情報を入力します。
This directory contains a subdirectory called “RPMS”. このディレクトリーには、「RPMS」というサブディレクトリーが含まれています。
Change directory to the “RPMS” directory. ディレクトリを “RPMS”ディレクトリに変更します。
Right-click within the directory and choose “Open in Terminal”. ディレクトリ内を右クリックし、[ターミナルで開く]を選択します。
A terminal window will open. 端末ウィンドウが開きます。
From the command line of the terminal window, enter the following command (you will be prompted to enter your root user’s password before the command will execute): 端末ウィンドウのコマンドラインから、次のコマンドを入力します(コマンドが実行される前にrootユーザーのパスワードを入力するよう求められます)。
For Fedora-based systems: su -c ‘yum install *.rpm’ Fedoraベースのシステムの場合:su -c ‘yum install * .rpm’ ← su -c ‘command’ で su にスイッチした後で’command’を実行します。
For Mandriva-based systems: sudo urpmi *.rpm Mandrivaベースのシステムの場合:sudo urpmi * .rpm ← Mandriva(マンドリーバ) Linux は、2011年に最終版をリリース後に開発を終了しています。RedHat Linux をベースとして開発されたディストリビューションなので「rpm」コマンドでインストールします。
For other RPM-based systems (openSUSE, etc.): rpm -Uvh *.rpm 他のRPMベースのシステム(openSUSEなど)の場合:rpm -Uvh * .rpm
The installation process is now completed, and you should have icons for all the LibreOffice applications in your desktop’s Applications/Office menu. これでインストールプロセスが完了し、デスクトップのアプリケーション/オフィスメニューにあるすべてのLibreOfficeアプリケーションのアイコンが表示されます。
Alternatively, you can use the ‘install’ script, located in the toplevel directory of this archive to perform an installation as a user. また、このアーカイブの最上位ディレクトリにある ‘install’スクリプトを使用して、ユーザーとしてインストールを実行することもできます。
The script will set up LibreOffice to have its own profile for this installation, separated from your normal LibreOffice profile. スクリプトは、通常のLibreOfficeプロファイルとは別に、このインストール用の独自のプロファイルを持つようにLibreOfficeを設定します。
Note that this will not install the system integration parts such as desktop menu items and desktop MIME type registrations. デスクトップメニュー項目やデスクトップMIMEタイプ登録などのシステム統合部分はインストールされません。
Installing a Language Pack Download the language pack for your desired language and platform. ご希望の言語とプラットフォーム用の言語パックをダウンロードしてください。
They are available from the same location as the main installation archive. これらのファイルは、メインインストールアーカイブと同じ場所から入手できます。
From the Nautilus file manager, extract the downloaded archive into a directory (your desktop, for instance). Nautilusファイルマネージャから、ダウンロードしたアーカイブをディレクトリ(デスクトップなど)に展開します。
Ensure that you have exited all LibreOffice applications (including the QuickStarter, if it is started). すべてのLibreOfficeアプリケーション(QuickStarterが起動されていればそれを含む)を終了してください。
Change directory to the directory in which you extracted your downloaded language pack. ダウンロードした言語パックを解凍したディレクトリに移動します。
Now change directory to the directory that was created during the extraction process. 次に、抽出プロセス中に作成されたディレクトリにディレクトリを変更します。
For instance, for the French language pack for a 32-bit Debian/Ubuntu-based system, the directory is named LibreOffice_, plus some version information, plus Linux_x86_langpack-deb_fr. たとえば、Debian / Ubuntuベースの32ビットシステム用のフランス語パックの場合、ディレクトリ名はLibreOffice_といくつかのバージョン情報とLinux_x86_langpack-deb_frという名前になります。
Now change directory to the directory that contains the packages to install. 次に、インストールするパッケージを含むディレクトリにディレクトリを変更します。
For Fedora-based systems: su -c ‘yum install *.rpm’ Fedoraベースのシステムの場合:su -c ‘yum install * .rpm’
For Mandriva-based systems: sudo urpmi *.rpm Mandrivaベースのシステムの場合:sudo urpmi * .rpm
For other RPM-using systems (openSUSE, etc.): rpm -Uvh *.rpm 他のRPMを使用するシステム(openSUSEなど)の場合:rpm -Uvh * .rpm
Now start one of the LibreOffice applications – Writer, for instance. 次に、LibreOfficeアプリケーションの1つ、たとえばWriterを起動します。 ← Writerとは Microsoft Office で言う「Word」のことを言います。
Go to the Tools menu and choose Options. [ツール]メニューの[オプション]を選択します。
In the Options dialog box, click on “Language Settings” and then click on “Languages”. [オプション]ダイアログボックスで、[言語設定]をクリックし、[言語]をクリックします。
Dropdown the “User interface” list and select the language you just installed. 「ユーザーインターフェイス」リストをドロップダウンして、インストールした言語を選択します。
If you want, do the same thing for the “Locale setting”, the “Default currency”, and the “Default languages for documents”. 必要に応じて、「ロケール設定」、「デフォルト通貨」、および「ドキュメントのデフォルト言語」で同じことを行います。
After adjusting those settings, click on OK. これらの設定をしたら、[OK]をクリックします。
The dialog box will close, and you will see an information message telling you that your changes will only be activated after you exit LibreOffice and start it again (remember to also exit the QuickStarter if it is started). ダイアログボックスを閉じ、LibreOfficeを終了してもう一度起動したときにのみ変更内容が有効になるという情報メッセージが表示されます(QuickStarterが起動していれば終了してください)。
The next time you start LibreOffice, it will start in the language you just installed.
次回にLibreOfficeを起動すると、インストールした言語で起動します。
Portions Copyright 1998, 1999 James Clark. Portions Copyright 1996, 1998 Netscape Communications Corporation. [test@cnt07 readmes]$ |
CentOS は RedHat のクローン(REHLクローン)なので、Fedora ベースに分類されます。
そのため「yum」コマンドでインストールします。
|
[root@cnt07 ~]# cd /home/test libobasis5.3-xsltfilter-5.3.4.2-2.x86_64.rpm libobasis5.3-gnome-integration-5.3.4.2-2.x86_64.rpm libreoffice5.3-5.3.4.2-2.x86_64.rpm libobasis5.3-graphicfilter-5.3.4.2-2.x86_64.rpm libreoffice5.3-base-5.3.4.2-2.x86_64.rpm libobasis5.3-images-5.3.4.2-2.x86_64.rpm libreoffice5.3-calc-5.3.4.2-2.x86_64.rpm libobasis5.3-impress-5.3.4.2-2.x86_64.rpm libreoffice5.3-dict-en-5.3.4.2-2.x86_64.rpm libobasis5.3-kde-integration-5.3.4.2-2.x86_64.rpm libreoffice5.3-dict-es-5.3.4.2-2.x86_64.rpm libobasis5.3-librelogo-5.3.4.2-2.x86_64.rpm libreoffice5.3-dict-fr-5.3.4.2-2.x86_64.rpm libobasis5.3-math-5.3.4.2-2.x86_64.rpm libreoffice5.3-draw-5.3.4.2-2.x86_64.rpm libobasis5.3-ogltrans-5.3.4.2-2.x86_64.rpm libreoffice5.3-en-US-5.3.4.2-2.x86_64.rpm libobasis5.3-onlineupdate-5.3.4.2-2.x86_64.rpm libreoffice5.3-freedesktop-menus-5.3.4-2.noarch.rpm libobasis5.3-ooofonts-5.3.4.2-2.x86_64.rpm libreoffice5.3-impress-5.3.4.2-2.x86_64.rpm libobasis5.3-ooolinguistic-5.3.4.2-2.x86_64.rpm libreoffice5.3-math-5.3.4.2-2.x86_64.rpm libobasis5.3-postgresql-sdbc-5.3.4.2-2.x86_64.rpm libreoffice5.3-ure-5.3.4.2-2.x86_64.rpm libobasis5.3-python-script-provider-5.3.4.2-2.x86_64.rpm libreoffice5.3-writer-5.3.4.2-2.x86_64.rpm libobasis5.3-pyuno-5.3.4.2-2.x86_64.rpm libobasis5.3-writer-5.3.4.2-2.x86_64.rpm ================================================================================================================================================================================================================= 合計容量: 808 M 完了しました! |
続けて日本語化パッケージをインストールします。
|
[root@cnt07 RPMS]# cd ../.. LibreOffice_5.3.4.2_Linux_x86-64_rpm_langpack_ja [root@cnt07 tmp]# cd LibreOffice_5.3.4.2_Linux_x86-64_rpm_langpack_ja/ libobasis5.3-ja-calc-5.3.4.2-2.x86_64.rpm libobasis5.3-ja-res-5.3.4.2-2.x86_64.rpm libreoffice5.3-ja-5.3.4.2-2.x86_64.rpm libobasis5.3-ja-math-5.3.4.2-2.x86_64.rpm libobasis5.3-ja-writer-5.3.4.2-2.x86_64.rpm
合計容量: 2.3 M
完了しました!
|
CentOS7にVNCをインストールしてリモートでGUI接続する
CentOSにVNCをインストールして設定をする詳しい手順はこちらをご参考ください。

VNC Server Quick HowTo
基本的には「/lib/systemd/system/vncserver@.service」ファイルに記載されている「Quick HowTo」を実行します。
|
# Quick HowTo: |
vncserver設定手順
以下、「test」アカウントの場合の設定です。
以下の手順ではファイル名を「vncserver@:X.service」にしています。
これは1セッションに1ポート番号が必要だからです。
たとえば以下のようにファイルを作成したら5セッションが可能になります。
vncserver@:1.service
vncserver@:2.service
vncserver@:3.service
vncserver@:4.service
vncserver@:5.service
※例
サーバーのIPアドレスが「192.168.1.1」の場合のアクセス先
- vncserver@:1.service → 192.168.1.1:5901
- vncserver@:2.service → 192.168.1.1:5902
- vncserver@:3.service → 192.168.1.1:5903
- vncserver@:4.service → 192.168.1.1:5904
- vncserver@:5.service → 192.168.1.1:5905
「ファイル名」と「ポート番号」が結び付いていることが分かりますでしょうか。
このようにして複数セッションを可能にします。
|
[root@cnt07 ~]# su – test
# The vncserver service unit file
[Unit] [Service] ↓この行の <USER> を test に変更します。 ExecStart=/usr/sbin/runuser -l test -c “/usr/bin/vncserver %i” ↓この行の <USER> を test に変更します。 [Install]
【編集後】 [test@cnt07 ~]$ cat /etc/systemd/system/vncserver@:1.service
[Unit] [Service] [Install]
|
「/etc/systemd/system/vncserver@:1.service」を修正したら「daemon-reload」を実行し、自動起動も有効にします。
|
[test@cnt07 ~]$ sudo systemctl daemon-reload [test@cnt07 ~]$ ps -ef | grep vncserver ← vncserverが起動しているか確認します。 |
VNC Serverの起動
vncserverを起動します。
|
[test@cnt07 ~]$ sudo systemctl status vncserver@:1.service 6月 30 21:17:30 cnt07.localdomain systemd[1]: Starting Remote desktop service (VNC)… See “systemctl status vncserver@:1.service” and “journalctl -xe” for details. |
「Job for vncserver@:1.service failed because a configured resource limit was exceeded.」というエラーが発生してvncserverが起動できないことが分かりました。
「Job for vncserver@:1.service failed because a configured resource limit was exceeded.」の原因
a configured resource limit was exceeded.の原因を調べます。
まずは「/var/log/messages」ファイルの中身を見てみます。
|
[root@cnt07 ~]# less /var/log/messages Jul 1 08:03:48 cnt07 systemd: Starting Remote desktop service (VNC)… |
/var/log/messages にエラーになって vncserver が起動できなかった答えが出ていますが、/tmpの下にロックファイルがあり、リソースをつかんでいるため起動ができませんでした。
ロックフィルを確認して削除します。
|
[root@cnt07 ~]# ls -la /tmp/ ← ls -la コマンドで隠しファイルも表示します。
[root@cnt07 ~]# rm -rf /tmp/.X* ← ロックファイルを消します。 |
VNC Serverの起動
再度 vncserver を起動します。
|
[test@cnt07 system]$ sudo systemctl start vncserver@:1.service 7月 01 08:23:50 cnt07.localdomain systemd[1]: Starting Remote desktop service (VNC)… |
VNC Viewerから接続
vncserverが起動したので VNC Viewer を使ってアクセスをします。
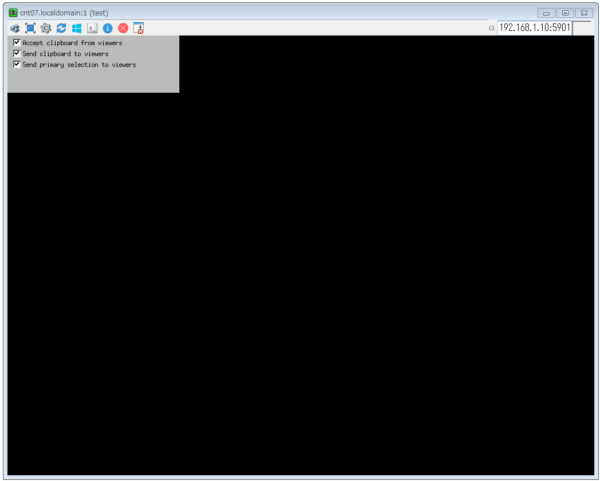
VNC Server にアクセスできているけど「VNC Viewer(Ultra VNC Viewer)」の画面が真っ黒くなる現象
ログイン画面が表示されて、ログインパスワードを正しく入力しましたが以下のように VNC Viewer の画面が真っ黒で操作できない(ログインできない?)現象が発生しました。
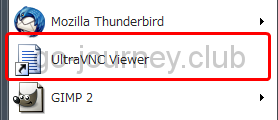
Ultra VNC Viewer を起動します。
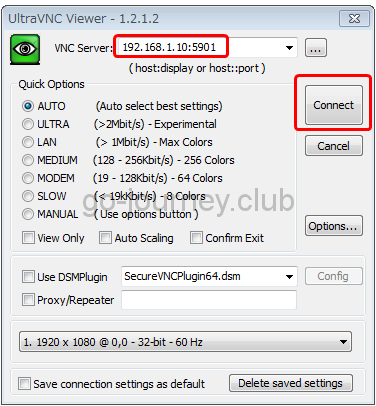
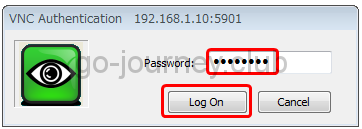
UltraVNC Viewerに「IPアドレス+ポート番号」を入力して「Connect」をクリックします。
パスワード入力画面も問題なく表示されます。
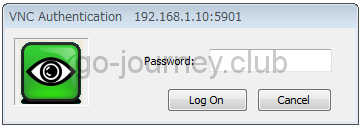
パスワードも正しく入力して「Log On」をクリックします。
しかし UltraVNC Viewer の画面が真っ暗で何も見えない状態です。
VNC Viewer で見れない場合の原因の切り分け調査
原因を切り分け調査します。
ネットワークはつながっているので(パスワード入力画面が表示されるので)、VNC Server 側の方で何かしら設定が間違っているところがあると思います。
最初に気になったのが、以下のように /home/test/.vnc ディレクトリ配下に vnc 関連のファイルが複数あることです。
|
[root@cnt07 ~]# ps -ef | grep vnc 7月 01 08:32:33 cnt07.localdomain systemd[1]: Starting Remote desktop service (VNC)… [test@cnt07 ~]$ pwd cnt07.localdomain:3.pid cnt07.localdomain:4.log cnt07.localdomain:4.pid cnt07.localdomain:5.log cnt07.localdomain:5.pid cnt07.localdomain:6.log cnt07.localdomain:6.pid cnt07.localdomain:7.log cnt07.localdomain:7.pid cnt07.localdomain:8.pid cnt07.localdomain:8.log passwd xstartup |
以前、testアカウントでいろいろ設定をいじったりしていたので、何かゴミ情報が残っているのでしょうか?
更に詳しく調査します。
|
[root@cnt07 log]# ls /var/log ← まずはログの調査から [ 67.049] AUDIT: Sat Jul 1 08:32:47 2017: 1396: client 1 connected from local host ( uid=0 gid=0 pid=2208 ) |
実際に /home/test/.vnc ディレクトリ配下には「cnt07.localdomain:1.pid」~「cnt07.localdomain:8.pid」まで複数ファイルが作成されていたので、一旦リネームして再度 VNC Server の設定をやり直します。
|
[test@cnt07 ~]$ mv .vnc .vnc_20170701 ← 一旦 .vnc フォルダをリネームします。 7月 01 08:32:33 cnt07.localdomain systemd[1]: Starting Remote desktop service (VNC)… 7月 01 09:16:49 cnt07.localdomain systemd[1]: Starting Remote desktop service (VNC)… Jul 1 09:13:31 cnt07 su: (to root) test on pts/1 7月 01 09:18:20 cnt07.localdomain systemd[1]: Starting Remote desktop service (VNC)… |
再度 UltraVNC Viewer でログイン確認
ここまで作業をしたら再度「UltraVNC Viewer」でリモートデスクトップ接続ができるかどうか確認します。
「UltraVNC Viewer」を起動します。
VNC Server の「IPアドレス:ポート番号」を入力して「Connect」をクリックします。
パスワード入力画面が表示されたら「パスワード」を入力して「Log On」をクリックします。
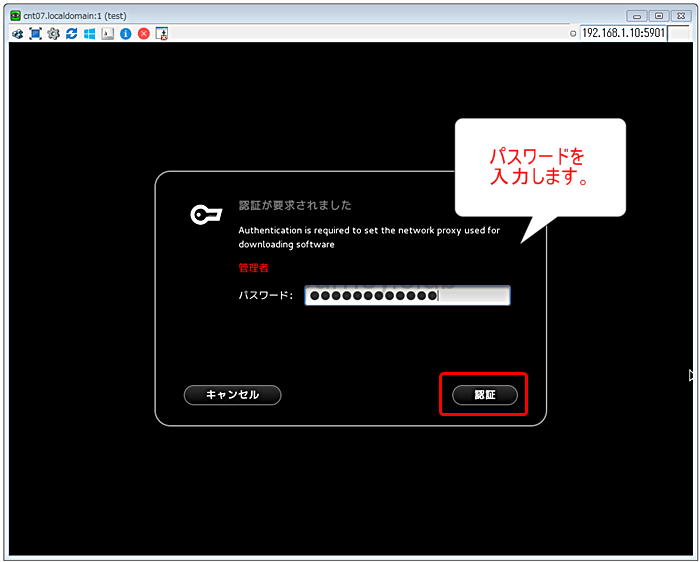
初回ログイン時に下図のようにパスワードを要求されるので、再度パスワード(この場合はtestアカウントのパスワード)を入力して「認証」をクリックします。
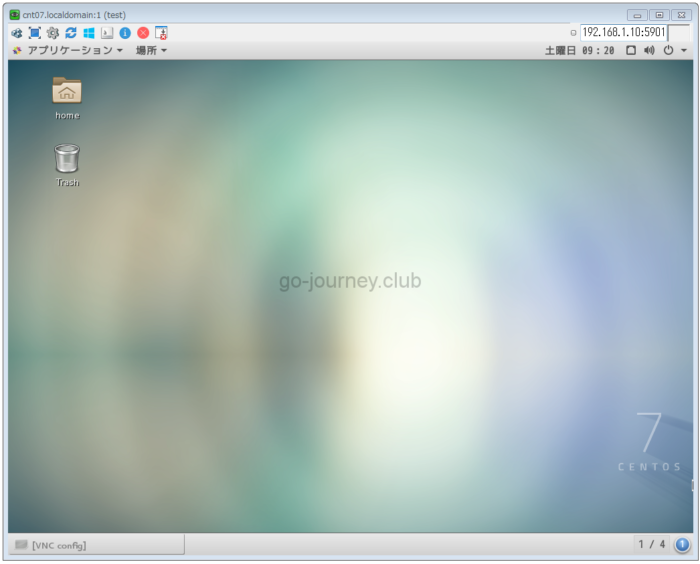
ようやく VNC Viewer 経由でログインできました。
LibreOfficeの動作確認
実際に「LibreOffice5.3」が起動するか試します。
デスクトップ画面より「アプリケーション」–「オフィス」–「LibreOffice 5.3」をクリックします。
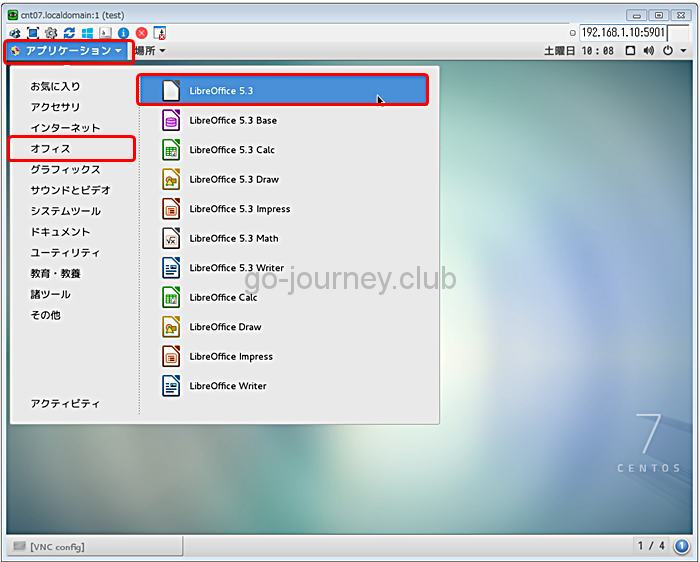
LibreOffice 5.3 が日本語表示で起動することを確認します。

まとめ
LibreOffice 5.3 のインストール自体は簡単でしたが、VNC Server 周りでうまく表示されなくていろいろ調べました。
しかしこれだけの機能を持ったオフィスソフトを Linux 上で利用できてしかも「無料」というのは驚きですね。