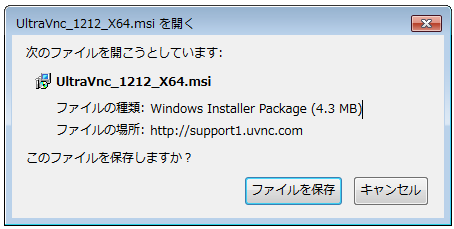
================================================================================================================
Package アーキテクチャー バージョン リポジトリー 容量
================================================================================================================
インストール中:
tigervnc-server x86_64 1.3.1-9.el7 base 203 k
依存性関連でのインストールをします:
libICE x86_64 1.0.9-2.el7 base 65 k
libSM x86_64 1.2.2-2.el7 base 39 k
libX11 x86_64 1.6.3-3.el7 base 606 k
libX11-common noarch 1.6.3-3.el7 base 162 k
libXau x86_64 1.0.8-2.1.el7 base 29 k
libXcursor x86_64 1.1.14-2.1.el7 base 30 k
libXdamage x86_64 1.1.4-4.1.el7 base 20 k
libXdmcp x86_64 1.1.1-6.1.el7 base 32 k
libXext x86_64 1.3.3-3.el7 base 39 k
libXfixes x86_64 5.0.1-2.1.el7 base 18 k
libXfont x86_64 1.5.1-2.el7 base 150 k
libXi x86_64 1.7.4-2.el7 base 40 k
libXinerama x86_64 1.1.3-2.1.el7 base 14 k
libXmu x86_64 1.1.2-2.el7 base 71 k
libXrandr x86_64 1.4.2-2.el7 base 26 k
libXrender x86_64 0.9.8-2.1.el7 base 25 k
libXt x86_64 1.1.4-6.1.el7 base 173 k
libXtst x86_64 1.2.2-2.1.el7 base 20 k
libXxf86misc x86_64 1.0.3-7.1.el7 base 19 k
libXxf86vm x86_64 1.1.3-2.1.el7 base 17 k
libfontenc x86_64 1.1.2-3.el7 base 30 k
libjpeg-turbo x86_64 1.2.90-5.el7 base 134 k
libxcb x86_64 1.11-4.el7 base 189 k
libxkbfile x86_64 1.0.8-5.el7 base 81 k
libxshmfence x86_64 1.2-1.el7 base 7.2 k
mesa-dri-drivers x86_64 11.2.2-2.20160614.el7 base 5.1 M
mesa-filesystem x86_64 11.2.2-2.20160614.el7 base 23 k
mesa-libGL x86_64 11.2.2-2.20160614.el7 base 162 k
mesa-libglapi x86_64 11.2.2-2.20160614.el7 base 40 k
mesa-private-llvm x86_64 3.8.1-1.el7 base 7.7 M
perl x86_64 4:5.16.3-291.el7 base 8.0 M
perl-Carp noarch 1.26-244.el7 base 19 k
perl-Encode x86_64 2.51-7.el7 base 1.5 M
perl-Exporter noarch 5.68-3.el7 base 28 k
perl-File-Path noarch 2.09-2.el7 base 26 k
perl-File-Temp noarch 0.23.01-3.el7 base 56 k
perl-Filter x86_64 1.49-3.el7 base 76 k
perl-Getopt-Long noarch 2.40-2.el7 base 56 k
perl-HTTP-Tiny noarch 0.033-3.el7 base 38 k
perl-PathTools x86_64 3.40-5.el7 base 82 k
perl-Pod-Escapes noarch 1:1.04-291.el7 base 51 k
perl-Pod-Perldoc noarch 3.20-4.el7 base 87 k
perl-Pod-Simple noarch 1:3.28-4.el7 base 216 k
perl-Pod-Usage noarch 1.63-3.el7 base 27 k
perl-Scalar-List-Utils x86_64 1.27-248.el7 base 36 k
perl-Socket x86_64 2.010-4.el7 base 49 k
perl-Storable x86_64 2.45-3.el7 base 77 k
perl-Text-ParseWords noarch 3.29-4.el7 base 14 k
perl-Time-HiRes x86_64 4:1.9725-3.el7 base 45 k
perl-Time-Local noarch 1.2300-2.el7 base 24 k
perl-constant noarch 1.27-2.el7 base 19 k
perl-libs x86_64 4:5.16.3-291.el7 base 688 k
perl-macros x86_64 4:5.16.3-291.el7 base 43 k
perl-parent noarch 1:0.225-244.el7 base 12 k
perl-podlators noarch 2.5.1-3.el7 base 112 k
perl-threads x86_64 1.87-4.el7 base 49 k
perl-threads-shared x86_64 1.43-6.el7 base 39 k
pixman x86_64 0.34.0-1.el7 base 248 k
tigervnc-license noarch 1.3.1-9.el7 base 26 k
tigervnc-server-minimal x86_64 1.3.1-9.el7 base 1.0 M
xkeyboard-config noarch 2.14-1.el7 base 758 k
xorg-x11-server-utils x86_64 7.7-14.el7 base 176 k
xorg-x11-xauth x86_64 1:1.0.9-1.el7 base 30 k
xorg-x11-xinit x86_64 1.3.4-1.el7 base 58 k
xorg-x11-xkb-utils x86_64 7.7-12.el7 base 103 k
# The vncserver service unit file
#
# Quick HowTo:
# 1. Copy this file to /etc/systemd/system/vncserver@.service
# 2. Edit /etc/systemd/system/vncserver@.service, replacing <USER>
# with the actual user name. Leave the remaining lines of the file unmodified
# (ExecStart=/usr/sbin/runuser -l <USER> -c “/usr/bin/vncserver %i”
# PIDFile=/home/<USER>/.vnc/%H%i.pid)
# 3. Run `systemctl daemon-reload`
# 4. Run `systemctl enable vncserver@:<display>.service`
#
# DO NOT RUN THIS SERVICE if your local area network is
# untrusted! For a secure way of using VNC, you should
# limit connections to the local host and then tunnel from
# the machine you want to view VNC on (host A) to the machine
# whose VNC output you want to view (host B)
#
# [user@hostA ~]$ ssh -v -C -L 590N:localhost:590M hostB
#
# this will open a connection on port 590N of your hostA to hostB’s port 590M
# (in fact, it ssh-connects to hostB and then connects to localhost (on hostB).
# See the ssh man page for details on port forwarding)
#
# You can then point a VNC client on hostA at vncdisplay N of localhost and with
# the help of ssh, you end up seeing what hostB makes available on port 590M
#
# Use “-nolisten tcp” to prevent X connections to your VNC server via TCP.
#
# Use “-localhost” to prevent remote VNC clients connecting except when
# doing so through a secure tunnel. See the “-via” option in the
# `man vncviewer’ manual page.
[Unit]
Description=Remote desktop service (VNC)
After=syslog.target network.target


コメント