前回、Ansible で取得した情報を JSON 形式で出力する方法を説明しました。
【Ansible】ansible-playbook 取得した結果を JSON 形式で出力する方法

今回は、更に進化して Ansible で取得した情報を JSON で出力して、更に JSON 形式のデータを Python で CSV、Excel 形式で出力するプログラムを説明します。
Ansible + Python で業務でも役に立つと思います。
目次
構成図
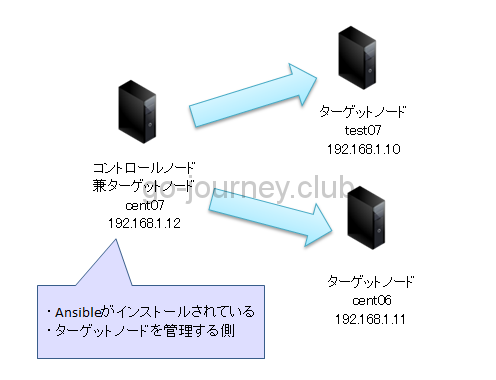
以下が今回の検証環境の構成図です。
コントロールノードは「Cent07」サーバーですが、ターゲットノードでもあります。
- コントロールノード : Ansible がインストールされている側、Ansible で操作する側
- ターゲットノード : Ansible で管理される側
今回の流れ
今回の流れです。
シンプルですが、結構大変です。
- Ansible で取得した情報を JSON 形式で出力する
- JSON 形式のデータを Python でパースをして CSV、Excel 形式にコンバートする
Ansible で取得した情報を JSON 形式で出力する
基本的には前回の記事の通りです。
【Ansible】ansible-playbook 取得した結果を JSON 形式で出力する方法
JSONとは?
JSONとは「JavaScript Object Notation」です。
Notation の意味は「表記法、表記、表示」です。
翻訳すると「JavaScript オブジェクトの表記法」ということでしょうか。
JavaScriptしか使えないのかと言うと、Python でも PHP でも Ruby でも使用できます。(別途 JSON 用のライブラリが必要となるケースがあります)
基本的には「名前(キー):値(バリュー)」の集まりです。
説明はこれで終わりと言っていいくらいシンプルな構成です。
しかし入れ子構造にすることが可能なので、「キー:{キー:バリュー}」などのように表現することもできます。
その結果、世の中の様々なことを JSON で表現することができ、更にコンピュータ(プログラム)からも正確に高速に解析することができます。
表現できるデータ型
以下の6つのデータを表現することができます。
今回の JSON データは入れ子構造になっていて、バリューが配列になっているものがありますが、配列も JSON で表現できます。
- 数値
- 文字列
- 真偽値
- 配列
- オブジェクト
- null
【Ansible の Playbook の疑問】モジュール「command」と「shell」はどっちがいいのか?
Ansible のモジュールに「command」と「shell」があります。
例えば、Playbook に「command: echo “test”」と書いても「shell: echo “test”」と書いても、結果は同じです。
しかし調べてみたところ機能が違いました。
- shell → シェルの機能が利用できる(環境変数、パイプ、リダイレクトなど)
- command → シェルの機能が利用できない
こうして見ると「shell」を使う方がいいと思うかもしれませんが、公式サイトを見ると「逆」の見解でした。
→つまり「command」モジュールの使用を勧めている(と言っても状況次第ですが)
「command」モジュールの説明
http://docs.ansible.com/ansible/latest/command_module.html
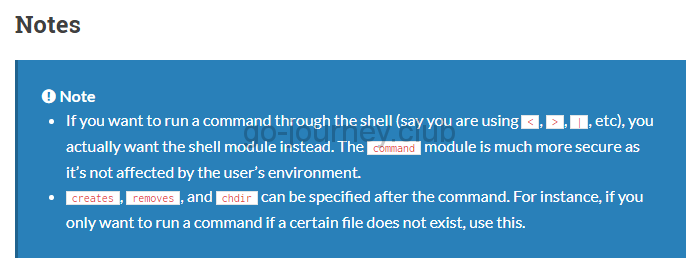
- If you want to run a command through the shell (say you are using
<span class="pre"><</span>,<span class="pre">></span>,<span class="pre">|</span>, etc), you actually want the shell module instead. The<span class="pre">command</span>module is much more secure as it’s not affected by the user’s environment.
シェルを介してコマンドを実行したい場合(たとえば、<、>、| など)は、shell モジュールを使う必要があります。しかし command モジュールは、ユーザーの環境変数の影響を受けないため、はるかに安全です。(予期しないエラーになる確率が低くなります) - creates, removes, and chdir can be specified after the command. For instance, if you only want to run a command if a certain file does not exist, use this.
コマンドの後に、creates、removes、chdir を指定ができます。 たとえば、もし特定のファイルが存在しない場合にのみコマンドを実行したい場合は、この command モジュールを使用します。
「shell」モジュールの説明
http://docs.ansible.com/ansible/latest/shell_module.html
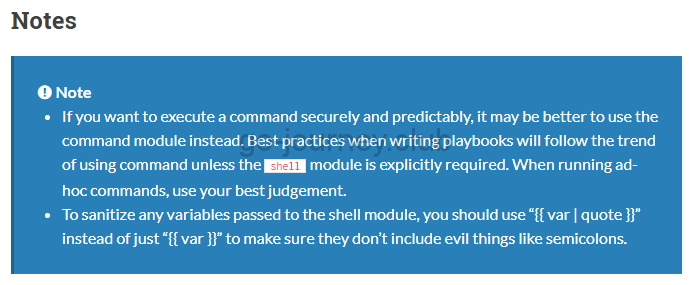
- If you want to execute a command securely and predictably, it may be better to use the command module instead. Best practices when writing playbooks will follow the trend of using command unless the
<span class="pre">shell</span>module is explicitly required. When running ad-hoc commands, use your best judgement.
もしコマンドを安全かつ結果が予測できるように実行したい場合は、shell モジュールの代わりに command モジュールを使用する方がよいでしょう。Playbook を書くときのベストプラクティスは、shell モジュールの使用を明確に要求されない限り、command モジュールを使用しましょう。アドホックコマンドを実行するときは、ベストの判断をしてください。 - To sanitize any variables passed to the shell module, you should use “{{ var | quote }}” instead of just “{{ var }}” to make sure they don’t include evil things like semicolons.
shell モジュールに渡される変数をサニタイズする(&や\など特殊記号を一般的な文字列に変換すること)には、 セミコロンのような危険なものが含まれていないことを確認するために、”{{var}}”の代わりに”{{var | quote}}” を使わなければいけません。
結論を言うと「より影響が少ない command モジュールを使う方がベター」ということでしょうか。
そのため、本サイトでは理由がない限りは「command」モジュールを使う方向でいきます。
JSON 形式で出力するための設定をする
JSON 用の Ansible のコンフィグファイルを作成します。
名前は何でも問題ありません。
以下は例として「json_ansible.cfg」ファイルとしています。
|
[test@cent07 ansible]$ pwd |
名前を「json_ansible.cfg」と変更しているので、実行時に「ANSIBLE_CONFIG=/home/test/ansible/json_ansible.cfg」をつけます。
【例】
|
$ ANSIBLE_CONFIG=/home/test/ansible/json_ansible.cfg ansible-playbook -i host test-playbook.yml |
上記のように最初に「ANSIBLE_CONFIG=/home/test/ansible/json_ansible.cfg」を読み込ませることで最優先で環境を設定できます。
ansible.cfg の優先順位
Ansible の環境を設定する ansible.cfg には優先順位があります。
↑優先度【高】(他と設定がかぶったらこっちが採用される)
- 環境変数を設定する(例:/home/test/ansible/ansible.cfg 等、環境変数でパス指定する場合、名前は ansible_for_apache.cfg 等、何でも良い)
- カレントディレクトリに存在する ansible.cfg(名前を変えたら NG)
- ホームディレクトリに設定した .ansible.cfg(例:test アカウントなら /home/test/.ansible.cfg ←自分で作成しないとできない)
- /etc/ansible/ansible.cfg
↓優先度【低】(他と設定がかぶったらこっちは採用されない)
OS の情報を取得する簡単な Playbook を作成する
単純な OS のディストリビューション情報を取得する Playbook を作ります。
|
[test@cent07 ansible]$ vi test-check-os-playbook.yml |
※Ansible の Playbook は yml ファイルの形式でインデントで処理を規定しています。
そのため、以下のようにインデントが消えてしまうと実行時にエラーになるので注意しましょう。
■インデントが消えてしまったケース
|
[test@cent07 ansible]$ cat test-check-os-playbook.yml |
JSON 形式のデータを Python でパースをする
簡単な Playbook を作成したので、ansible-playbook コマンドで取得した情報を JSON 形式で出力する設定をします。
設定は簡単で Ansible のコンフィグを変更するだけです。
JSON 形式で出力するための設定をする
JSON 形式で出力するための Ansible のコンフィグファイルを作成します。
名前は何でも問題ありません。
以下は例として「json_ansible.cfg」ファイルとしています。
|
[test@cent07 ansible]$ pwd |
名前を「json_ansible.cfg」と変更しているので、実行時に「ANSIBLE_CONFIG=/home/test/ansible/json_ansible.cfg」をつけます。
【例】
|
$ ANSIBLE_CONFIG=/home/test/ansible/json_ansible.cfg ansible-playbook -i host test-playbook.yml |
上記のように最初に「ANSIBLE_CONFIG=/home/test/ansible/json_ansible.cfg」を読み込ませることで最優先で環境を設定できます。
ansible.cfg の優先順位
Ansible の環境を設定する ansible.cfg には優先順位があります。
↑優先度【高】(他と設定がかぶったらこっちが採用される)
- 環境変数を設定する(例:/home/test/ansible/ansible.cfg 等、環境変数でパス指定する場合、名前は ansible_for_apache.cfg 等、何でも良い)
- カレントディレクトリに存在する ansible.cfg(名前を変えたら NG)
- ホームディレクトリに設定した .ansible.cfg(例:test アカウントなら /home/test/.ansible.cfg ←自分で作成しないとできない)
- /etc/ansible/ansible.cfg
↓優先度【低】(他と設定がかぶったらこっちは採用されない)
ansible-playbook コマンドを実行する
環境が整ったら ansible-playbook コマンドを実行します。
最初に「ANSIBLE_CONFIG=/home/test/ansible/json_ansible.cfg」で、JSON 用の Ansible の環境変数を設定しています。
|
[test@cent07 ansible]$ ANSIBLE_CONFIG=/home/test/ansible/json_ansible.cfg ansible-playbook -i hostlist test-check-os-playbook.yml |
ここまではいい感じで JSON 形式で出力しています。
更にファイルとして JSON 形式として出力をします。
ansible-playbook のコマンド結果をファイルとして出力する
単純にリダイレクトをしてファイルに吐き出します。
|
[test@cent07 ansible]$ ANSIBLE_CONFIG=/home/test/ansible/json_ansible.cfg ansible-playbook -i hostlist test-check-os-playbook.yml > /home/test/ansible/test.json ← 単純にファイルにリダイレクトをして吐き出します。 ~ 省略 ~ [test@cent07 ansible]$ |
Python で JSON 形式のファイルをパースして CSV、Excel 形式にコンバートする
JSON 形式のファイルを Python でパースをして CSV、Excel 形式にコンバートします。
Python3.6でプログラムを作成する
今回は Python 3.6 でプログラムを作成します。
ただし、現在私の環境「CentOS7」ではデフォルトでインストールされている Python のバージョンが「2.7」なので「Python 3.6」をインストールします。
CentOS 7 で Python 3.6 を yum でインストールする方法は以下を参考にしてください。
【Python】【CentOS7】Python 3.6.2 を「yum からインストールする手順」と「ソースからインストールする手順」

パースをするとは?
パースをするとは具体的に何をどのようにすることなのか調べました。
パースとは「parse(構文要素に分析する、文字列を構文解析する等の意味)」があります。
これと言った定義はなさそうですが、例を挙げると HTML 文書の構文解析をして URL のみ抽出したり、タイトルを抽出したりして文章を解析することでしょうか。
→いろいろ調べても、なるべく分かりづらく、いろんな受け止め方ができるように説明されているので難しいですね。。
最近オライリー・ジャパン社の「Python ではじめる データラングリング」を読んでいますが、今回のように Ansible で JSON 形式で情報を取得して、その結果を加工して利用するという手法は、「パース」と言うよりも「データラングリング」と言った方が近いでしょうか。

![]()
Pythonではじめるデータラングリング ―データの入手、準備、分析、プレゼンテーション![]()
ちなみに「Pythonではじめるデータラングリング ―データの入手、準備、分析、プレゼンテーション![]() 」では「データラングリング」の定義を以下のように説明しています。
」では「データラングリング」の定義を以下のように説明しています。
データラングリングとは何か?
「データラングリング」とは、整理されていない、あるいは磨かれていないデータソースを役に立つものに変身させることです。
未加工のデータが手に入るソースをまず探し、その価値を判断します。
データセットとしてどれくらい良質か、自分の目標にどれだけ関連性があるか、もっとよいデータセットがあるかといったことです。
データをパース(意味を分析して理解すること)し、クリーンアップして、データセットが使えるものになったら、データを分析したり、発見したことをレポートとしてプレゼンテーションするために、Python スクリプトのようなツールや方法論を活用します。
こうすることで、誰も顧みないようなデータでも、明確で実用的なものに変身させることができます。
ちなみに「データラングリング」とは英語で「Data wrangling」で、「wrangling」の意味は「口論する、 論争する、 けんかする、家畜の世話をするなどで、元々は牛や馬を集めて飼いならすという意味」です。
ちなみに「wrangler」の意味は「カウボーイ、牛や馬の世話をする人、口論する人、論争する人」になります。
Python プログラム
以下のように Python プログラムを作成しました。
|
#coding:utf-8 # コマンドライン引数を取り込みます。 # ファイルを読み取り専用でオープンします。 # ここからデータをパースします。 |
Python プログラムの分析
いきなり初見の JSON ファイルをパースすることは結構難しいです。(慣れていれば別だと思いますが)
そのため、JSON の構造をざっくりと確認するために、まずは JSONファイルの中身を抜いてみました。
|
[test@cent07 ansible]$ cat test.json |
JSONの形式ですが、「辞書型(ディクショナリ型)」になっています。
「{(中括弧)」と「}(中括弧)」で囲まれています。
中身は、「key : value」のセットになっています。
更に上の辞書型(ディクショナリ型)は入れ子構造になっています。
つまり、キー(key)に対応するバリュー(値、value)が、「key:value」の1セットになっています。
つまり、{ animals : { honyu-rui : human } }という感じでしょうか。
配列(PythonではListと呼ぶ)の中に配列があるイメージでしょうか。
バリュー(値)に対しては、タイプ(リスト型とかタプル型、辞書型など)は気にしなくてもOKです。
- { animals : { honyu-rui : human } } ← OK
- { animals : [ human, cat, dog ] } ← OK(バリューが配列でもOK)
逆にキーに対して、「リスト型とかタプル型、辞書型など」を設定するのはNGです。
更に中身を抜いてシンプルにしてみました。
- test.json は、辞書型(ディクショナリ型)です。
- キーは2つあります。「plays」と「stats」です。
- キー「plays」のバリュー(値)は、「配列」です。
- キー「stats」のバリュー(値)は、「辞書型(ディクショナリ型)」です。
|
[test@cent07 ansible]$ cat test.json |
Python プログラムで「test.json」のキーのみ取得してみます。
|
[test@cent07 ansible]$ vi test_01.py ← キーのみ取得するプログラムです。 # コマンドライン引数を取り込みます。 # ファイルを読み取り専用でオープンします。 # ここからデータをパースします。 |
キーのみを取得する場合は以下の方法でも可能です。(こちらがスタンダードかもしれません)
|
[test@cent07 ansible]$ vi test_01.py ← キーのみ取得するプログラムです。 # コマンドライン引数を取り込みます。 # ファイルを読み取り専用でオープンします。 # ここからデータをパースします。 print(i) |
次に目的とする「値」は「”stdout”: “CentOS Linux release 7.3.1611 (Core) “,」です。
そのため、「plays」の中を更に探ります。
以下は値を抜いてシンプルに修正した JSON ファイルです。
キー plays のバリューは、リスト(配列)になっています。
3台のホストがあるのでリストの中に値が3つ入っています。
|
{ |
今度は、この値を取得する Python プログラムを作成します。
|
#coding:utf-8 # コマンドライン引数を取り込みます。 # ファイルを読み取り専用でオープンします。 # ここからデータをパースします。 |
このプログラムを実行すると・・・以下のような必要な値が取得できません。
|
[test@cent07 ansible]$ python3.6 test_01.py test.json |
そのため、目的の値が取得できるように items() を付けます。
|
#coding:utf-8 # コマンドライン引数を取り込みます。 # ファイルを読み取り専用でオープンします。 # ここからデータをパースします。 |
上記のプログラムを実行すると以下のように「キー」と「値」のペアが取得できます。
- キー
- バリュー
- キー
- バリュー
の形で取得できました。
|
[test@cent07 ansible]$ python3.6 test_01.py test.json |
ここまでは順調です。
更に目的の値を絞ります。
以下のようにキー「tasks」のバリューのリストに目的の値(”stdout”: “CentOS Linux release 7.3.1611 (Core) “,)が入っています。
|
{ |
今までは for 文で値を取得していましたが、上の JSON 形式をデータを見ると、規則性がないことが分かります。
キー:plays
キー:stats
ここまでは規則性がありますが、そこから先が規則性がなくなります。
キー:plays → バリューがリスト型になる
キー:stats → バリューが辞書型になる
そのため、ピンポイントで「キー:バリュー」を見つけていく必要があります。
省略して書くと、以下の構造になります。
この構造の「stdout」をピンポイントで取得するプログラムを考えます。
|
{ “plays”: [ { “tasks”: [ { “hosts”: { “192.168.1.10”: { “stdout”: “CentOS Linux release 7.3.1611 (Core) “, } }, |
実際の構造です。
辞書型キー「plays」のバリュー(値)はリストで、リストには辞書型で、「play」と「tasks」が入っています。
更に「tasks」の「hosts」の中の「192.168.1.10(IPアドレス)」の「stdout」のバリューを取得します。
まだまだ先は長そうですが、何台あっても「stdout」の構造は変わらないので規則性・法則性は簡単に見つけ出せそうです。
簡単に言うと、「plays」のキーの「tasks」のキーの「hosts」のキーの「IPアドレス」のキーの「stdout」のバリューを抜き出します。
(しかし結構複雑ではあります)
|
[test@cent07 ansible]$ ANSIBLE_CONFIG=/home/test/ansible/json_ansible.cfg ansible-playbook -i hostlist test-check-os-playbook.yml |
ピンポイントで値を取得します。
まずはキー「plays」に絞ります。
|
#coding:utf-8 # コマンドライン引数を取り込みます。 # ファイルを読み取り専用でオープンします。 # ここからデータをパースします。 |
プログラムの実行結果です。
キーplaysの下の3つのバリューを取得できました。
目的は「tasks(※taskではないことに注意)」の中です。
ちなみに、「{}」で囲まれている3つのバリューがあり、バリューの中には「play」と「tasks」のキーがあります。
「tasks」の値だけを取得するために更に絞ります。
|
[test@cent07 ansible]$ python3.6 test_02.py test.json ‘tasks’: [{‘hosts’: {‘192.168.1.10’: {‘_ansible_no_log’: False, ‘_ansible_parsed’: True, ‘changed’: True, ‘cmd’: [‘cat’, ‘/etc/redhat-release’], ‘delta’: ‘0:00:01.005299’, ‘end’: ‘2017-09-02 15:09:21.661956’, ‘invocation’: {‘module_args’: {‘_raw_params’: ‘cat /etc/redhat-release’, ‘_uses_shell’: False, ‘chdir’: None, ‘creates’: None, ‘executable’: None, ‘removes’: None, ‘warn’: True}}, ‘rc’: 0, ‘start’: ‘2017-09-02 15:09:20.656657’, ‘stderr’: ”, ‘stderr_lines’: [], ‘stdout’: ‘CentOS Linux release 7.3.1611 (Core) ‘, ‘stdout_lines’: [‘CentOS Linux release 7.3.1611 (Core) ‘]}}, ‘task’: {‘id’: ‘000c296b-9db5-ba33-017d-000000000006’, ‘name’: ‘Check OS’}}]} ‘tasks’: [{‘hosts’: {‘192.168.1.11’: {‘_ansible_no_log’: False, ‘_ansible_parsed’: True, ‘changed’: True, ‘cmd’: [‘cat’, ‘/etc/redhat-release’], ‘delta’: ‘0:00:00.003838’, ‘end’: ‘2017-09-02 15:08:42.930813’, ‘invocation’: {‘module_args’: {‘_raw_params’: ‘cat /etc/redhat-release’, ‘_uses_shell’: False, ‘chdir’: None, ‘creates’: None, ‘executable’: None, ‘removes’: None, ‘warn’: True}}, ‘rc’: 0, ‘start’: ‘2017-09-02 15:08:42.926975’, ‘stderr’: ”, ‘stderr_lines’: [], ‘stdout’: ‘CentOS release 6.5 (Final)’, ‘stdout_lines’: [‘CentOS release 6.5 (Final)’]}}, ‘task’: {‘id’: ‘000c296b-9db5-ba33-017d-000000000006’, ‘name’: ‘Check OS’}}]} ‘tasks’: [{‘hosts’: {‘192.168.1.12’: {‘_ansible_no_log’: False, ‘_ansible_parsed’: True, ‘changed’: True, ‘cmd’: [‘cat’, ‘/etc/redhat-release’], ‘delta’: ‘0:00:00.005318’, ‘end’: ‘2017-09-02 15:09:24.721009’, ‘invocation’: {‘module_args’: {‘_raw_params’: ‘cat /etc/redhat-release’, ‘_uses_shell’: False, ‘chdir’: None, ‘creates’: None, ‘executable’: None, ‘removes’: None, ‘warn’: True}}, ‘rc’: 0, ‘start’: ‘2017-09-02 15:09:24.715691’, ‘stderr’: ”, ‘stderr_lines’: [], ‘stdout’: ‘CentOS Linux release 7.3.1611 (Core) ‘, ‘stdout_lines’: [‘CentOS Linux release 7.3.1611 (Core) ‘]}}, ‘task’: {‘id’: ‘000c296b-9db5-ba33-017d-000000000006’, ‘name’: ‘Check OS’}}]} |
更に「tasks」に絞ります。
|
#coding:utf-8 # コマンドライン引数を取り込みます。 # ファイルを読み取り専用でオープンします。 # ここからデータをパースします。 |
かなり絞れました。
|
[test@cent07 ansible]$ python3.6 test_02.py test.json |
更に絞りました。
|
#coding:utf-8 # コマンドライン引数を取り込みます。 # ファイルを読み取り専用でオープンします。 # ここからデータをパースします。 |
しかし、このプログラムを実行してみると、、
|
[test@cent07 ansible]$ python3.6 test_03.py test.json |
どうやら目的の値が取得できなかったようです。
以下のようになることを期待していたのですが、何か間違っているようです。
|
{‘192.168.1.10’: {‘_ansible_no_log’: False, ‘_ansible_parsed’: True, ‘changed’: True, ‘cmd’: [‘cat’, ‘/etc/redhat-release’], ‘delta’: ‘0:00:01.005299’, ‘end’: ‘2017-09-02 15:09:21.661956’, ‘invocation’: {‘module_args’: {‘_raw_params’: ‘cat /etc/redhat-release’, ‘_uses_shell’: False, ‘chdir’: None, ‘creates’: None, ‘executable’: None, ‘removes’: None, ‘warn’: True}}, ‘rc’: 0, ‘start’: ‘2017-09-02 15:09:20.656657’, ‘stderr’: ”, ‘stderr_lines’: [], ‘stdout’: ‘CentOS Linux release 7.3.1611 (Core) ‘, ‘stdout_lines’: [‘CentOS Linux release 7.3.1611 (Core) ‘]}}, ‘task’: {‘id’: ‘000c296b-9db5-ba33-017d-000000000006’, ‘name’: ‘Check OS’} |
なぜIPアドレスだけしか取得できなかったのでしょうか?
辞書型の場合は「キー」を指定することでバリュー(値)が取得できるのですが入れ子構造だと動作が異なるのでしょうか?
しかし「hosts」以下のすべてのデータを取得したいため、以下のようにプログラム修正をしました。
「.items()」を付けることで「キー」も「バリュー(値)」も全部取得しています。
|
#coding:utf-8 # コマンドライン引数を取り込みます。 # ファイルを読み取り専用でオープンします。 # ここからデータをパースします。 |
このプログラムを実行すると、値は全部取得できました。
だいぶ近づいてきましたが、値がカッコ「(」と「)」で囲まれています。
|
[test@cent07 ansible]$ python3.6 test_04.py test.json |
カッコの場合は「タプル型」になるそうです。
タプル型はリスト型と似ていますが、値を変更できない所が異なります。
値はカンマ区切りです。
ここまでくれば、構造は変わらないのでピンポイントで値を取得できます。
タブル型の要素 [1] は、辞書型になっています。その辞書型の中のキー「stdout」のバリュー「’CentOS Linux release 7.3.1611 (Core) ‘」 を取得します。
|
[test@cent07 ansible]$ python3.6 test_04.py test.json {‘_ansible_no_log’: False, ‘_ansible_parsed’: True, ‘changed’: True, ‘cmd’: [‘cat’, ‘/etc/redhat-release’], ‘delta’: ‘0:00:01.005299’, ‘end’: ‘2017-09-02 15:09:21.661956’, ‘invocation’: {‘module_args’: {‘_raw_params’: ‘cat /etc/redhat-release’, ‘_uses_shell’: False, ‘chdir’: None, ‘creates’: None, ‘executable’: None, ‘removes’: None, ‘warn’: True}}, ‘rc’: 0, ‘start’: ‘2017-09-02 15:09:20.656657’, ‘stderr’: ”, ‘stderr_lines’: [], ‘stdout’: ‘CentOS Linux release 7.3.1611 (Core) ‘, ‘stdout_lines’: [‘CentOS Linux release 7.3.1611 (Core) ‘]} ← [1] m[1]でこの値{‘_ansible_no_log’ ~ [‘CentOS Linux release 7.3.1611 (Core) ‘]}にアクセス可能です。更にこの値の中を特定する場合はキーを指定します。m[1][‘stdout’]で「’CentOS Linux release 7.3.1611 (Core) ‘」 にアクセスできます。 ) |
キー「stdout」のバリュー「’CentOS Linux release 7.3.1611 (Core) ‘」 を指定するためには [1]の要素のキー「stdout」を取得すれば良さそうです。
ここでのポイントは、バリューを特定するために m[0] や m[1] やさらに m[1][stdout] という使い方ができるということです。
Python プログラムを解説するサイトは多いですが、なかなかこのような応用的な使い方を解説したサイトや雑誌がなかったので、1つ1つ検証しました。
|
#coding:utf-8 # コマンドライン引数を取り込みます。 # ファイルを読み取り専用でオープンします。 # ここからデータをパースします。 |
プログラムを実行すると、値が取得できました!
|
[test@cent07 ansible]$ python3.6 test_04.py test.json |
ここにホスト名(IPアドレス)が欲しいので、ホスト名も一緒に取得します。
ホスト名(IPアドレス)は要素[0]です。
そして以下のプログラムが完成しました。
|
#coding:utf-8 # コマンドライン引数を取り込みます。 # ファイルを読み取り専用でオープンします。 # ここからデータをパースします。 print(m[0], end=”,”) ← 一緒にホスト名(今回の場合はIPアドレス)を取得します。CSV形式で情報を取得したいため改行を消してカンマ(,)を追加します。 |
プログラムを実行します。
|
[test@cent07 ansible]$ python3.6 test_04.py test.json |
完璧ですね。
取得したいデータを取得できました。
後は、エラー処理など加えていけばより完璧になります。
※Python 2.7 で実行するとエラーになります。
「print(i[0], end=”,”)」の「end=””」が Python 2.7 で引っ掛かります。
参考にした技術書
「IT技術者のための現場ノウハウ Ansible 実践ガイド」を読んでいますが現場に近いエンジニアが記述しているので参考になります。

![]()
Ansible実践ガイド (impress top gear)![]()
Python ではじめる データラングリングは、データを取得して加工する際の発想の参考になります。
![]()
Pythonではじめるデータラングリング ―データの入手、準備、分析、プレゼンテーション![]()
まとめ
Ansible + Python は非常に使い勝手がいいですね。
今回はためしに3台に対してプログラムを作成して実行してみましたが、3台だけでなく1,000台でも10,000台でも問題なく行けます。
人間が1つ1つチェックをする時代は終わり、ツールを開発して正確に且つ一気に且つ短時間で運用監視の処理をする時代になったと思います。
→ますますプログラムの知識が必要になるでしょう。