[root@AmazonLinux2 bin]# ./amazon-cloudwatch-agent-config-wizard
=============================================================
= Welcome to the AWS CloudWatch Agent Configuration Manager =
=============================================================
On which OS are you planning to use the agent?
1. linux
2. windows
default choice: [1]:
1
Trying to fetch the default region based on ec2 metadata…
Are you using EC2 or On-Premises hosts?
1. EC2
2. On-Premises
default choice: [1]:
1
Which user are you planning to run the agent?
1. root
2. cwagent
3. others
default choice: [1]:
1
Do you want to turn on StatsD daemon?
1. yes
2. no
default choice: [1]:
1
Which port do you want StatsD daemon to listen to?
default choice: [8125]
What is the collect interval for StatsD daemon?
1. 10s
2. 30s
3. 60s
default choice: [1]:
3
What is the aggregation interval for metrics collected by StatsD daemon?
1. Do not aggregate
2. 10s
3. 30s
4. 60s
default choice: [4]:
4
Do you want to monitor metrics from CollectD?
1. yes
2. no
default choice: [1]:
1
Do you want to monitor any host metrics? e.g. CPU, memory, etc.
1. yes
2. no
default choice: [1]:
1
Do you want to monitor cpu metrics per core? Additional CloudWatch charges may apply.
1. yes
2. no
default choice: [1]:
1
Do you want to add ec2 dimensions (ImageId, InstanceId, InstanceType, AutoScalingGroupName) into all of your metrics if the info is available?
1. yes
2. no
default choice: [1]:
1
Would you like to collect your metrics at high resolution (sub-minute resolution)? This enables sub-minute resolutio n for all metrics, but you can customize for specific metrics in the output json file.
1. 1s
2. 10s
3. 30s
4. 60s
default choice: [4]:
4
Which default metrics config do you want?
1. Basic
2. Standard
3. Advanced
4. None
default choice: [1]:
3
Current config as follows:
{
“agent”: {
“metrics_collection_interval”: 60,
“run_as_user”: “root”
},
“metrics”: {
“append_dimensions”: {
“AutoScalingGroupName”: “${aws:AutoScalingGroupName}”,
“ImageId”: “${aws:ImageId}”,
“InstanceId”: “${aws:InstanceId}”,
“InstanceType”: “${aws:InstanceType}”
},
“metrics_collected”: {
“collectd”: {
“metrics_aggregation_interval”: 60
},
“cpu”: {
“measurement”: [
“cpu_usage_idle”,
“cpu_usage_iowait”,
“cpu_usage_user”,
“cpu_usage_system”
],
“metrics_collection_interval”: 60,
“resources”: [
“*”
],
“totalcpu”: false
},
“disk”: {
“measurement”: [
“used_percent”,
“inodes_free”
],
“metrics_collection_interval”: 60,
“resources”: [
“*”
]
},
“diskio”: {
“measurement”: [
“io_time”,
“write_bytes”,
“read_bytes”,
“writes”,
“reads”
],
“metrics_collection_interval”: 60,
“resources”: [
“*”
]
},
“mem”: {
“measurement”: [
“mem_used_percent”
],
“metrics_collection_interval”: 60
},
“netstat”: {
“measurement”: [
“tcp_established”,
“tcp_time_wait”
],
“metrics_collection_interval”: 60
},
“statsd”: {
“metrics_aggregation_interval”: 60,
“metrics_collection_interval”: 60,
“service_address”: “:8125”
},
“swap”: {
“measurement”: [
“swap_used_percent”
],
“metrics_collection_interval”: 60
}
}
}
}
Are you satisfied with the above config? Note: it can be manually customized after the wizard completes to add addit ional items.
1. yes
2. no
default choice: [1]:
1
Do you have any existing CloudWatch Log Agent (http://docs.aws.amazon.com/AmazonCloudWatch/latest/logs/AgentReferenc e.html) configuration file to import for migration?
1. yes
2. no
default choice: [2]:
2
Do you want to monitor any log files?
1. yes
2. no
default choice: [1]:
1
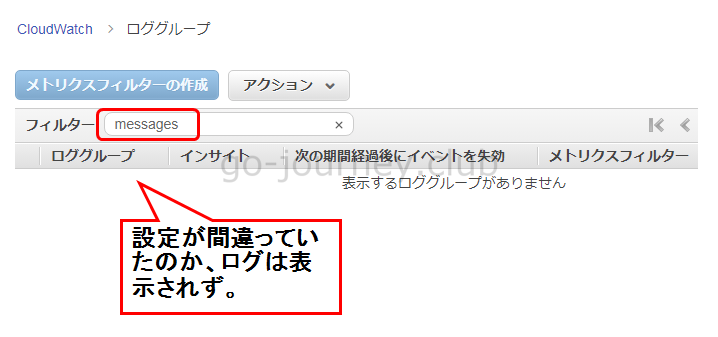
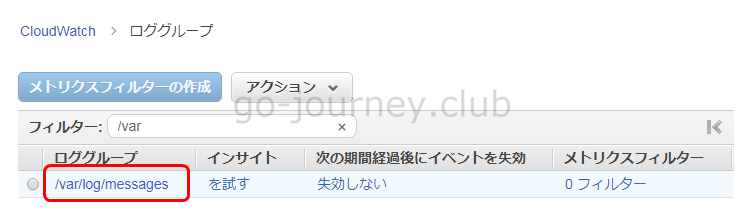
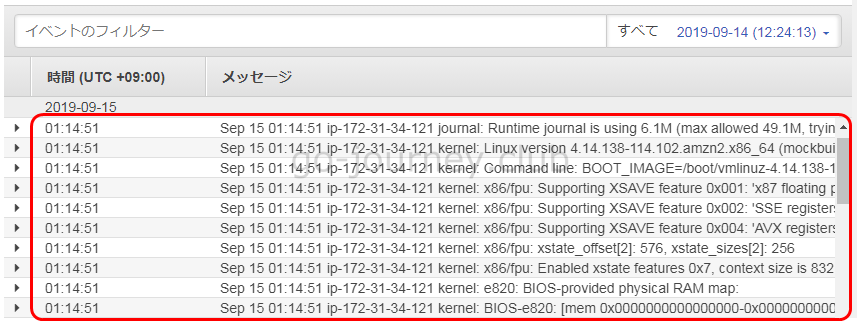
Log file path:
/var/log/messages
Log group name:
default choice: [messages]
Log stream name:
default choice: [{instance_id}]
Do you want to specify any additional log files to monitor?
1. yes
2. no
default choice: [1]:
2
Saved config file to /opt/aws/amazon-cloudwatch-agent/bin/config.json successfully.
Current config as follows:
{
“agent”: {
“metrics_collection_interval”: 60,
“run_as_user”: “root”
},
“logs”: {
“logs_collected”: {
“files”: {
“collect_list”: [
{
“file_path”: “/var/log/messages”,
“log_group_name”: “messages”,
“log_stream_name”: “{instance_id}”
}
]
}
}
},
“metrics”: {
“append_dimensions”: {
“AutoScalingGroupName”: “${aws:AutoScalingGroupName}”,
“ImageId”: “${aws:ImageId}”,
“InstanceId”: “${aws:InstanceId}”,
“InstanceType”: “${aws:InstanceType}”
},
“metrics_collected”: {
“collectd”: {
“metrics_aggregation_interval”: 60
},
“cpu”: {
“measurement”: [
“cpu_usage_idle”,
“cpu_usage_iowait”,
“cpu_usage_user”,
“cpu_usage_system”
],
“metrics_collection_interval”: 60,
“resources”: [
“*”
],
“totalcpu”: false
},
“disk”: {
“measurement”: [
“used_percent”,
“inodes_free”
],
“metrics_collection_interval”: 60,
“resources”: [
“*”
]
},
“diskio”: {
“measurement”: [
“io_time”,
“write_bytes”,
“read_bytes”,
“writes”,
“reads”
],
“metrics_collection_interval”: 60,
“resources”: [
“*”
]
},
“mem”: {
“measurement”: [
“mem_used_percent”
],
“metrics_collection_interval”: 60
},
“netstat”: {
“measurement”: [
“tcp_established”,
“tcp_time_wait”
],
“metrics_collection_interval”: 60
},
“statsd”: {
“metrics_aggregation_interval”: 60,
“metrics_collection_interval”: 60,
“service_address”: “:8125”
},
“swap”: {
“measurement”: [
“swap_used_percent”
],
“metrics_collection_interval”: 60
}
}
}
}
Please check the above content of the config.
The config file is also located at /opt/aws/amazon-cloudwatch-agent/bin/config.json.
Edit it manually if needed.
Do you want to store the config in the SSM parameter store?
1. yes
2. no
default choice: [1]:
1
What parameter store name do you want to use to store your config? (Use ‘AmazonCloudWatch-‘ prefix if you use our ma naged AWS policy)
default choice: [AmazonCloudWatch-linux]
Trying to fetch the default region based on ec2 metadata…
Which region do you want to store the config in the parameter store?
default choice: [ap-northeast-1]
Which AWS credential should be used to send json config to parameter store?
1. ASIAUJQZRURBZGAE5WM2(From SDK)
2. Other
default choice: [1]:
Successfully put config to parameter store AmazonCloudWatch-linux.
Program exits now.
[root@AmazonLinux2 bin]#
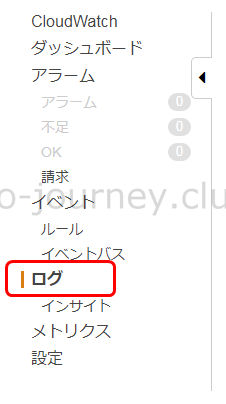
CloudWatch エージェントのステータスを確認します。
■CloudWatch エージェントのステータス確認
[root@AmazonLinux2 bin]# /opt/aws/amazon-cloudwatch-agent/bin/amazon-cloudwatch-agent-ctl -m ec2 -a status
{
“status”: “stopped”,
“starttime”: “”,
“version”: “1.227496.0”
}
[root@AmazonLinux2 bin]#
CloudWatch エージェントを起動します。
■CloudWatch エージェントの起動
[root@AmazonLinux2 bin]# /opt/aws/amazon-cloudwatch-agent/bin/amazon-cloudwatch-agent-ctl -m ec2 -a start
amazon-cloudwatch-agent is not configured. Applying default configuration before starting it.
/opt/aws/amazon-cloudwatch-agent/bin/config-downloader –output-dir /opt/aws/amazon-cloudwatch-agent/etc/amazon-cloudwatch-agent.d –download-source default –mode ec2 –config /opt/aws/amazon-cloudwatch-agent/etc/common-config.toml –multi-config default
Successfully fetched the config and saved in /opt/aws/amazon-cloudwatch-agent/etc/amazon-cloudwatch-agent.d/default.tmp
Start configuration validation…
/opt/aws/amazon-cloudwatch-agent/bin/config-translator –input /opt/aws/amazon-cloudwatch-agent/etc/amazon-cloudwatch-agent.json –input-dir /opt/aws/amazon-cloudwatch-agent/etc/amazon-cloudwatch-agent.d –output /opt/aws/amazon-cloudwatch-agent/etc/amazon-cloudwatch-agent.toml –mode ec2 –config /opt/aws/amazon-cloudwatch-agent/etc/common-config.toml –multi-config default
2019/09/15 10:34:56 Reading json config file path: /opt/aws/amazon-cloudwatch-agent/etc/amazon-cloudwatch-agent.d/default.tmp …
Valid Json input schema.
I! Detecting runasuser…
No csm configuration found.
No log configuration found.
Configuration validation first phase succeeded
/opt/aws/amazon-cloudwatch-agent/bin/amazon-cloudwatch-agent -schematest -config /opt/aws/amazon-cloudwatch-agent/etc/amazon-cloudwatch-agent.toml
Configuration validation second phase succeeded
Configuration validation succeeded
Created symlink from /etc/systemd/system/multi-user.target.wants/amazon-cloudwatch-agent.service to /etc/systemd/system/amazon-cloudwatch-agent.service.
Redirecting to /bin/systemctl restart amazon-cloudwatch-agent.service
[root@AmazonLinux2 bin]#
再度 CloudWatch エージェントのステータスを確認します。
■CloudWatch エージェントのステータス確認
[root@AmazonLinux2 bin]# /opt/aws/amazon-cloudwatch-agent/bin/amazon-cloudwatch-agent-ctl -m ec2 -a status
{
“status”: “running”,
“starttime”: “2019-09-15T01:34:56+0000”,
“version”: “1.227496.0”
}
[root@AmazonLinux2 bin]#
[root@AmazonLinux2 logs]# less /etc/awslogs/awslogs.conf
#
# ——————————————
# CLOUDWATCH LOGS AGENT CONFIGURATION FILE
# ——————————————
#
# — DESCRIPTION —
# This file is used by the CloudWatch Logs Agent to specify what log data to send to the service and how.
# You can modify this file at any time to add, remove or change configuration.
#
# NOTE: A running agent must be stopped and restarted for configuration changes to take effect.
#
# — CLOUDWATCH LOGS DOCUMENTATION —
# https://aws.amazon.com/documentation/cloudwatch/
#
# — CLOUDWATCH LOGS CONSOLE —
# https://console.aws.amazon.com/cloudwatch/home?region=us-east-1#logs:
#
# — AGENT COMMANDS —
# To check or change the running status of the CloudWatch Logs Agent, use the following:
#
# To check running status: service awslogs status
# To stop the agent: service awslogs stop
# To start the agent: service awslogs start
# To start the agent on server startup: chkconfig awslogs on
#
# — AGENT LOG OUTPUT —
# You can find logs for the agent in /var/log/awslogs.log
#
[general]
# Path to the CloudWatch Logs agent’s state file. The agent uses this file to maintain
# client side state across its executions.
state_file = /var/lib/awslogs/agent-state
## Each log file is defined in its own section. The section name doesn’t
## matter as long as its unique within this file.
#[kern.log]
#
## Path of log file for the agent to monitor and upload.
#file = /var/log/kern.log
#
## Name of the destination log group.
#log_group_name = kern.log
#
## Name of the destination log stream. You may use {hostname} to use target machine’s hostname.
#log_stream_name = {instance_id} # Defaults to ec2 instance id
#
## Format specifier for timestamp parsing. Here are some sample formats:
## Use ‘%b %d %H:%M:%S’ for syslog (Apr 24 08:38:42)
## Use ‘%d/%b/%Y:%H:%M:%S’ for apache log (10/Oct/2000:13:55:36)
## Use ‘%Y-%m-%d %H:%M:%S’ for rails log (2008-09-08 11:52:54)
#datetime_format = %b %d %H:%M:%S # Specification details in the table below.
#
## A batch is buffered for buffer-duration amount of time or 32KB of log events.
## Defaults to 5000 ms and its minimum value is 5000 ms.
#buffer_duration = 5000
#
# Use ‘end_of_file’ to start reading from the end of the file.
# Use ‘start_of_file’ to start reading from the beginning of the file.
#initial_position = start_of_file
#
## Encoding of file
#encoding = utf-8 # Other supported encodings include: ascii, latin-1
#
#
#
# Following table documents the detailed datetime format specification:
# ———————————————————————————————————————-
# Directive Meaning Example
# ———————————————————————————————————————-
# %a Weekday as locale’s abbreviated name. Sun, Mon, …, Sat (en_US)
# ———————————————————————————————————————-
# %A Weekday as locale’s full name. Sunday, Monday, …, Saturday (en_US)
# ———————————————————————————————————————-
# %w Weekday as a decimal number, where 0 is Sunday and 6 is Saturday. 0, 1, …, 6
# ———————————————————————————————————————-
# %d Day of the month as a zero-padded decimal numbers. 01, 02, …, 31
# ———————————————————————————————————————-
# %b Month as locale’s abbreviated name. Jan, Feb, …, Dec (en_US)
# ———————————————————————————————————————-
# %B Month as locale’s full name. January, February, …, December (en_US)
# ———————————————————————————————————————-
# %m Month as a zero-padded decimal number. 01, 02, …, 12
# ———————————————————————————————————————-
# %y Year without century as a zero-padded decimal number. 00, 01, …, 99
# ———————————————————————————————————————-
# %Y Year with century as a decimal number. 1970, 1988, 2001, 2013
# ———————————————————————————————————————-
# %H Hour (24-hour clock) as a zero-padded decimal number. 00, 01, …, 23
# ———————————————————————————————————————-
# %I Hour (12-hour clock) as a zero-padded decimal numbers. 01, 02, …, 12
# ———————————————————————————————————————-
# %p Locale’s equivalent of either AM or PM. AM, PM (en_US)
# ———————————————————————————————————————-
# %M Minute as a zero-padded decimal number. 00, 01, …, 59
# ———————————————————————————————————————-
# %S Second as a zero-padded decimal numbers. 00, 01, …, 59
# ———————————————————————————————————————-
# %f Microsecond as a decimal number, zero-padded on the left. 000000, 000001, …, 999999
# ———————————————————————————————————————-
# %z UTC offset in the form +HHMM or -HHMM (empty string if the the object is naive). (empty), +0000, -0400, +1030
# ———————————————————————————————————————-
# %j Day of the year as a zero-padded decimal number. 001, 002, …, 365
# ———————————————————————————————————————-
# %U Week number of the year (Sunday as the first day of the week) as a zero padded 00, 01, …, 53
# decimal number. All days in a new year preceding the first Sunday are considered
# to be in week 0.
# ———————————————————————————————————————-
# %W Week number of the year (Monday as the first day of the week) as a decimal number. 00, 01, …, 53
# All days in a new year preceding the first Monday are considered to be in week 0.
# ———————————————————————————————————————-
# %c Locale’s appropriate date and time representation. Tue Aug 16 21:30:00 1988 (en_US)
# ———————————————————————————————————————-
Total download size: 15 k
Installed size: 24 k
Is this ok [y/d/N]: y
Downloading packages:
epel-release-7-11.noarch.rpm | 15 kB 00:00:00
Running transaction check
Running transaction test
Transaction test succeeded
Running transaction
Installing : epel-release-7-11.noarch 1/1
Verifying : epel-release-7-11.noarch 1/1
Installed: epel-release.noarch 0:7-11
Complete!
0 ansible2 available [ =2.4.2 =2.4.6 ]
2 httpd_modules available [ =1.0 ]
3 memcached1.5 available [ =1.5.1 =1.5.16 ]
4 nginx1.12 available [ =1.12.2 ]
5 postgresql9.6 available [ =9.6.6 =9.6.8 ]
6 postgresql10 available [ =10 ]
8 redis4.0 available [ =4.0.5 =4.0.10 ]
9 R3.4 available [ =3.4.3 ]
10 rust1 available \
[ =1.22.1 =1.26.0 =1.26.1 =1.27.2 =1.31.0 ]
11 vim available [ =8.0 ]
13 ruby2.4 available [ =2.4.2 =2.4.4 ]
15 php7.2 available \
[ =7.2.0 =7.2.4 =7.2.5 =7.2.8 =7.2.11 =7.2.13 =7.2.14
=7.2.16 =7.2.17 =7.2.19 =7.2.21 ]
16 php7.1 available \
[ =7.1.22 =7.1.25 =7.1.27 =7.1.28 =7.1.30 =7.1.31 ]
17 lamp-mariadb10.2-php7.2 available \
[ =10.2.10_7.2.0 =10.2.10_7.2.4 =10.2.10_7.2.5
=10.2.10_7.2.8 =10.2.10_7.2.11 =10.2.10_7.2.13
=10.2.10_7.2.14 =10.2.10_7.2.16 =10.2.10_7.2.17
=10.2.10_7.2.19 =10.2.10_7.2.21 ]
18 libreoffice available [ =5.0.6.2_15 =5.3.6.1 ]
19 gimp available [ =2.8.22 ]
20 docker=latest enabled \
[ =17.12.1 =18.03.1 =18.06.1 ]
21 mate-desktop1.x available [ =1.19.0 =1.20.0 ]
22 GraphicsMagick1.3 available [ =1.3.29 =1.3.32 ]
23 tomcat8.5 available \
[ =8.5.31 =8.5.32 =8.5.38 =8.5.40 =8.5.42 ]
24 epel=latest enabled [ =7.11 ]
25 testing available [ =1.0 ]
26 ecs available [ =stable ]
27 corretto8 available \
[ =1.8.0_192 =1.8.0_202 =1.8.0_212 =1.8.0_222 ]
28 firecracker available [ =0.11 ]
29 golang1.11 available \
[ =1.11.3 =1.11.11 =1.11.13 ]
30 squid4 available [ =4 ]
31 php7.3 available \
[ =7.3.2 =7.3.3 =7.3.4 =7.3.6 =7.3.8 ]
32 lustre2.10 available [ =2.10.5 ]
33 java-openjdk11 available [ =11 ]
34 lynis available [ =stable ]
35 kernel-ng available [ =stable ]
36 BCC available [ =0.x ]
37 mono available [ =5.x ]
[root@AmazonLinux2 bin]#
[root@AmazonLinux2 bin]# systemctl enable collectd.service
Created symlink from /etc/systemd/system/multi-user.target.wants/collectd.service to /usr/lib/systemd/system/collectd.service.
[root@AmazonLinux2 bin]#
usage: amazon-cloudwatch-agent-ctl -a stop|start|status|fetch-config|append-config|remove-config [-m ec2|onPremise|auto] [-c default|ssm:|file:] [-s]
e.g.
1. apply a SSM parameter store config on EC2 instance and restart the agent afterwards:
amazon-cloudwatch-agent-ctl -a fetch-config -m ec2 -c ssm:AmazonCloudWatch-Config.json -s
2. append a local json config file on onPremise host and restart the agent afterwards:
amazon-cloudwatch-agent-ctl -a append-config -m onPremise -c file:/tmp/config.json -s
3. query agent status:
amazon-cloudwatch-agent-ctl -a status
-a: action
stop: stop the agent process.
start: start the agent process.
status: get the status of the agent process.
fetch-config: use this json config as the agent’s only configuration. このjson configをエージェントの唯一の構成として使用します。
append-config: append json config with the existing json configs if any.
既存のjson構成があれば、json構成を追加します。
remove-config: remove json config based on the location (ssm parameter store name, file name)
場所(ssmパラメーターストア名、ファイル名)に基づいてjson構成を削除します
-m: mode
ec2: indicate this is on ec2 host.
これがec2ホスト上にあることを示します。
onPremise: indicate this is on onPremise host.
これがオンプレミスホスト上にあることを示します。
auto: use ec2 metadata to determine the environment, may not be accurate if ec2 metadata is not available for some reason on EC2.
-c: configuration
default: default configuration for quick trial.
クイックトライアル用のデフォルト設定。
ssm:: ssm parameter store name
ssmパラメーターストア名
file:: file path on the host ホスト上のファイルパス
-s: optionally restart after configuring the agent configuration
this parameter is used for ‘fetch-config’, ‘append-config’, ‘remove-config’ action only.