Amazon EC2 インスタンスもしくはパソコンに AWS CLI(aws コマンド)をインストールする手順を解説します。
OS は Windows および Linux 両方を対象としています。
Windows に AWS CLI(aws コマンド)をインストールする手順
Windows に AWS CLI(aws コマンド)をインストールします。
EC2 インスタンス、パソコン共通の手順です。
以下のURLにアクセスします。
Microsoft Windows で AWS Command Line Interface をインストールする
https://docs.aws.amazon.com/ja_jp/cli/latest/userguide/awscli-install-windows.html
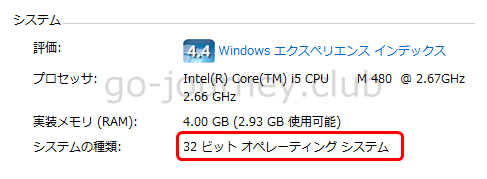
使用している Windows の「システムの種類」 を確認し「64ビット」 もしくは「32ビット」 の MSI インストーラの URL をクリックしてダウンロードします。
「コントロールパネル」 –「システム」 をクリックして「64ビット」 もしくは「32ビット」 かを確認します。
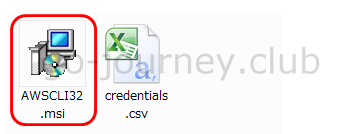
ダウンロードした「AWSCLI32.msi」 ファイルをダブルクリックします。
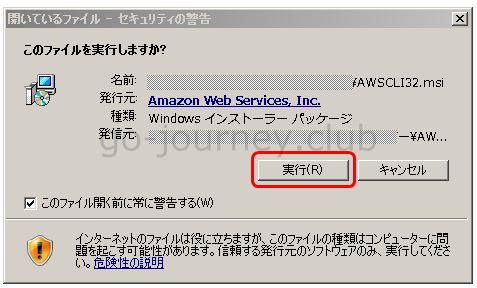
下図の画面が表示されたら「実行」 ボタンをクリックします。
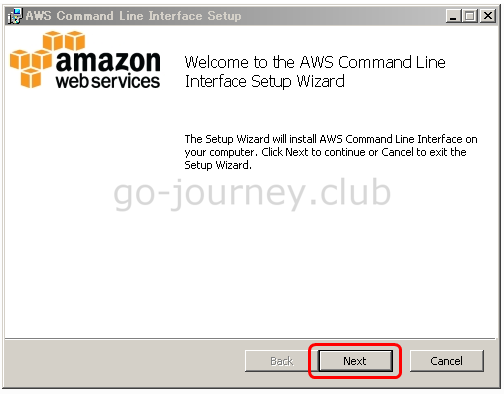
「Next」 ボタンをクリックします。
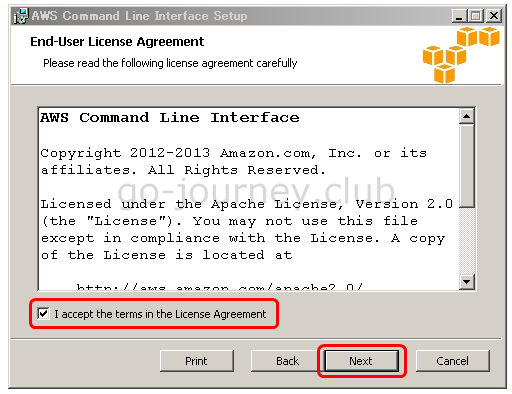
「I accept the terms in the License Agreement」 にチェックを入れて「Next」 ボタンをクリックします。
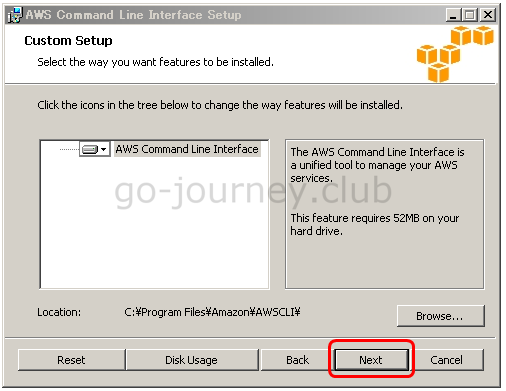
「Next」 ボタンをクリックします。
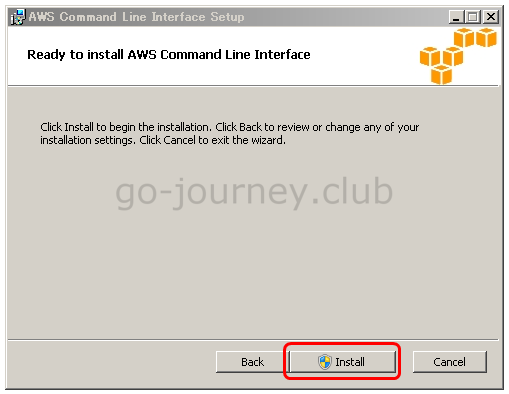
「Install」 ボタンをクリックします。
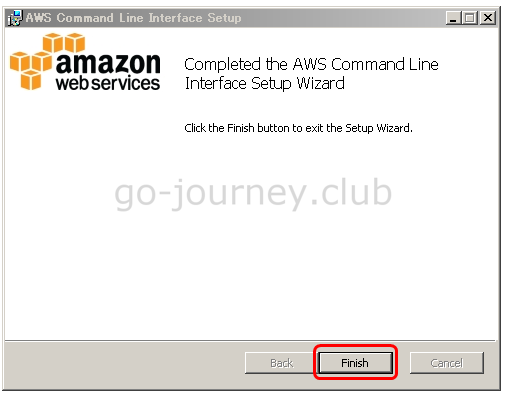
インストールが完了したら「Finish」 ボタンをクリックします。
Windows で AWS CLI を利用する
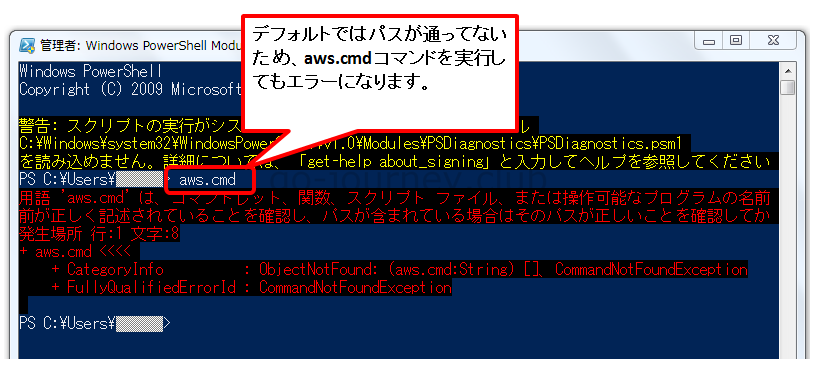
AWS CLI のインストール直後は、aws.cmd コマンドのパスが通っていないため、aws コマンドを実行しても Windows OS が実行ファイルを見つけることが出来ずに下図のようにエラーになります。
AWS CLI 実行ファイル(aws.cmd)を Windows OS のコマンド実行パスに通す
AWS CLI 実行ファイル(aws.cmd)を Windows OS のコマンド実行パスに通します。
具体的には、以下のように PATH 環境変数に AWS CLI 実行ファイル(aws.cmd)のパスを追加します。
■Windows 32ビットの場合
AWS CLI 実行ファイル(aws.cmd)のパス:C:\Program Files\Amazon\AWSCLI\bin\aws.cmd
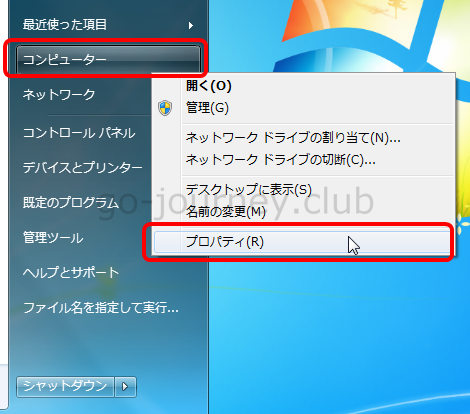
Windows のスタートメニューより「コンピューター」 を右クリックして「プロパティ」 をクリックします。
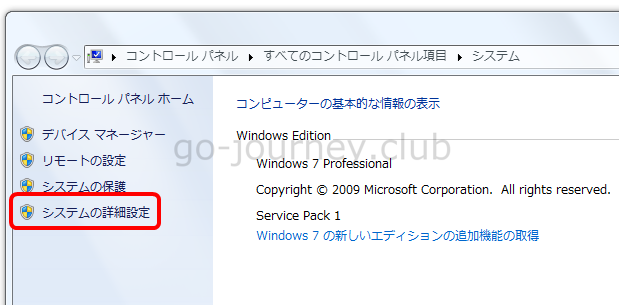
「システムの詳細設定」をクリックします。
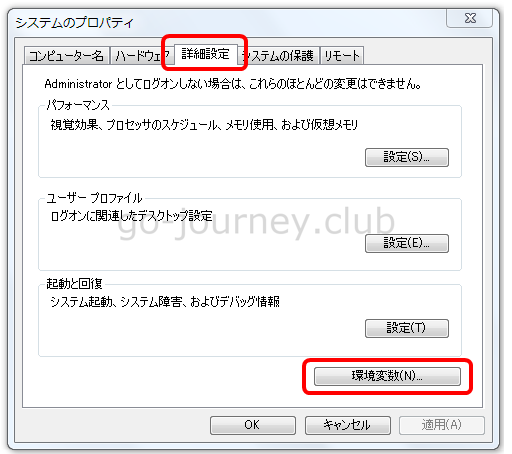
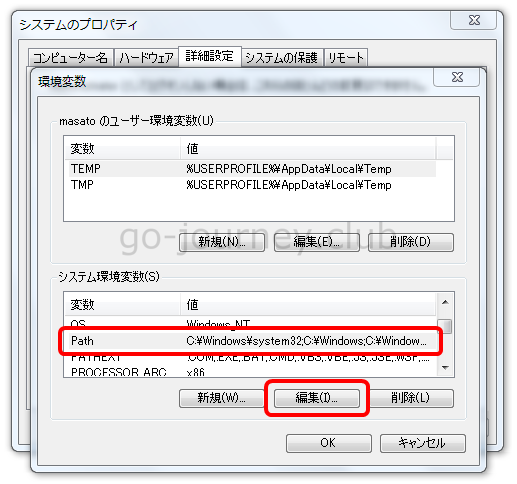
「システムのプロパティ」 画面が表示されたら「詳細設定」 タブをクリックし「環境変数」 ボタンをクリックします。
「環境変数」 画面が表示されたら「システム環境変数」 の「Path」 を選択して「編集」 ボタンをクリックします。
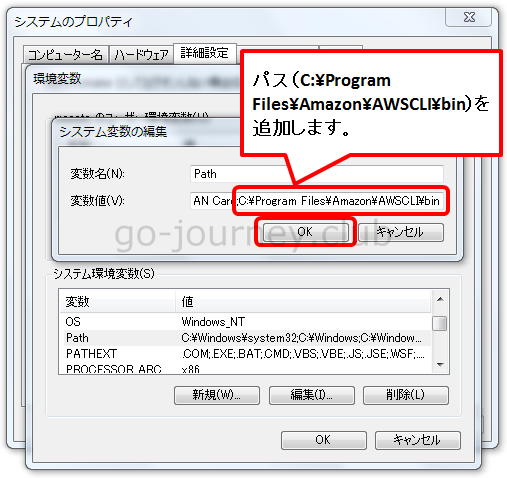
「Path」 の「編数値」 に aws.cmd へのパス「C:\Program Files\Amazon\AWSCLI\bin」 を追加して「OK」 ボタンをクリックします。
※既存のパスに追加する場合は、パスの前に「;(セミコロン)」を追加します。
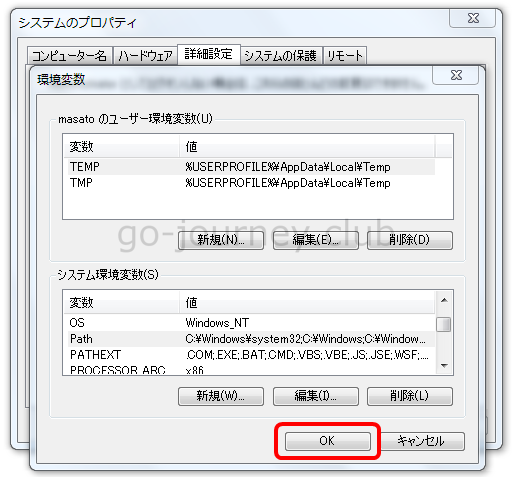
「OK」 ボタンをクリックして「環境変数」 画面を閉じます。
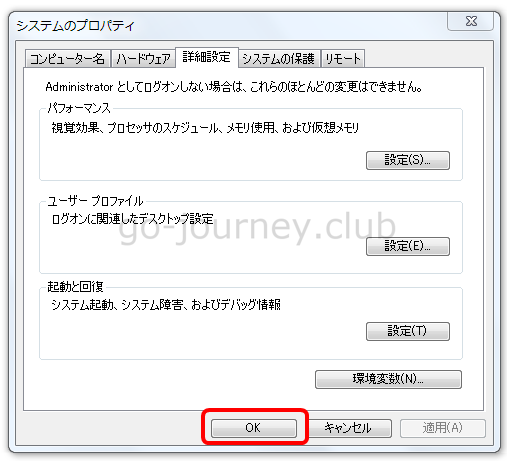
「OK」 ボタンをクリックして「システムのプロパティ」 画面を閉じます。
パワーシェル&コマンドプロンプトを起動し aws コマンドを実行する
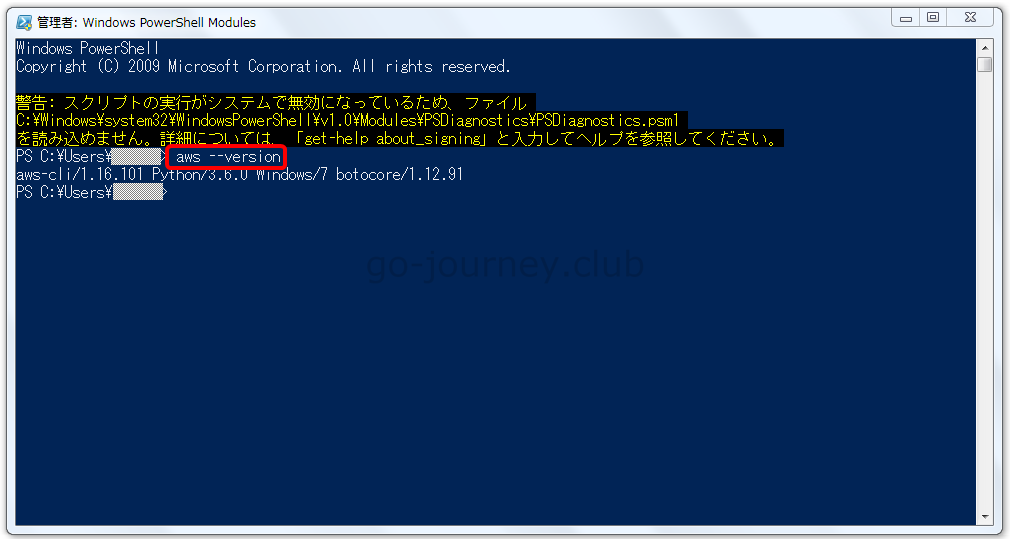
パワーシェルを起動し「aws –version」 コマンドを実行します。
以下のようにバージョンが返ってくれば問題ありません。
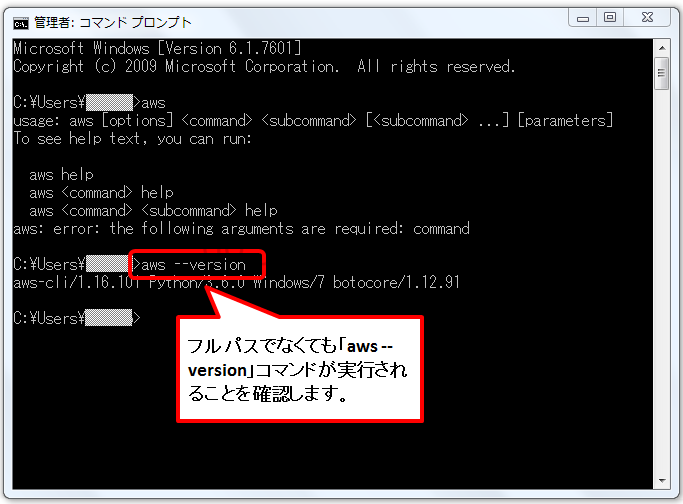
次にコマンドプロンプトを起動し「aws –version」 コマンドを実行します。
以下のようにバージョンが返ってくれば問題ありません。
■コマンドプロンプト実行結果
Microsoft Windows [Version 6.1.7601]
Copyright (c) 2009 Microsoft Corporation. All rights reserved.
C:\Users\xxxx> aws
usage: aws [options] [ …] [parameters]
To see help text, you can run:
aws help
aws help
aws help
aws: error: the following arguments are required: command
C:\Users\xxxx> aws –version
aws-cli/1.16.101 Python/3.6.0 Windows/7 botocore/1.12.91
C:\Users\xxxx>
AWS CLI を実行するための AWS 認証情報を設定する
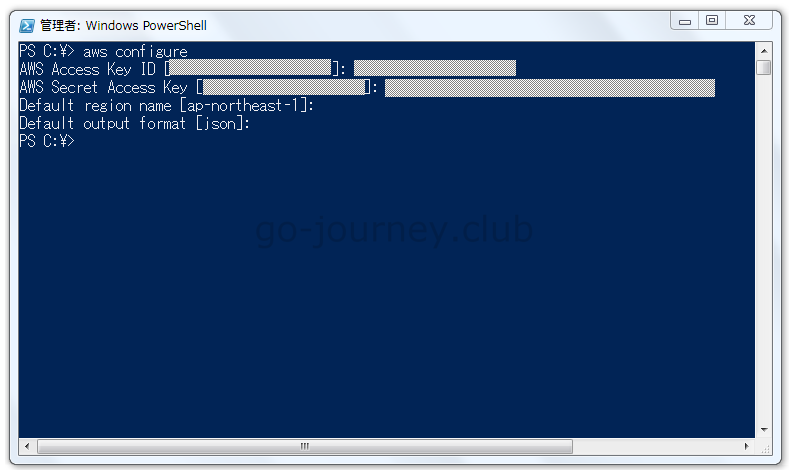
「aws configure」 コマンドを実行して AWS CLI を実行するための AWS 認証情報を設定します。
PS C:\> aws configure
AWS Access Key ID [****************]: AXXXXXXXXXXXXXXX ← アクセスキーを設定します。
AWS Secret Access Key [****************]: MXXXXXXXXXXXXXXXXXXXXXXXXXX ← シークレットアクセスキーを設定します。
Default region name [ap-northeast-1]: ← 東京リージョン(ap-northeast-1)で使用するため、Enter のみ押下します。
Default output format [json]: ← いずれでもいいですが、デフォルトの「JSON」を設定します。
PS C:\>
コマンドを実行する
最後にコマンドを実行して情報が取得できるか確認します。
PS C:\> aws ec2 describe-instances | more
{
“Reservations”: [
{
“Groups”: [],
“Instances”: [
{
“AmiLaunchIndex”: 0,
“ImageId”: “ami-xxxxx”,
“InstanceId”: “i-xxxxxxxxxxxx”,
“InstanceType”: “t2.xlarge”,
“KeyName”: “xxxxxxxx”,
“LaunchTime”: “20xx-10-17T06:06:00.000Z”,
“Monitoring”: {
“State”: “disabled”
},
“Placement”: {
“AvailabilityZone”: “ap-northeast-1a”,
“GroupName”: “”,
“Tenancy”: “default”
},
“PrivateDnsName”: “ip-xx-xx-xx-xx.ap-northeast-1.compute.internal”,
— More —
Windows に jq コマンドをインストールする手順
次に Windows に jq コマンドをインストールする手順を解説します。
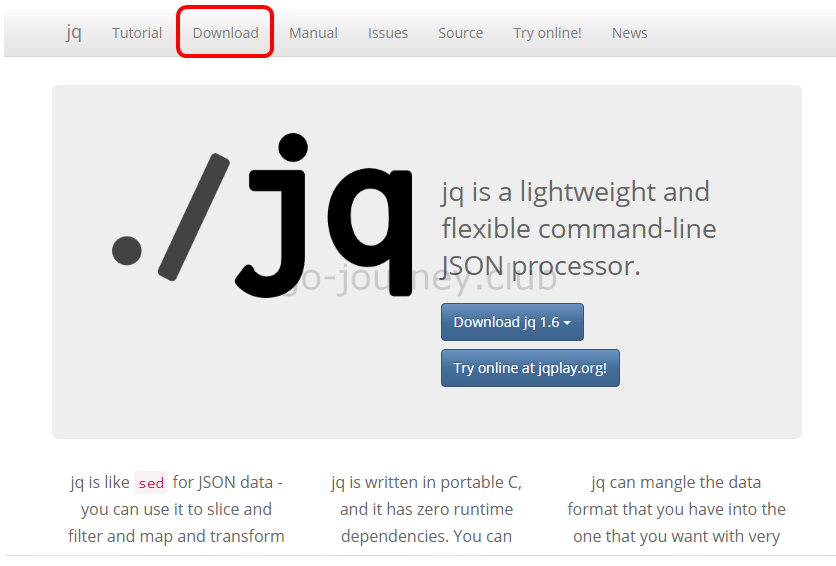
jq 公式サイトにアクセスします。
https://stedolan.github.io/jq/
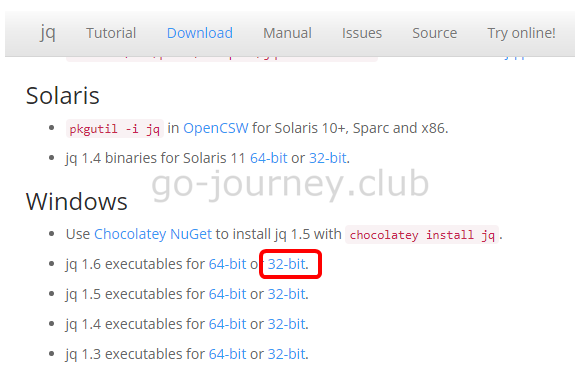
jq 公式サイトにアクセスをしたら、メニューより「Download」 をクリックします。
自身が使用しているアーキテクチャ(64-bit か 32-bit)を選択します。
※私は Windows 7 32bit を使用しているので「32-bit」をクリックします。
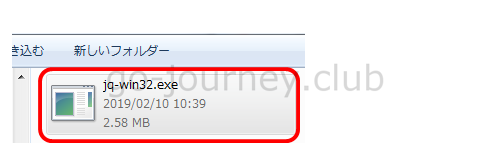
「jq-win32.exe」 ファイルをダウンロードしました。
この実行ファイルをパスが通っているフォルダに移動すれば、とりあえずは利用できるようになりますが、毎回「jq-win32」 とコマンドを打ち込むのは面倒です。
jq-win32.exe のファイル名を jq.exe にリネームする
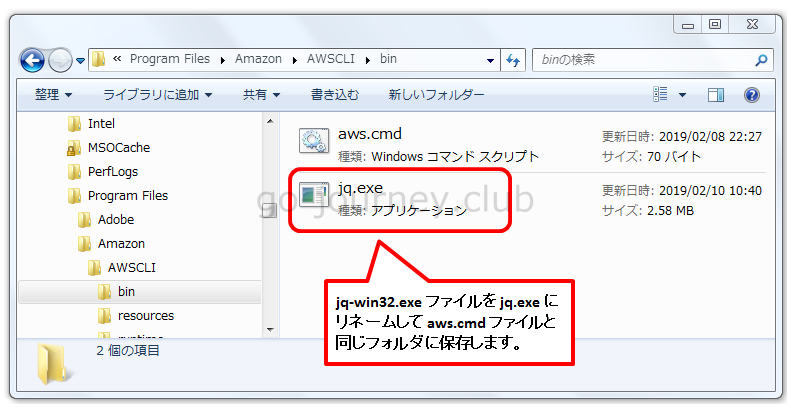
「jq-win32.exe」 のファイル名を毎回打ち込むのは面倒なので「jq.exe」 にリネームします。
リネーム後にファイルを以下の場所にコピーしました。
すでに Windows OS の設定で PATH を通しているので、jq コマンドが実行できる状態になっています。
■動作確認
jq コマンドが実行できています。
PS C:\> aws ec2 describe-instances | jq ‘.Reservations[].Instances[].InstanceId’
“i-0xxxxxxxxxxxxxxxx”
Linux(RedHat) に AWS CLI(aws コマンド)をインストールする手順
Linux(RedHat)に AWS CLI(aws コマンド)をインストールします。
最初に OS の確認です。
[root@redhat7 ~]# cat /etc/redhat-release
Red Hat Enterprise Linux Server release 7.6 (Maipo)
[root@redhat7 ~]#
もし pip コマンドがインストールされていない場合、Linux 系の EC2 インスタンスへの pip インストール手順は以下の記事を参考にしてください。
【AWS】EC2 インスタンスへの pip インストール手順
pip コマンドで AWS CLI(aws コマンド)をインストールします。
[root@redhat7 ~]# pip install awscli
Collecting awscli
Downloading https://files.pythonhosted.org/packages/41/b5/4e48f49bcf38d10d027b419b9be0a0ce98a370a5f75e1a2e0640073e1a5b/awscli-1.16.92-py2.py3-none-any.whl (1.4MB)
100% |????????????????????????????????| 1.4MB 15.8MB/s
Collecting s3transfer<0.2.0,>=0.1.12 (from awscli)
Downloading https://files.pythonhosted.org/packages/d7/14/2a0004d487464d120c9fb85313a75cd3d71a7506955be458eebfe19a6b1d/s3transfer-0.1.13-py2.py3-none-any.whl (59kB)
100% |????????????????????????????????| 61kB 22.6MB/s
Collecting botocore==1.12.82 (from awscli)
Downloading https://files.pythonhosted.org/packages/ee/3a/2c1ef0f7d9f13db88a3b1475bfc0eafacfd9e5a622ecf8fb34ffb0c33fe3/botocore-1.12.82-py2.py3-none-any.whl (5.2MB)
100% |????????????????????????????????| 5.2MB 7.9MB/s
Collecting colorama<=0.3.9,>=0.2.5 (from awscli)
Downloading https://files.pythonhosted.org/packages/db/c8/7dcf9dbcb22429512708fe3a547f8b6101c0d02137acbd892505aee57adf/colorama-0.3.9-py2.py3-none-any.whl
Collecting rsa<=3.5.0,>=3.1.2 (from awscli)
Downloading https://files.pythonhosted.org/packages/e1/ae/baedc9cb175552e95f3395c43055a6a5e125ae4d48a1d7a924baca83e92e/rsa-3.4.2-py2.py3-none-any.whl (46kB)
100% |????????????????????????????????| 51kB 23.5MB/s
Collecting docutils>=0.10 (from awscli)
Downloading https://files.pythonhosted.org/packages/50/09/c53398e0005b11f7ffb27b7aa720c617aba53be4fb4f4f3f06b9b5c60f28/docutils-0.14-py2-none-any.whl (543kB)
100% |????????????????????????????????| 552kB 31.4MB/s
Requirement already satisfied: PyYAML<=3.13,>=3.10 in /usr/lib64/python2.7/site-packages (from awscli) (3.10)
Collecting futures<4.0.0,>=2.2.0; python_version == “2.6” or python_version == “2.7” (from s3transfer<0.2.0,>=0.1.12->awscli)
Downloading https://files.pythonhosted.org/packages/2d/99/b2c4e9d5a30f6471e410a146232b4118e697fa3ffc06d6a65efde84debd0/futures-3.2.0-py2-none-any.whl
Collecting jmespath<1.0.0,>=0.7.1 (from botocore==1.12.82->awscli)
Downloading https://files.pythonhosted.org/packages/b7/31/05c8d001f7f87f0f07289a5fc0fc3832e9a57f2dbd4d3b0fee70e0d51365/jmespath-0.9.3-py2.py3-none-any.whl
Collecting python-dateutil<3.0.0,>=2.1; python_version >= “2.7” (from botocore==1.12.82->awscli)
Downloading https://files.pythonhosted.org/packages/74/68/d87d9b36af36f44254a8d512cbfc48369103a3b9e474be9bdfe536abfc45/python_dateutil-2.7.5-py2.py3-none-any.whl (225kB)
100% |????????????????????????????????| 235kB 30.9MB/s
Collecting urllib3<1.25,>=1.20; python_version == “2.7” (from botocore==1.12.82->awscli)
Downloading https://files.pythonhosted.org/packages/62/00/ee1d7de624db8ba7090d1226aebefab96a2c71cd5cfa7629d6ad3f61b79e/urllib3-1.24.1-py2.py3-none-any.whl (118kB)
100% |????????????????????????????????| 122kB 37.4MB/s
Collecting pyasn1>=0.1.3 (from rsa<=3.5.0,>=3.1.2->awscli)
Downloading https://files.pythonhosted.org/packages/7b/7c/c9386b82a25115cccf1903441bba3cbadcfae7b678a20167347fa8ded34c/pyasn1-0.4.5-py2.py3-none-any.whl (73kB)
100% |????????????????????????????????| 81kB 28.4MB/s
Requirement already satisfied: six>=1.5 in /usr/lib/python2.7/site-packages (from python-dateutil<3.0.0,>=2.1; python_version >= “2.7”->botocore==1.12.82->awscli) (1.9.0)
Installing collected packages: futures, jmespath, docutils, python-dateutil, urllib3, botocore, s3transfer, colorama, pyasn1, rsa, awscli
Found existing installation: python-dateutil 1.5
Uninstalling python-dateutil-1.5:
Successfully uninstalled python-dateutil-1.5
Found existing installation: urllib3 1.10.2
Uninstalling urllib3-1.10.2:
Successfully uninstalled urllib3-1.10.2
Successfully installed awscli-1.16.92 botocore-1.12.82 colorama-0.3.9 docutils-0.14 futures-3.2.0 jmespath-0.9.3 pyasn1-0.4.5 python-dateutil-2.7.5 rsa-3.4.2 s3transfer-0.1.13 urllib3-1.24.1
[root@redhat7 ~]#
Linux 系の EC2 インスタンスへの pip インストール手順は以下の記事を参考にしてください。
【AWS】EC2 インスタンスへの pip インストール手順
aws コマンドのバージョンを確認します。
[root@redhat7 ~]# aws –version
aws-cli/1.16.92 Python/2.7.5 Linux/3.10.0-957.el7.x86_64 botocore/1.12.82
[root@redhat7 ~]#
jq コマンドのインストール手順
jq コマンドのインストール手順です。
jq コマンドは epel リポジトリからインストールできます。
まずは epel リポジトリをダウンロードするために wget コマンドをインストールします。
[root@redhat7 ~]# yum install wget
epel のリポジトリをダウンロードします。
[root@redhat7 ~]# wget http://dl.fedoraproject.org/pub/epel/epel-release-latest-7.noarch.rpm
epel リポジトリをインストールします。
[root@redhat7 ~]# yum install epel-release-latest-7.noarch.rpm
jq コマンドをインストールします。
[root@redhat7 ~]# yum install jq
jq コマンドがインストールされていることを確認します。
[ec2-user@redhat7 ~]$ jq
jq – commandline JSON processor [version 1.5]
Usage: jq [options] <jq filter> [file…]
jq is a tool for processing JSON inputs, applying the
given filter to its JSON text inputs and producing the
filter’s results as JSON on standard output.
The simplest filter is ., which is the identity filter,
copying jq’s input to its output unmodified (except for
formatting).
For more advanced filters see the jq(1) manpage (“man jq”)
and/or https://stedolan.github.io/jq
Some of the options include:
-c compact instead of pretty-printed output;
-n use `null` as the single input value;
-e set the exit status code based on the output;
-s read (slurp) all inputs into an array; apply filter to it;
-r output raw strings, not JSON texts;
-R read raw strings, not JSON texts;
-C colorize JSON;
-M monochrome (don’t colorize JSON);
-S sort keys of objects on output;
–tab use tabs for indentation;
–arg a v set variable $a to value ;
–argjson a v set variable $a to JSON value ;
–slurpfile a f set variable $a to an array of JSON texts read from ;
See the manpage for more options.
[ec2-user@redhat7 ~]$
AWS CLI の動作確認
インストールが完了したら AWS CLI の動作確認を行ないます。
IAM ユーザーの作成
最初に AWS CLI 用の IAM ユーザーを作成します。
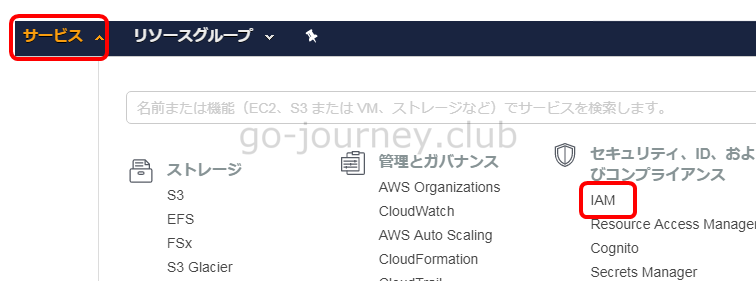
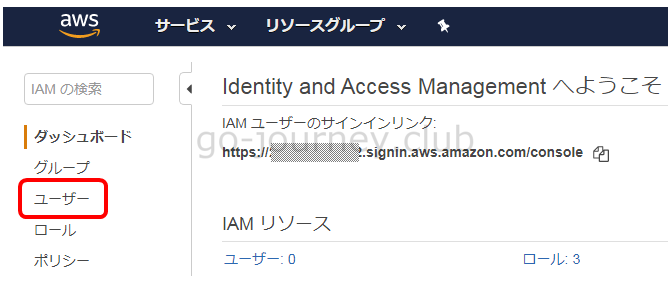
AWS 管理コンソールより「サービス」 -「セキュリティ、ID、およびコンプライアンス」 -「IAM」 をクリックします。
左側ペインより「ユーザー」 をクリックします。
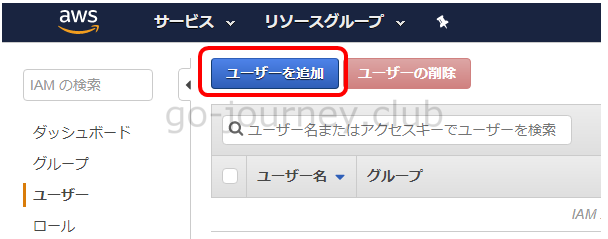
「ユーザーを追加」 ボタンをクリックします。
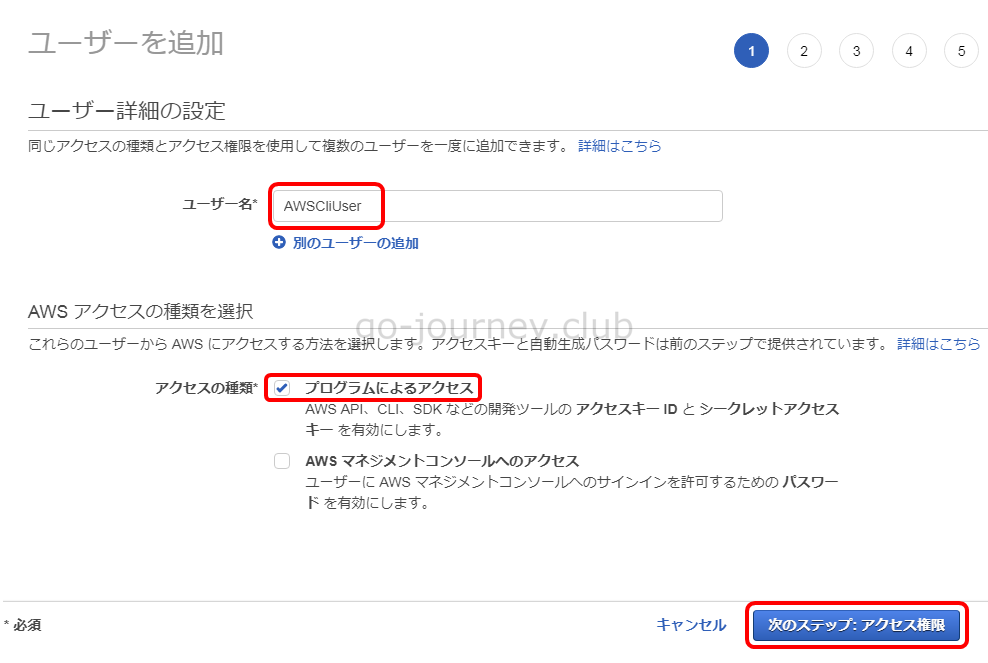
「ユーザーを追加」 画面で以下のように設定します。
ユーザー名 ← AWS CLI 用ユーザーに付ける任意の名前を入力します。
アクセスの種類 ← 「プログラムによるアクセス」を選択します。
「次のステップ:アクセス権限」 ボタンをクリックします。
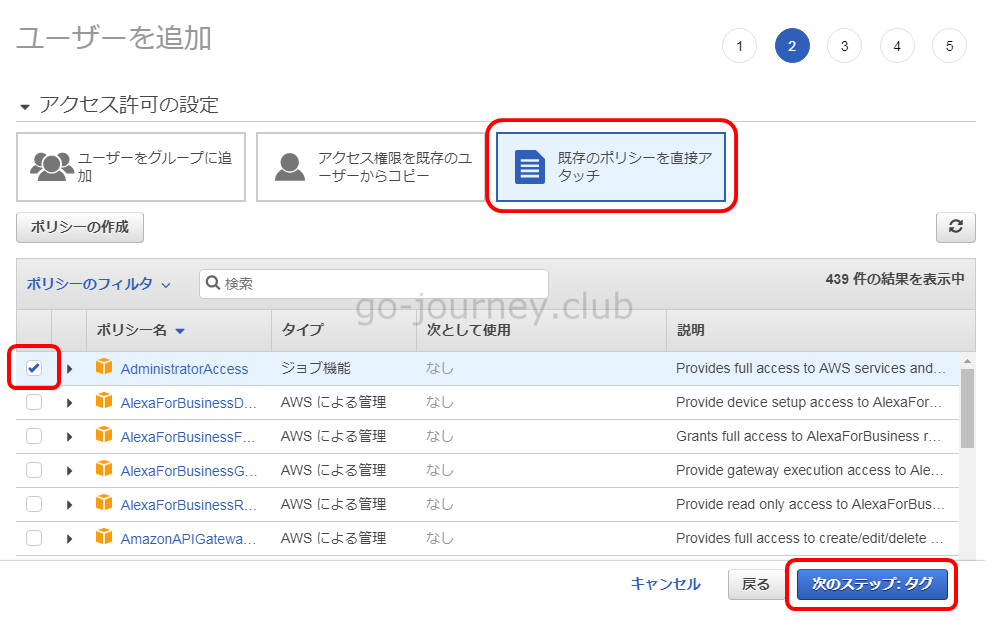
「アクセス許可の設定」 で「既存のポリシーを直接アタッチ」 をクリックします。
既存のポリシー一覧が表示されるので「AdministratorAccess」 を選択し「次のステップ:タグ」 ボタンをクリックします。
※AdministratorAccess は一番権限が強いので本番環境の場合は絞れるなら権限を絞りましょう。
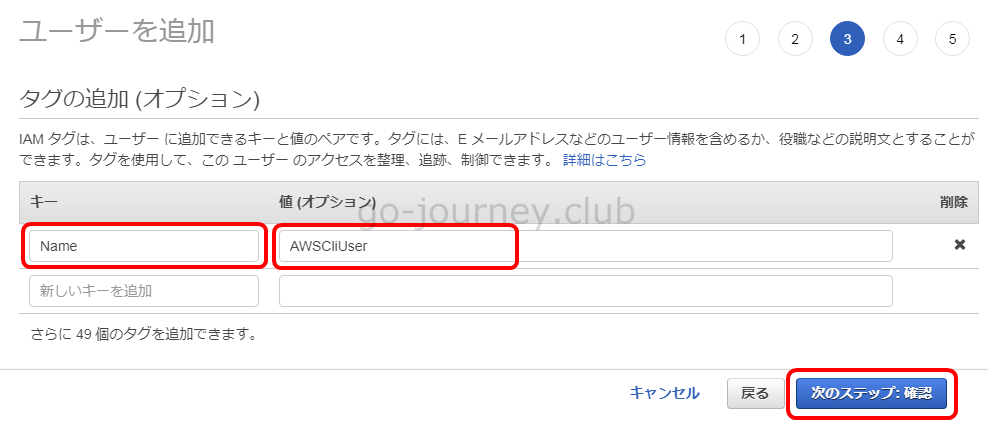
「タグの追加(オプション)」 画面で、必要な場合は下図のようにタグを設定します。
設定したら「次のステップ:確認」 ボタンをクリックします。
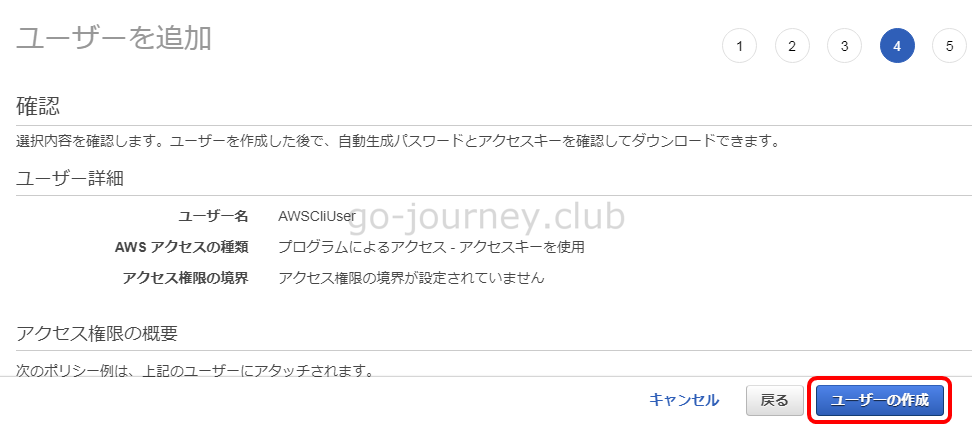
「確認」 画面で「ユーザーの作成」 ボタンをクリックします。
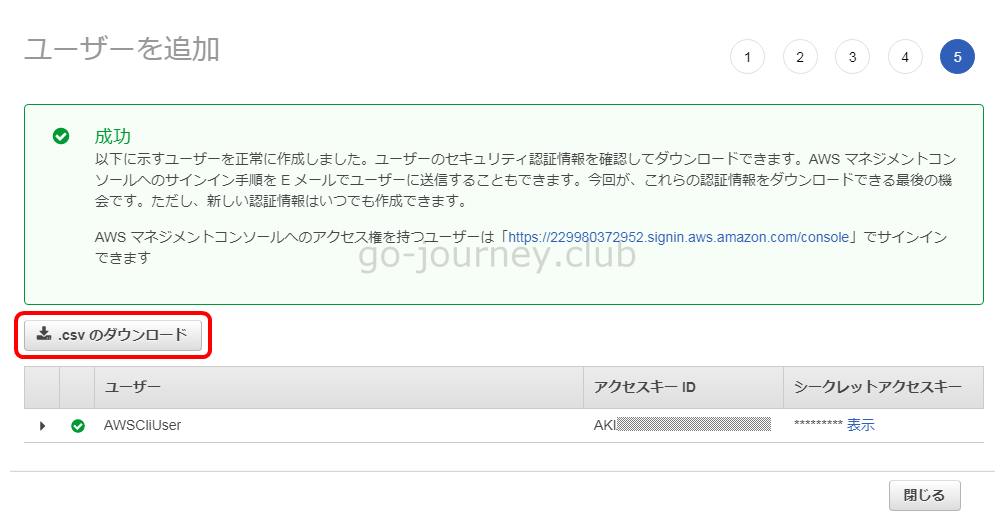
下図の画面に切り替わったら「csv のダウンロード」 ボタンをクリックします。
下図のように csv ファイルに「Access key ID」 と「Secret access key」 が記載されていることを確認します。
AWS CLI を実行するための AWS 認証情報を設定する
AWS CLI をインストールしたマシンにログインし「aws configure」 コマンドを実行して AWS CLI を実行するための AWS 認証情報を設定します。
[ec2-user@redhat7 ~]$ aws configure
AWS Access Key ID [None]: Axxxxxxxxxxxxxxxxx
AWS Secret Access Key [None]: lQxxxxxxxxxxxxxxxxxxxxxxxxxxxxxxxxx
Default region name [None]: ap-northeast-1
Default output format [None]: json
[ec2-user@redhat7 ~]$
コマンドを実行する
最後にコマンドを実行して情報が取得できるか確認します。
[ec2-user@redhat7 ~]$ aws ec2 describe-instances
{
“Reservations”: [
{
“Instances”: [
{
“Monitoring”: {
“State”: “disabled”
},
“PublicDnsName”: “ec2-54-xxx-xxx-xxx.ap-northeast-1.compute.amazonaws.com”,
“State”: {
“Code”: 16,
“Name”: “running”
},
“EbsOptimized”: false,
“LaunchTime”: “2019-05-12T11:06:42.000Z”,
“PublicIpAddress”: “54.xxx.xxx.xxx”,
“PrivateIpAddress”: “172.31.10.244”,
“ProductCodes”: [],
“VpcId”: “vpc-34776f56”,
“CpuOptions”: {
“CoreCount”: 1,
“ThreadsPerCore”: 1
},
“StateTransitionReason”: “”,
“InstanceId”: “i-0xxxxxxxxxxxxxx”,
~ 省略 ~
コメント